
How to Replace DC97-17004B Washer Flange Shaft Assembly (Spider Arm) on Samsung Washer — Step-by-Step
Drum assembly weighs 40-50 pounds — get help lifting. Unplug washer and shut off water before starting. Corroded spider arm edges can be sharp — wear gloves.
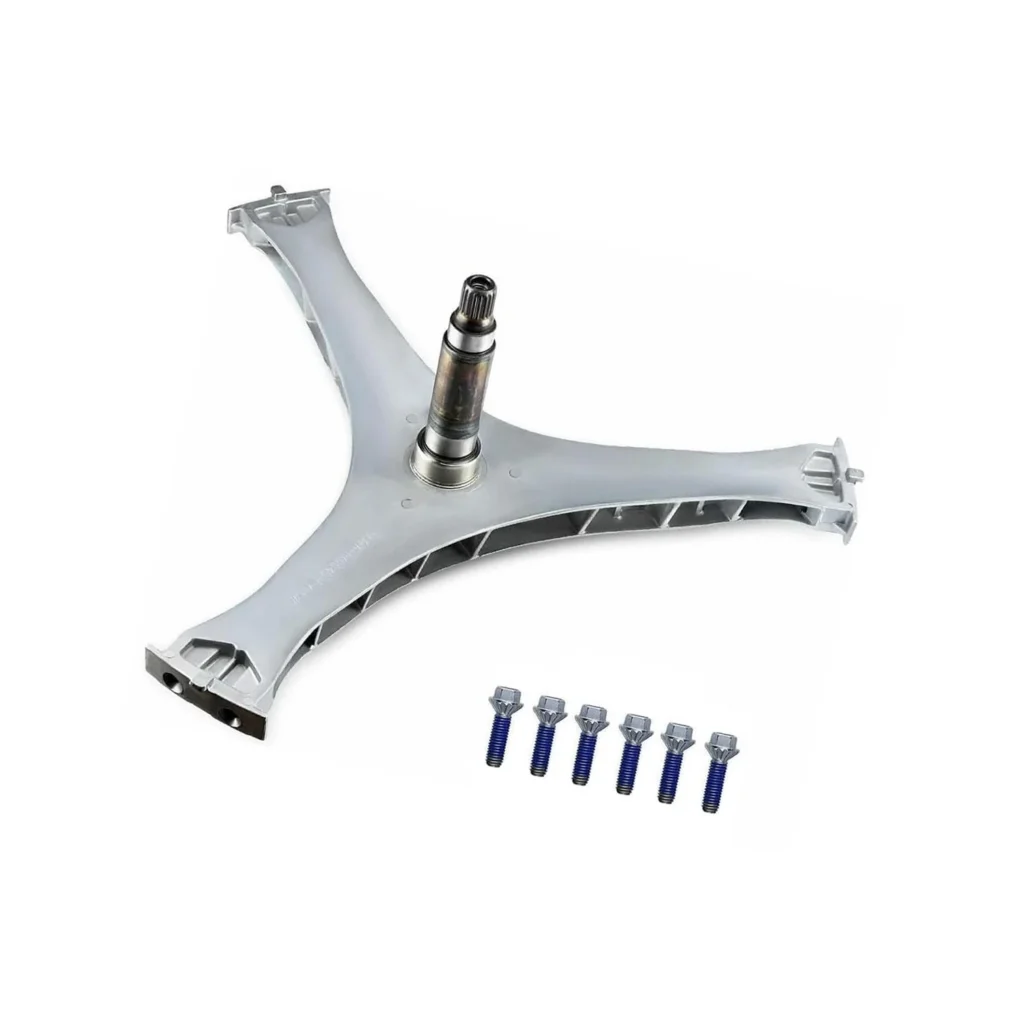
Your Samsung front-load washer started making a grinding noise during the spin cycle. Then it got louder. Now the drum wobbles so badly it walks across the floor, and you can actually feel play when you move the tub by hand. What you're dealing with is a failed spider arm — the DC97-17004B flange shaft assembly that connects your washer's drum to the drive shaft. This three-armed bracket corrodes from the inside out, and once it fails, there's no temporary fix.
This repair isn't quick, but it'll save you $400+ compared to a service call. You'll need to disassemble the entire front half of your washer to access this part. Budget 3-4 hours if it's your first time, 2 hours if you've done appliance work before.
What You Need Before Starting
The spider arm sits behind the drum, so you're taking apart most of the washer to reach it:
- Socket set (8mm, 10mm, 12mm sockets most common)
- Phillips and flathead screwdrivers
- Needle-nose pliers
- Rubber mallet
- Towels (you'll drain residual water)
- Smartphone camera (photograph wire connections)
- Penetrating oil (WD-40 or PB Blaster)
- New spider arm assembly DC97-17004B
- New drum bearings (recommended — if spider failed, bearings are compromised)
- Bearing grease
Repair time: 2-4 hours depending on experience
Difficulty: Advanced — requires complete drum removal
Safety First
Unplug the washer completely. Turn off both hot and cold water supply valves. You'll be handling a 40-50 pound drum assembly — get someone to help with the heavy lifting, or risk dropping it and cracking the plastic tub. The spider arm may have sharp corroded edges where it's flaking apart, so wear work gloves. Keep your phone handy to photograph every wire connection and hose position before disconnecting anything.
Step 1: Remove the Front Panel and Door Assembly
Pull out the detergent dispenser drawer completely (press the release tab). Remove the two screws hidden behind it. Pop off the top panel by sliding it back and lifting — two clips hold it at the front. Disconnect the lid switch wire. Now remove the door boot clamp (the thick wire band around the rubber door seal) using needle-nose pliers to pull the spring. Tuck the boot into the drum. Remove all screws around the front panel perimeter and pull it straight off. You're looking at the drum assembly now.
Step 2: Disconnect and Remove the Tub Assembly
Photograph everything before disconnecting. Remove the shipping bolts if still installed. Disconnect the pressure switch hose from the tub (small clear tube at top). Disconnect all wire harnesses from the tub. Detach the shock absorbers from the tub — two bolts each. Remove the counterweights (heavy concrete blocks on top and sometimes front of tub) — these are held by multiple bolts and weigh 20+ pounds each. Support the drum from underneath. Remove the spring suspension rods (usually four) from the top of the cabinet. The entire tub assembly should now lift out — this requires two people.
Step 3: Split the Tub Halves and Access the Spider Arm
Place the tub assembly on a workbench or padded floor. Remove the drum belt if still attached. Samsung tubs have 20-30 bolts around the center seam holding front and rear tub halves together. Remove every single bolt — keep them organized. Some models use clamps instead of bolts at certain positions. Gently pry the halves apart using a flathead screwdriver at multiple points. The halves separate to reveal the stainless steel drum inside. Lift out the front tub half. The drum stays in the rear half with the spider arm visible on the back of the drum.
Step 4: Remove the Failed Spider Arm
The spider arm is bolted to the back of the drum with three large bolts. These bolts often corrode into place, so spray them thoroughly with penetrating oil and wait 10 minutes. Use a socket wrench to remove all three bolts. The spider arm should slide off the drum shaft. If it's stuck, tap it gently with a rubber mallet while pulling. Inspect the drum shaft — if there's corrosion or pitting, clean it with fine sandpaper and wipe with degreaser. Check the drum itself for cracks or damage. This is also when you replace the bearings and seals in the rear tub half — if the spider failed, the bearings absorbed water and metal debris.
Step 5: Install the New DC97-17004B Spider Arm
Clean the drum shaft mounting surface completely. Slide the new DC97-17004B spider arm onto the shaft — the three arms should align with the bolt holes in the drum. Install all three mounting bolts and tighten them in a star pattern (like lug nuts) to ensure even pressure. Torque them snug but don't overtighten and crack the drum. If you replaced bearings, pack them with grease per bearing instructions. Reassemble the tub halves by aligning them carefully and reinstalling all bolts in reverse order. Make sure the drum spins freely by hand before proceeding — if it binds, something's misaligned.
Step 6: Reinstall the Tub Assembly
With help, lift the tub back into the washer cabinet. Reattach the spring suspension rods first (they hold the weight while you connect everything else). Bolt the shock absorbers back to the tub. Reinstall the counterweights — don't skip this step or the washer will shake violently. Reconnect all wire harnesses using your reference photos. Reattach the pressure switch hose. Reinstall the drum belt around the motor pulley and drum pulley — use your photos to verify correct routing.
Step 7: Reassemble the Cabinet
Pull the door boot back over the front panel opening and reseat the clamp (this takes patience — work it around gradually with pliers). Reinstall the front panel and all screws. Slide the top panel back into place. Reinstall the detergent drawer. Double-check that no tools or parts are left inside the cabinet. Reconnect water hoses. Plug in the washer.
Testing After Installation
Run an empty wash cycle on the highest spin speed. Listen for any unusual noises — grinding, squeaking, or rattling means something's not right. Watch for excessive vibration during spin. The washer should run smoothly and quietly compared to before. Check underneath for leaks during and after the cycle. If water appears, you may need to reseat the tub halves or check bearing seals. Manually spin the drum by hand when empty — it should rotate smoothly with no grinding or catching.
Frequently Asked Questions
Can I repair a corroded spider arm instead of replacing it?
No. Once the spider arm shows corrosion or cracks, it's structurally compromised. The corrosion happens from the inside out where water sits between the aluminum and drum. Welding or patching won't hold up to the forces during spin cycles. The DC97-17004B replacement is the only reliable fix.
How long does a spider arm typically last?
In Samsung front-loaders, the original spider arm typically fails between 5-8 years. Frequent use of liquid fabric softener and detergent buildup accelerate corrosion. Running cleaning cycles monthly and using HE detergent sparingly extends spider arm life. The replacement DC97-17004B uses updated materials to resist corrosion better than earlier versions.
Should I replace the bearings when I replace the spider arm?
Yes, absolutely. If your spider arm corroded enough to fail, metal particles and water contaminated the drum bearings. Even if they're not making noise yet, they've been compromised. Bearings cost $30-50 and you're already 90% through the labor to access them. Replace them now or you'll be doing this entire job again in six months when the bearings seize.
Photograph every wire connection before disconnecting. Organize tub bolts by location. If spider failed, replace bearings at same time — they're already contaminated.
Need the part for this repair?
DC97-17004B · In Stock · Ships next business day