
How to Replace DC97-14370E Drum Spider Flange Shaft Assembly on Samsung Washer — Step-by-Step
Drum assembly is very heavy (30-40 lbs). Get help lifting to prevent back injury. Sharp edges around spider assembly can cause cuts — wear work gloves.
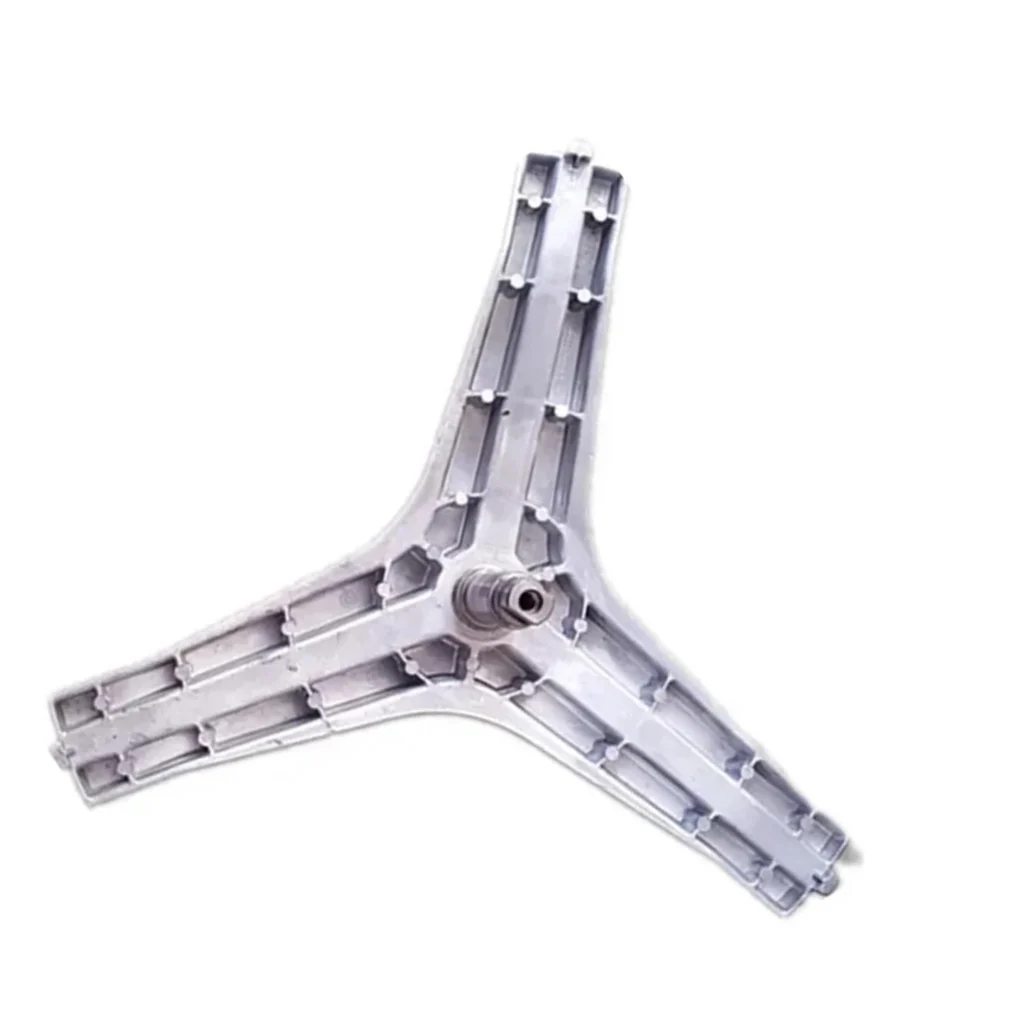
Your Samsung washer started making a grinding noise during the spin cycle last week. Now it won't spin at all, and when you manually turn the drum, it feels rough and catches. There's a good chance your drum spider flange shaft assembly has failed — one of the most critical structural components in your washer's drum system.
The DC97-14370E drum spider flange shaft assembly connects your washer's drum to the drive shaft. When it fails, you'll typically see complete spin failure, loud grinding during operation, or the drum wobbling excessively. This repair requires disassembling most of your washer, but it's absolutely doable with patience and the right approach.
What You Need Before Starting
Tools Required:
- Socket set (8mm, 10mm, 12mm sockets)
- Phillips and flathead screwdrivers
- Adjustable wrench
- Rubber mallet
- Needle-nose pliers
- Spanner wrench (for drum retaining ring)
- Towels for water cleanup
- Camera or phone (to document wire connections)
Estimated Time: 2.5-3.5 hours
Difficulty: Advanced
This part replaces DC97-14370H, DC97-14370B, and DC97-14370D. It's compatible with dozens of Samsung front-load washer models including WD10J6410AW/ZS, WD80K5410OW/EC, and WD90J6A10AW/EC.
Safety First
Unplug your washer completely and turn off both hot and cold water supply valves. This repair requires removing the drum assembly, which is heavy (30-40 pounds depending on model). Have someone available to help lift, and protect your back. Wear work gloves when handling the drum — sharp edges around the spider assembly can cause cuts. Place towels around your work area because residual water will drain from hoses during disassembly.
Step 1: Remove the Top and Front Panels
Start by removing the detergent dispenser drawer — press the release tab and pull it completely out. Remove the two screws behind the dispenser cavity. At the back top corners of your washer, remove the screws securing the top panel. Slide the top panel back about an inch, then lift it off. Now disconnect the door boot clamp using needle-nose pliers to release the wire spring, then peel the boot seal away from the front panel. Remove all screws around the front panel perimeter and carefully lift the panel away, disconnecting the door lock wire harness.
Step 2: Disconnect Water Hoses and Drain System
Take photos of all wire connections before disconnecting anything — you'll thank yourself during reassembly. Disconnect the inlet water hoses from the valve. Have a shallow pan ready because water will drip out. Loosen the clamp on the drain hose where it connects to the pump and pull it free. Disconnect the pressure sensor hose from the tub. Label everything with masking tape if needed.
Step 3: Remove the Drum Assembly
Disconnect all wire harnesses connected to the tub (heater wires, thermistor, and any sensors). Remove the counterweights — these are the concrete blocks bolted to the top and sometimes front of the drum. They're heavy, so handle carefully. Now remove the shock absorbers from the bottom of the tub by removing the bolts at both ends. Disconnect the suspension springs from the top of the cabinet. With all connections free, carefully lift the entire drum assembly out of the cabinet. This is the heaviest part — get help with this step.
Step 4: Split the Drum and Access the Spider Assembly
Place the drum assembly on a sturdy work surface with the front facing up. The drum is held together by a retaining ring or band clamp around the middle seam. Use a spanner wrench or carefully work around the ring with a flathead screwdriver to release it. Once removed, carefully separate the two drum halves. The spider flange shaft assembly is now visible, bolted to the back half of the drum behind the drum basket.
Step 5: Remove the Old Spider Assembly
You'll see three or four large bolts securing the spider to the drum shaft. Hold the drum basket steady while you loosen these bolts — they're typically very tight. Use penetrating oil if they're stubborn. Once the bolts are out, pull the old spider assembly straight off the shaft. Inspect the shaft itself for damage — if it's scored or corroded, you may need additional parts. Clean the mounting surface thoroughly with a wire brush and degreaser.
Step 6: Install the New DC97-14370E Spider Assembly
Slide the new DC97-14370E drum spider flange shaft assembly onto the shaft, aligning the bolt holes carefully. Thread in all bolts by hand first to ensure proper alignment. Then tighten the bolts in a star pattern (like tightening lug nuts on a tire) to ensure even pressure. Torque them firmly but don't overtighten — you're threading into aluminum. Apply a thin bead of silicone sealant around the drum seam where the two halves meet, then carefully align and press the drum halves back together. Reinstall the retaining ring, working it back into its groove completely.
Step 7: Reassemble the Washer
Reverse the disassembly process. Lift the drum assembly back into the cabinet (again, get help with this). Reconnect the suspension springs first to support the weight. Reattach the shock absorbers. Bolt the counterweights back in place. Reconnect all wire harnesses using your photos as reference. Reattach water hoses, the drain hose, and the pressure sensor line. Reinstall the front panel, door boot seal, top panel, and dispenser drawer.
Testing After Installation
Turn on the water supply valves and plug in the washer. Run a rinse and spin cycle without any load to test for leaks and proper operation. Listen carefully during the spin cycle — it should be noticeably quieter than before. Check around all your reconnected hoses for leaks. Manually rotate the drum when empty — it should turn smoothly without grinding or catching. If everything checks out, run a full wash cycle with a small load to verify complete functionality.
Frequently Asked Questions
How long does the DC97-14370E spider assembly typically last?
With proper maintenance, this drum spider assembly should last 8-12 years. The most common killer is leaving wet laundry sitting in the drum — constant moisture exposure corrodes the aluminum spider over time. Always remove clothes promptly after washing and leave the door open between loads to allow moisture to evaporate.
Can I replace just the spider without buying the entire shaft assembly?
The DC97-14370E comes as a complete assembly because the spider and shaft need to be precisely aligned and balanced. Attempting to mix old and new components typically results in vibration issues and premature failure. The assembly includes everything you need for a proper repair that'll last.
My washer is only 4 years old — why did the spider fail so soon?
Early spider failure usually happens when using excessive detergent, which creates residue buildup that traps moisture against the aluminum. Also, if your washer sits in a damp basement or laundry room with poor ventilation, corrosion accelerates significantly. Switch to HE detergent, use less than you think you need, and improve airflow around your washer to prevent repeat failures.
Take photos of every wire connection before disconnecting. Label water hoses with masking tape. Tighten spider bolts in a star pattern for even pressure distribution.
Need the part for this repair?
DC97-14370E · In Stock · Ships next business day