
How to Replace 279827 Dryer Drive Motor with Pulley on Whirlpool Maytag Kenmore — Step-by-Step
Always unplug the dryer and disconnect gas supply before starting. Motor mounting bolts can be tight — use the correct size socket to avoid rounding them off.
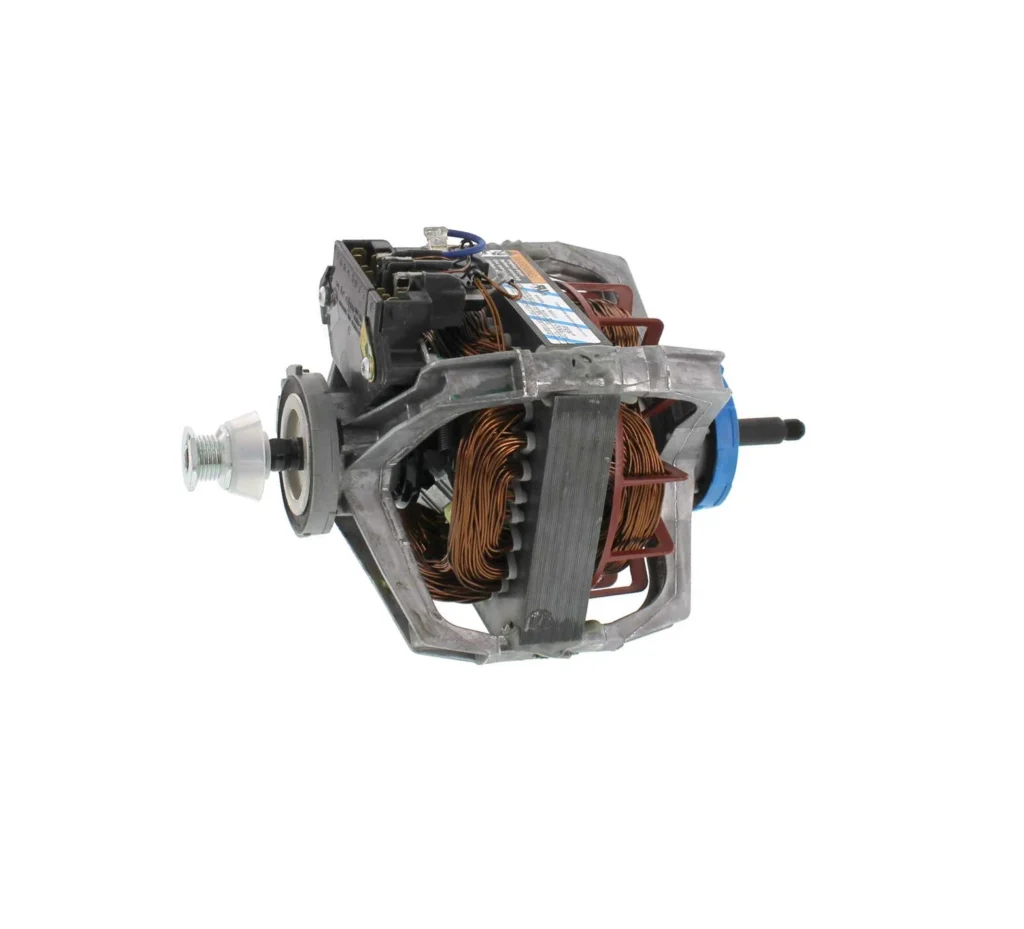
Your Whirlpool WED5000DW2 dryer drum won't turn, but you can hear a faint humming noise when you hit start. That's the classic signature of a failed drive motor — the motor tries to engage but can't generate enough torque to spin the drum. On models like the WGD7300DW1, WED4815EW1, and Kenmore 110-series dryers, this 279827 motor assembly is the workhorse that moves everything, and when it fails, you're stuck with wet clothes.
The good news? Replacing this motor is more straightforward than you'd think. The 279827 comes as a complete assembly with the pulley already attached, which eliminates the most frustrating part of the job. You'll spend more time removing panels than actually swapping the motor.
What You Need Before Starting
This is a moderate difficulty repair that'll take you about 45 minutes to an hour once you've got everything apart. Here's what you need on hand:
- 1/4" nut driver or socket set
- Phillips screwdriver
- Flat-head screwdriver (for drum belt)
- Work gloves (motor gets dusty)
- Towel or blanket (to protect your floor when tilting the dryer)
- Flashlight or work light
Estimated Time: 45-60 minutes
Difficulty: Moderate — requires panel removal and working in tight spaces
Safety First
Unplug the dryer completely before you touch anything. Not just turning it off — physically unplug it from the wall. If you have a gas dryer, shut off the gas supply valve and disconnect the gas line. The motor itself isn't electrically dangerous once unplugged, but you'll be working around sharp metal edges inside the cabinet. Wear gloves and watch your knuckles when reaching into tight spaces.
Step 1: Access the Motor by Removing the Front Panel
Pop the top of the dryer up by inserting a putty knife into the seam between the top and front panel (about 3 inches from each corner) and pushing the clips. Lift the top and prop it against the wall. Now remove the two screws securing the front panel near the door opening — they're usually 1/4" hex head screws. Disconnect the door switch wire harness, then lift the front panel up and off. You're now looking at the drum, motor, and belt assembly.
Step 2: Release Tension and Remove the Drive Belt
The drum belt wraps around the motor pulley in a specific pattern. Take a photo with your phone before removing it — trust me on this. Reach underneath the drum from the front, locate the idler pulley (small spring-loaded wheel), and push it toward the motor to release belt tension. Slip the belt off the motor pulley first, then off the idler, then pull it off the drum. The drum will now spin freely.
Step 3: Disconnect Motor Wiring and Mounting
The motor has a wire harness plug that you'll need to disconnect — squeeze the locking tab and pull straight out. Now locate the motor mounting bracket. On most Whirlpool dryers using this motor, there are either two or three bolts holding the motor to the blower housing. Remove these with your socket or nut driver. The motor will still be attached to the blower wheel at this point.
Step 4: Separate Motor from Blower Housing
The motor shaft extends through the blower housing with a clamp holding the blower wheel. You'll see either a spring clamp or a threaded clamp on the motor shaft. Release this clamp (spring clamps just pull off, threaded clamps unscrew), then carefully pull the motor away from the blower housing. The blower wheel stays in the housing — you're only removing the motor assembly.
Step 5: Install the New 279827 Motor Assembly
Here's where the 279827 saves you time — the pulley is already installed and properly aligned. Slide the new motor shaft into the blower housing until it's fully seated, then reinstall the blower wheel clamp. Mount the motor back to its bracket using the same bolts you removed (hand-tighten first, then snug them down). Reconnect the wire harness — it only fits one way, so you can't mess this up.
Step 6: Reinstall the Drive Belt
This is where that photo comes in handy. The belt goes around the drum first (ribbed side against the drum), then loops under the idler pulley, then wraps around the motor pulley. Make sure the belt seats properly in the drum channel. Push the idler pulley toward the motor, slip the belt over the motor pulley, then release the idler. Give the drum a spin by hand — it should rotate smoothly with slight resistance.
Step 7: Reassemble and Test
Reverse the disassembly process. Reconnect the door switch harness, set the front panel back on its bottom clips, push it down, and reinstall the two mounting screws. Lower the top panel until it clicks. Plug the dryer back in, load some damp towels, and run a test cycle. Listen for smooth operation — no grinding, squealing, or excessive vibration. The drum should start rotating within 2-3 seconds of pressing start.
Testing After Installation
Run the dryer empty for about 5 minutes first, just to make sure everything's running smoothly. Check for unusual noises, vibration, or burning smells. Then run a normal load. If the drum hesitates before starting or the motor sounds strained, you might have the belt too tight or the idler pulley binding. If you hear squealing, the belt might be twisted or not fully seated in the drum channel.
Frequently Asked Questions
Will this motor work on my Kenmore 110-series dryer?
Yes, as long as your full model number matches the compatibility list. Kenmore dryers were manufactured by Whirlpool, and many use this exact motor. Check the model tag inside the door opening — if it starts with 110.6 or 110.8, this motor will likely fit. The 279827 replaces older numbers like AP3094245, PS334304, and W10448892.
My dryer drum spins but there's no heat — is it still the motor?
No, if the drum rotates normally, your motor is fine. No heat means you've got an issue with the heating element (electric) or gas valve assembly (gas dryers), thermal fuse, or cycling thermostat. The motor only drives the drum and blower — it doesn't control heat.
How long should a dryer motor last?
You should get 10-15 years out of a dryer motor under normal use. If yours failed earlier, check your dryer vent — a clogged vent makes the motor work harder and can shorten its life significantly. After replacing the motor, clean your entire vent system from the dryer to the outside termination.
Do I need to replace the idler pulley and belt when changing the motor?
Not necessarily, but inspect them while you're in there. If the idler pulley bearing feels rough when you spin it, or if the belt shows cracks, glazing, or fraying, replace them now. You've already got the dryer apart — it's cheap insurance. A worn idler pulley can kill a new motor prematurely.
Take a clear photo of the belt routing before removal. The belt pattern looks simple but is easy to get wrong during reassembly, and an incorrectly routed belt will cause squealing or poor drum rotation.
Need the part for this repair?
279827 · In Stock · Ships next business day