
Whirlpool/Maytag Dryer Won't Start or Overheating — 5 Causes & How to Fix
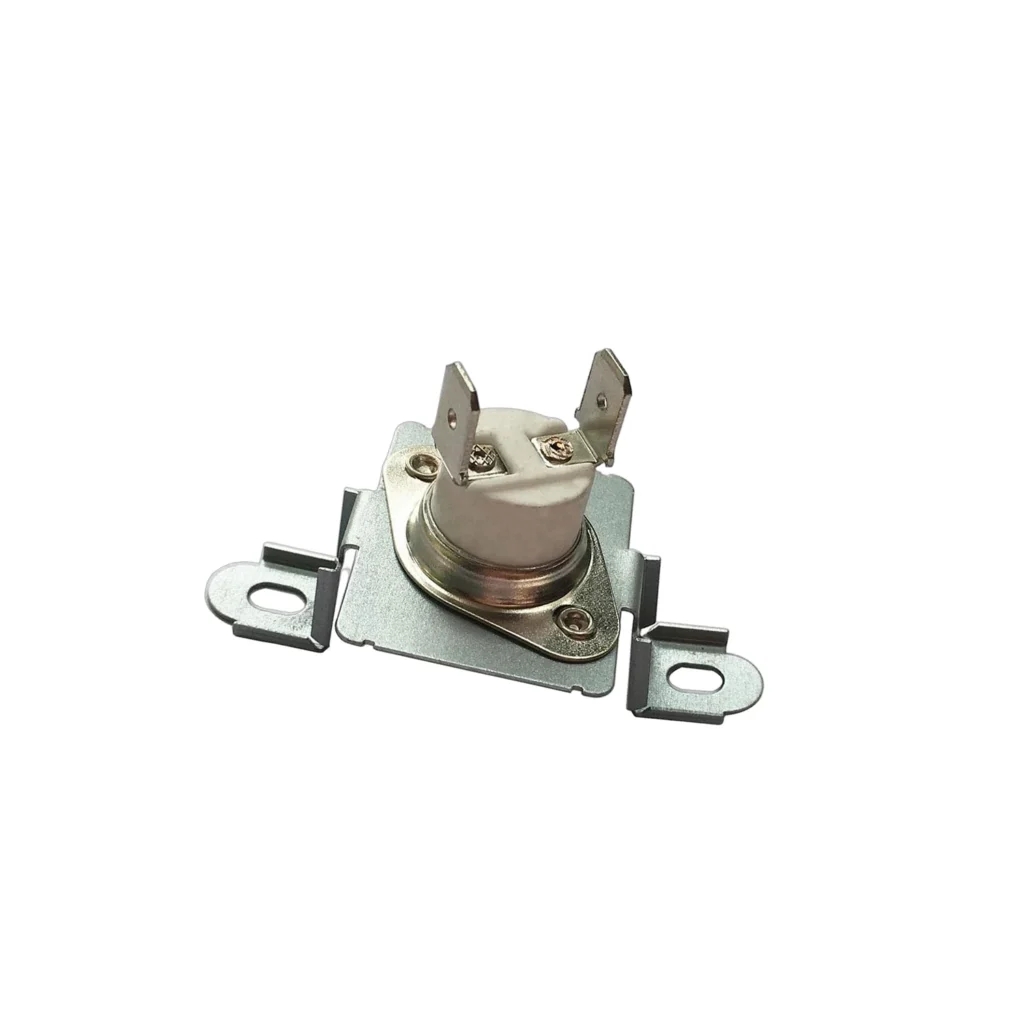
You load wet laundry into your Maytag dryer, hit start, and... nothing. Or worse — it runs but your towels come out scorching hot and smelling like burning lint. Either way, there's a good chance your high limit thermal fuse just did its job by blowing itself out to save your house from a fire.
This little $11 safety device (part #40113801) is designed to fail exactly once when your dryer overheats past 250°F. It's not resettable. When it blows, your dryer won't start — period. But here's what most people miss: the fuse blowing is a symptom, not the root problem. Something made your dryer overheat in the first place, and if you just replace the fuse without fixing that underlying issue, you'll be back in the same spot within weeks.
Quick Symptom Check
Your dryer likely has a blown thermal fuse if you're experiencing:
- Dryer won't start at all — no lights, no hum, completely dead when you press start
- Dryer runs but produces no heat — clothes tumble but stay wet after full cycle
- Dryer gets too hot — clothes are scalding, plastic buttons melting, burnt smell
- Fuse blows repeatedly — you've replaced it before and it keeps failing
The thermal fuse is mounted on the blower housing or heating element housing, depending on your model. On Maytag models like MDE208DAYW and MEDC400VW0, it's typically on the blower wheel housing. On Whirlpool models, check near the heating element canister.
Cause #1: Blocked Exhaust Vent (70% of Cases)
This is the big one. When your exhaust vent is restricted — whether from lint buildup, a crushed duct, or a bird's nest in the outside vent hood — hot air can't escape. Temperature inside the drum climbs past 250°F, the thermal fuse sees this and sacrifices itself.
How to diagnose: Disconnect the exhaust duct from the back of your dryer. Start the dryer and feel the airflow — it should be strong and hot. Now reconnect the duct and go outside. Hold your hand near the vent hood while the dryer runs. If airflow is weak or nonexistent, you've found your problem.
The fix:
- Disconnect dryer from power and gas (if applicable)
- Pull dryer away from wall and disconnect exhaust duct
- Use a dryer vent cleaning kit or shop vac to clean the entire duct run
- Check outside vent hood for blockages, stuck damper, or pest nests
- Replace any crushed or kinked flexible duct with rigid metal duct
- Reassemble, then replace the blown thermal fuse
Cost: $15–$50 for vent cleaning kit, plus $10.99 for new fuse
Cause #2: Clogged Internal Lint Screen and Blower Wheel (50% of Cases)
Even if you clean the lint trap after every load, lint still gets past it. Over years, lint accumulates inside the dryer cabinet — especially around the blower wheel, the felt drum seals, and inside the blower housing where the thermal fuse mounts.
When the blower wheel gets packed with lint, it can't move enough air through the drum. Heat builds up, temperature spikes, fuse blows.
How to diagnose: You'll need to open the dryer cabinet (varies by model, but usually involves removing the front panel or top). Look at the blower wheel — if it looks like a fuzzy hamster instead of metal fins, that's your problem.
The fix:
- Unplug dryer completely
- Remove front or top panel to access blower housing (on Maytag models like MDG2706AWW, remove front panel; on Admiral ADE7005AYW, lift top)
- Vacuum out all visible lint from around drum, seals, and blower area
- Remove blower wheel (usually one clip or nut) and clean thoroughly
- While you're in there, replace the thermal fuse mounted on the housing
- Reassemble and test
Cost: $0 if DIY, $10.99 for fuse part
Difficulty: Moderate — requires some disassembly but no special tools
Cause #3: Failed Heating Element Cycling Thermostat (20% of Cases)
Your dryer has a cycling thermostat that's supposed to turn the heating element on and off to maintain proper temperature (usually around 140–150°F). When this thermostat fails in the closed position, the element stays on continuously. Temperature climbs unchecked until the high limit thermal fuse trips.
How to diagnose: If your dryer was getting extremely hot before it stopped working — like clothes too hot to touch, plastic items melting — the cycling thermostat likely stuck closed. You can test it with a multimeter (should show continuity at room temp, open circuit when heated above its setpoint).
The fix: Replace both the cycling thermostat AND the thermal fuse. The cycling thermostat is usually mounted near the heating element canister. On models like MEDC215EW1 and SDE3606AYW, it's on the side of the blower housing.
Cost: $15–$30 for cycling thermostat, $10.99 for thermal fuse
Cause #4: Bad Heating Element or Grounded Element (15% of Cases)
Sometimes the heating element coil itself develops a short or ground, causing it to draw excessive current and produce too much heat. This is more common in older dryers (8+ years) or if you've had power surges.
How to diagnose: With power disconnected, use a multimeter to test the heating element. Should show 8–12 ohms of resistance between the two element terminals, and infinite resistance (no continuity) between each terminal and the ground/housing. If you get continuity to ground, the element is shorted.
The fix: Replace the heating element assembly and thermal fuse together. Elements vary by model — make sure you're ordering the correct one for your specific Maytag or Whirlpool model number.
Cost: $30–$60 for heating element, $10.99 for fuse
Cause #5: Restricted Airflow Through Drum (10% of Cases)
Less common but still possible: if you're overloading the dryer, the heavy wet clothes block airflow from the blower into the drum. Or if the felt drum seals are worn and letting hot air recirculate improperly instead of exhausting.
How to diagnose: Does this happen when you're drying heavy comforters or overloaded towel loads? Can you see gaps or worn areas in the felt seals around the drum?
The fix: Stop overloading, dry heavy items in smaller batches. If drum seals are worn (especially the front felt seal on front-panel-removal models like MDGT336AWW), replace them. Always replace the thermal fuse.
Cost: $20–$40 for drum seal kit, $10.99 for fuse
How to Test and Replace the 40113801 Thermal Fuse
Before ordering parts, confirm the fuse is actually blown:
- Unplug dryer from wall outlet (critical safety step)
- Locate the thermal fuse — on Maytag models it's usually on the blower housing; on some Whirlpool models it's on the heating element housing
- Disconnect the two wire terminals from the fuse
- Set multimeter to continuity/resistance mode
- Touch probes to the two metal terminals on the fuse
- A good fuse shows continuity (0 ohms or beep); a blown fuse shows infinite resistance (no beep)
Replacement steps:
- Order part #40113801 (also sold as WP40113801, replaces AP6009129 and others)
- With dryer unplugged, access the fuse location (may require removing back panel, front panel, or top depending on model)
- Remove the one mounting screw holding the fuse bracket
- Pull off the two wire connectors
- Install new fuse in the same position, secure with screw
- Reconnect wires — doesn't matter which wire goes to which terminal
- Button everything back up
- Test the dryer
This fuse fits dozens of models including MDE208DAYW, MDG2706AWW, MEDC400VW0, PDET910AYW, and Admiral models like ADE7005AKW. Always verify your model number before ordering.
When to Call a Pro
You can handle this repair yourself if you're comfortable with basic tools and following disassembly instructions for your specific model. Call a tech if:
- You can't locate the thermal fuse (model-specific locations vary)
- The fuse keeps blowing even after you've cleaned vents and internal lint
- You're dealing with a gas dryer and aren't comfortable working around gas connections
- You've tested the fuse and it's actually fine (the problem is elsewhere)
- Your dryer is still under warranty
Labor for this repair typically runs $150–$250 including the service call. The fuse itself is $10.99. If your dryer is more than 12 years old and needs multiple parts, consider whether repair makes sense vs. replacement.
Preventing Future Thermal Fuse Failures
Once you've fixed the underlying cause and replaced the fuse:
- Clean the lint trap after every single load — no exceptions
- Deep-clean your exhaust vent annually — twice a year if you do more than 5 loads per week
- Keep duct runs short — under 25 feet total with no more than two 90° elbows
- Use rigid metal duct, never plastic or vinyl (fire hazard)
- Check the outside vent hood monthly — make sure the damper moves freely
- Don't overload — fill drum only 2/3 full for proper airflow
- Vacuum inside the cabinet yearly — pull the dryer out and remove the lower front panel to access the blower area
The thermal fuse exists for one reason: to prevent your house from burning down. When it blows, it's telling you something is seriously wrong with airflow or temperature regulation. Fix the root cause, not just the symptom.
Frequently Asked Questions
Can I bypass the thermal fuse to test if that's the problem?
Technically yes — you can jumper the two wire terminals together to see if the dryer starts — but never run it this way. The thermal fuse is a critical safety device. Without it, an overheating dryer could literally start a fire. Test it with a multimeter instead, confirm it's blown, then replace it after you've fixed whatever caused it to blow.
Why does my thermal fuse keep blowing after I replace it?
Because you haven't fixed the underlying problem. The fuse is doing its job by protecting you from an overheating dryer. Go back and thoroughly check: Is your exhaust vent 100% clear? Did you clean the blower wheel and internal lint? Is the cycling thermostat working correctly? The fuse will keep blowing until you eliminate the heat source.
Are aftermarket thermal fuses as good as OEM Whirlpool/Maytag parts?
For this particular part, yes. The 40113801 is a simple thermal cutoff device rated for 250°F — there's not much to engineer. Quality aftermarket versions perform identically to OEM. Just make sure you're getting the correct temperature rating (250°F for this part number). The part sold at heima.com is a direct OEM-quality replacement that works across Whirlpool, Maytag, Amana, and Admiral models.
Diagnosed the problem?
40113801 · In Stock · Fast shipping