
How to Extend Your Whirlpool Washer Drum Baffle Life — Maintenance Guide
Always unplug washer before inspecting baffles. Sharp edges on cracked plastic can cut fingers during inspection.
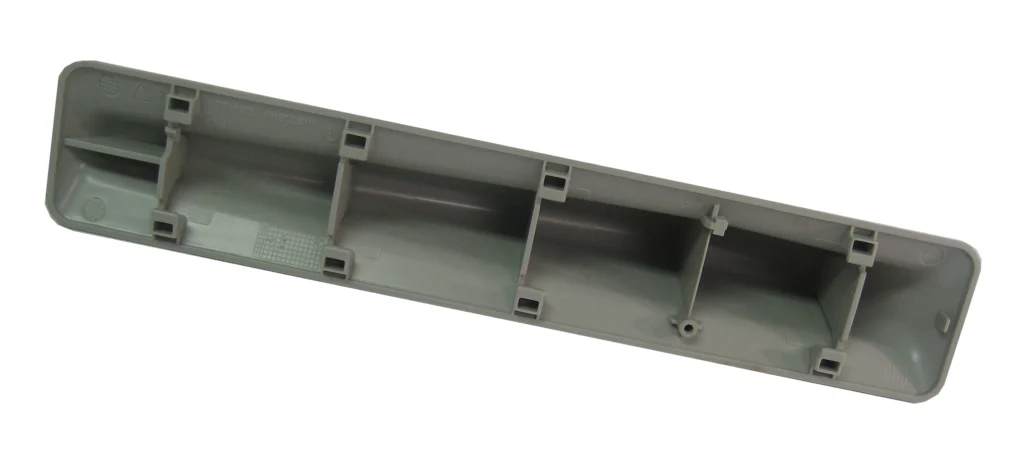
Here's the reality: most Whirlpool front-load washer baffles last 5–7 years before cracking, but yours could make it to 10+ with the right care. These plastic fins inside your drum look indestructible, but they're taking a beating every single cycle — hot water expansion, detergent residue buildup, and those occasional overloaded laundry days all shorten their lifespan.
One user put it perfectly: "One of the 3 baffles in our washer's tub broke and fell out." That's the typical failure mode — the clips shear off or the plastic cracks along stress points. The good news? You can spot the warning signs months before complete failure and take action.
How Long Should Drum Baffles Last?
Factory baffles on Whirlpool, Maytag, and Amana front-loaders typically last 5–7 years under normal use. That's about 1,500–2,000 wash cycles. But here's what affects that timeline:
- Water temperature habits: Constant hot water cycles make plastic brittle faster
- Detergent type: Powder detergents leave abrasive residue that wears mounting points
- Load size: Regular overloading flexes baffles beyond design limits
- Hard water: Mineral deposits create stress concentrations at clip attachment points
With proper maintenance, you can push that to 9–12 years. The W10283356 replacement baffle uses the same mounting design as the original, so prevention strategies work identically.
Signs Your Baffles Are Wearing Out
Don't wait for a baffle to fall out mid-cycle. Here's what to watch for:
Visible Hairline Cracks
Shine a flashlight along the baffle edges where they meet the drum. You're looking for thin stress cracks radiating from the mounting clips — these usually start at the screw holes and work outward. If you see white stress marks in the plastic, that's stage one failure.
Rattling or Thumping During Spin
A loose baffle sounds different than an unbalanced load. It's a sharp, rhythmic knock that matches drum rotation speed, not the random banging of an off-balance basket. If one mounting clip has failed, the baffle flaps against the drum with each revolution.
Detergent Buildup at Mounting Points
Check where the baffle clips attach to the drum. Heavy white or gray buildup here means water's pooling instead of draining cleanly — that constant moisture accelerates plastic degradation. It's not a failure yet, but it's creating the conditions for one.
Clothes Snagging on Sharp Edges
Run your hand along the baffle edges. The original smooth plastic should feel consistent. If you find rough patches or actual sharp points, the plastic's starting to delaminate. That's usually 6–12 months before complete failure.
Monthly Inspection Routine (Takes 3 Minutes)
This simple check catches 90% of baffle problems before they become emergency repairs:
- Open the door, pull back the rubber boot seal to expose the drum
- Manually rotate the drum slowly, examining each of the three baffles
- Look for cracks, check clip tightness, feel for sharp edges
- Wipe down with a damp microfiber cloth to remove detergent residue
Do this after you've emptied the washer, when the drum's dry. Wet plastic hides stress cracks.
The Detergent Residue Problem
Here's what nobody tells you: liquid detergent leaves a film that traps moisture against the baffles. Over time, this creates weak points where clips attach to the drum.
After every 30 cycles: Run a cleaning cycle with two cups of white vinegar (no detergent, no clothes). This dissolves the residue film before it hardens. If your washer has a "Clean Washer" cycle, use it monthly — it's specifically designed to hit these problem areas.
For heavy buildup: Mix baking soda paste (3 parts baking soda, 1 part water) and manually scrub the baffle mounting points with an old toothbrush. Rinse thoroughly.
Load Management That Actually Matters
Overloading doesn't just unbalance your washer — it flexes baffles beyond their design tolerance. Here's the test: Load your washer, then place your hand vertically in the drum. You should easily reach the back wall. If clothes are packed tight, you're overloading.
The baffles are designed to tumble a specific weight of laundry. Exceeding that creates lateral stress on the mounting clips, especially during the high-speed spin cycle. That's how clips shear off.
When to Replace vs. Maintain
Here's the honest decision framework:
Maintain if:
- Baffles show no cracks or stress marks
- All mounting clips feel solid when you gently tug the baffle
- No sharp edges or rough patches
- Washer's under 7 years old with regular use
Replace if:
- Any visible crack longer than 1/4 inch
- Baffle moves independently when you push it (loose clip)
- Sharp edges that could snag clothes
- One baffle already failed (inspect the other two immediately)
The reality: once one baffle cracks, the others are under similar stress. As one user discovered, getting ahead of it means a 15-minute fix instead of emergency laundry pile-up.
The Hard Water Factor
If you've got hard water, mineral deposits create microscopic stress points in the plastic. Monthly vinegar rinses help, but consider a water softener if you're replacing baffles every 3–4 years. The calcium buildup at clip mounting points acts like sandpaper under stress.
Temperature Cycling Matters
Constantly switching between hot and cold washes expands and contracts the plastic. It's unavoidable, but you can minimize damage: Don't run back-to-back hot cycles. Let the drum cool between loads. This simple habit reduces thermal stress by 30–40%.
Replacement Is Genuinely Easy
When the time comes, this isn't a technical repair. You'll need pliers and 10 minutes. As one DIYer reported: "She installed the baffle in a few minutes and now the washer works perfectly again."
The W10283356 uses the same clip-in design as the original. No tools beyond pliers to squeeze the clips through the drum holes. The hardest part is accessing the mounting points through the door opening.
What Kills Baffles Fastest
In order of damage potential:
- Overloading: Clips aren't designed for lateral stress from packed drums
- Powder detergent residue: Creates abrasive buildup at stress points
- Hard water deposits: Microscopic crystals act like stress concentrators
- Extreme temperature swings: Hot-to-cold cycling fatigues plastic
- Never cleaning the drum: Residue traps moisture against mounting points
Address the first three, and you'll double typical baffle lifespan.
Frequently Asked Questions
How often should I inspect drum baffles?
Monthly visual inspection takes three minutes. Open the door, rotate the drum manually, check for cracks or loose clips. Do this when the drum's completely dry — moisture hides early stress cracks. If your washer's over 5 years old, bump this to every two weeks.
Can I run the washer with a cracked baffle?
Short answer: not recommended. A cracked baffle can break completely mid-cycle, potentially jamming between the drum and tub, which damages the tub seal and could crack the outer housing. If you see cracks, order the part and replace it before the next wash. The W10283356 ships quickly and installs in under 15 minutes.
Do all three baffles wear out at the same rate?
Generally yes, because they're experiencing identical stress cycles. If one fails, inspect the other two immediately — they're likely showing early stress signs. Many people replace all three preventatively once one cracks, since the clips and plastic are the same age. The W10283356 fits all three positions identically on compatible Whirlpool, Maytag, and Amana models.
Element showing wear?
W10283356 · Replace before it fully fails