
How to Extend Your LG Dryer Heater Assembly Life — Maintenance Guide
Always disconnect power before accessing internal dryer components. The heating assembly carries 240V and can cause severe electrical shock.
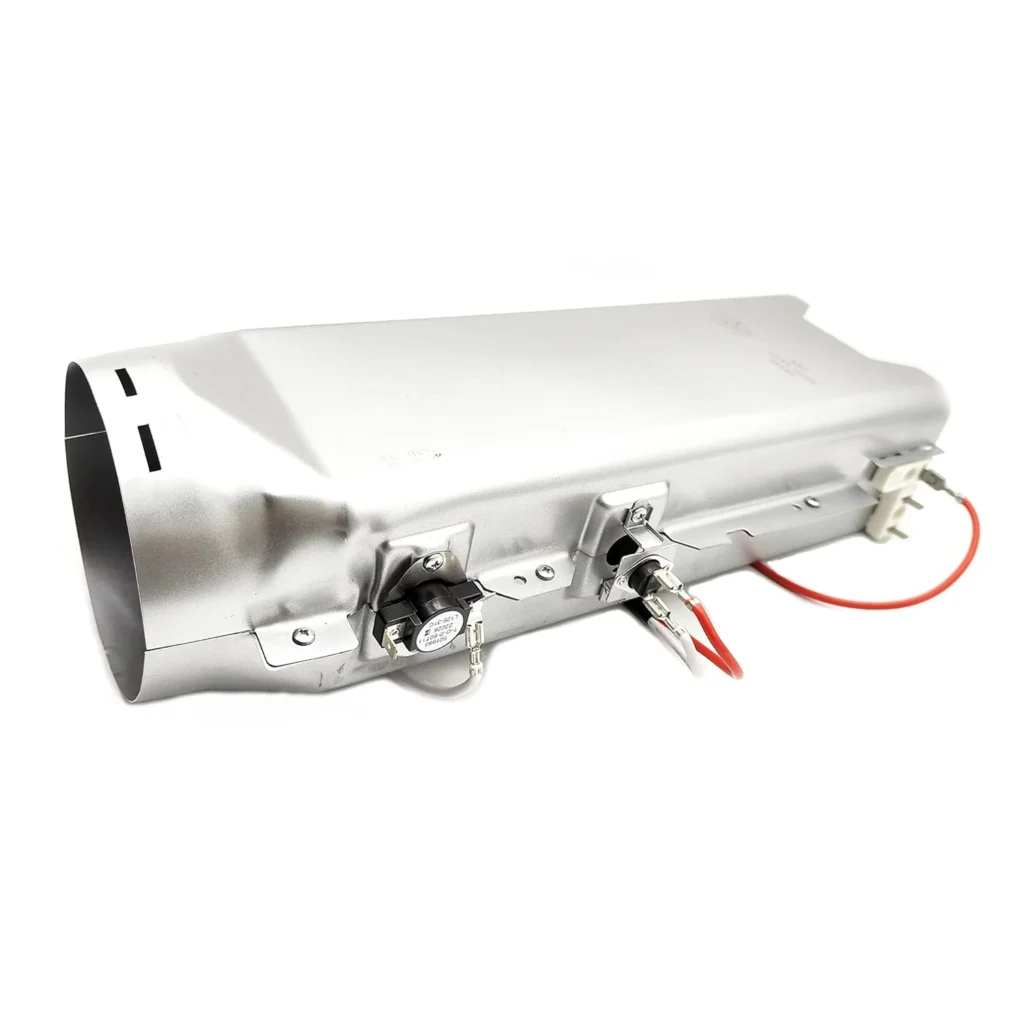
Most LG dryer heating assemblies like the 5301EL1001A should last 8-12 years, but many homeowners replace them after just 5-6 years. The difference? How well the dryer's maintained and how hard it works. When a heating element burns out prematurely, it's rarely the element's fault—it's usually lint buildup, restricted airflow, or overworked cycles that cook the assembly to death.
This $117 part doesn't need much attention, but the little maintenance it does need will save you from those "clothes still damp after an hour" frustrations that signal a failing heater.
How Long Should It Last?
The 5301EL1001A heating assembly fits dozens of LG models (from the DLE0332W to the DLE8377WM and beyond). Under normal conditions with proper airflow, you're looking at:
- 8-12 years with good maintenance and moderate use
- 5-7 years with heavy use (multiple loads daily)
- 3-5 years with poor ventilation or chronic lint buildup
What kills heating assemblies early? Three things: restricted exhaust vents forcing the element to overheat, lint accumulation around the housing creating hot spots, and running back-to-back loads without cool-down periods. Each time the element can't dissipate heat properly, its lifespan drops.
Signs It's Wearing Out
The heating assembly doesn't just quit one day—it gives you warnings. Catch these early, and you might squeeze another year or two out of it.
Not Heating at All
When your dryer runs but produces zero heat, the heating element has likely failed. This is the end-stage symptom, but it often starts subtly weeks earlier with inconsistent heating. You'll notice it first on delicate cycles or timed dry settings where the element cycles on and off frequently.
Taking Too Long to Dry
This is your early warning system. If loads that used to take 45 minutes now need 90+ minutes, the heating assembly is struggling. The element might be partially broken, coated in lint reducing efficiency, or cycling off too quickly due to overheating. On models like the DLE5977W or DLE7177WM, this symptom often appears gradually—adding five minutes here, ten minutes there, until suddenly an hour isn't enough.
Burning Smell During Operation
A slight burning smell during the first few minutes of a new dryer is normal. But if your LG dryer suddenly starts smelling like burned dust or hot metal mid-cycle, lint has likely accumulated around the heating assembly housing. The element itself is fine, but debris on or near it is scorching. This is fixable with cleaning—ignore it, and you'll cook the element prematurely.
Maintenance Schedule That Actually Works
Here's what keeps a heating assembly running for its full lifespan. None of this is complicated, but consistency matters.
After Each Load
Clean the lint screen. Not "most of the time"—every single load. A clogged screen forces the dryer to work harder and run hotter, which directly stresses the heating element. Takes 10 seconds, prevents hundreds in repairs.
Monthly Deep Clean
Vacuum around the lint screen housing with a crevice tool. Lint gets past the screen and accumulates in the cavity below. Once a month, pull the screen and vacuum that space thoroughly. While you're at it, check the door seal area—lint collects there too and can get sucked back toward the heating assembly.
Quarterly Vent Inspection
Check your exhaust vent from the back of the dryer to the outside termination. Look for lint buildup, crushed sections, or excessive length. A restricted vent forces hot air back into the dryer cabinet, causing the heating assembly to cycle constantly and overheat. Models like the DLE2512W or DLE5932S with high-efficiency cycles are especially sensitive to vent restrictions.
Annual Professional Service
Once a year, have the dryer cabinet opened and the heating assembly area cleaned professionally, or do it yourself if you're comfortable. Lint gets everywhere inside a dryer, and the heating element compartment needs periodic cleaning that you can't reach from the lint trap.
When to Replace vs Maintain
If your dryer still heats but cycles are running long, start with maintenance. Clean the entire vent system, vacuum the cabinet interior, and replace the lint screen if it's damaged. Cost: maybe $20 and an afternoon.
Replace the heating assembly when it's completely failed (no heat at all) or if you've confirmed the element is visibly broken. You can't repair the 5301EL1001A—it's a sealed assembly. Testing requires a multimeter to check continuity across the element terminals, but if you've already confirmed good airflow and the dryer still won't heat, replacement is the only fix.
Here's the honest truth: if your LG dryer is over 10 years old and the heating assembly fails, calculate whether a $117 part plus your time (or a service call) makes sense versus replacing the entire unit. But if the dryer's only 5-7 years old? Replace that heating assembly and keep going.
What Actually Damages This Part
Normal wear and tear eventually gets every heating element—metal expands and contracts thousands of times, and eventually the coil develops a break. But premature failure comes from:
- Lint accumulation creating localized hot spots on the element
- Restricted airflow from clogged vents preventing heat dissipation
- Running oversized loads that force extended cycle times
- Back-to-back loads without cooldown, keeping the element at maximum temperature for hours
The dryer's thermal fuse is designed to protect the heating assembly from overheating, but it can only do so much. Keep airflow clean and strong, and the element will reach its full lifespan.
Frequently Asked Questions
Can I clean the heating element itself?
Not really, and you shouldn't try. The element coils inside the 5301EL1001A assembly are enclosed in a metal housing. What you can and should clean is the area around the housing—the ductwork leading to it, the blower wheel that pushes air through it, and the cabinet space surrounding it. Trying to access the element itself risks breaking the fragile coil.
How do I know if it's the heating assembly or the thermal fuse?
The thermal fuse is a one-time safety device that cuts power to the heating element if the dryer overheats. If your fuse has blown, the dryer won't heat at all—same symptom as a failed element. Test the fuse first (it's cheaper and easier to access). If the fuse has continuity (conducts electricity), then the heating assembly is your problem. If the fuse is blown, replace it—but also figure out why it blew, or you'll blow the replacement too.
Does the heating assembly work harder on certain cycles?
Yes. High heat and heavy-duty cycles stress the element more than delicate or air-dry settings. Timed dry cycles that run continuously are harder on the assembly than sensor dry cycles that shut off when moisture is gone. If you want maximum heater lifespan, use sensor dry modes when possible and avoid running high heat unless you actually need it. Your towels don't care if they dry on medium heat—it just takes a few extra minutes.
Element showing wear?
5301EL1001A · Replace before it fully fails