
How to Replace WR51X10101 Defrost Heater Kit on GE Refrigerator — Step-by-Step
Unplug refrigerator completely before starting. Never chip ice aggressively near evaporator coils — puncturing them causes refrigerant leaks requiring professional repair.
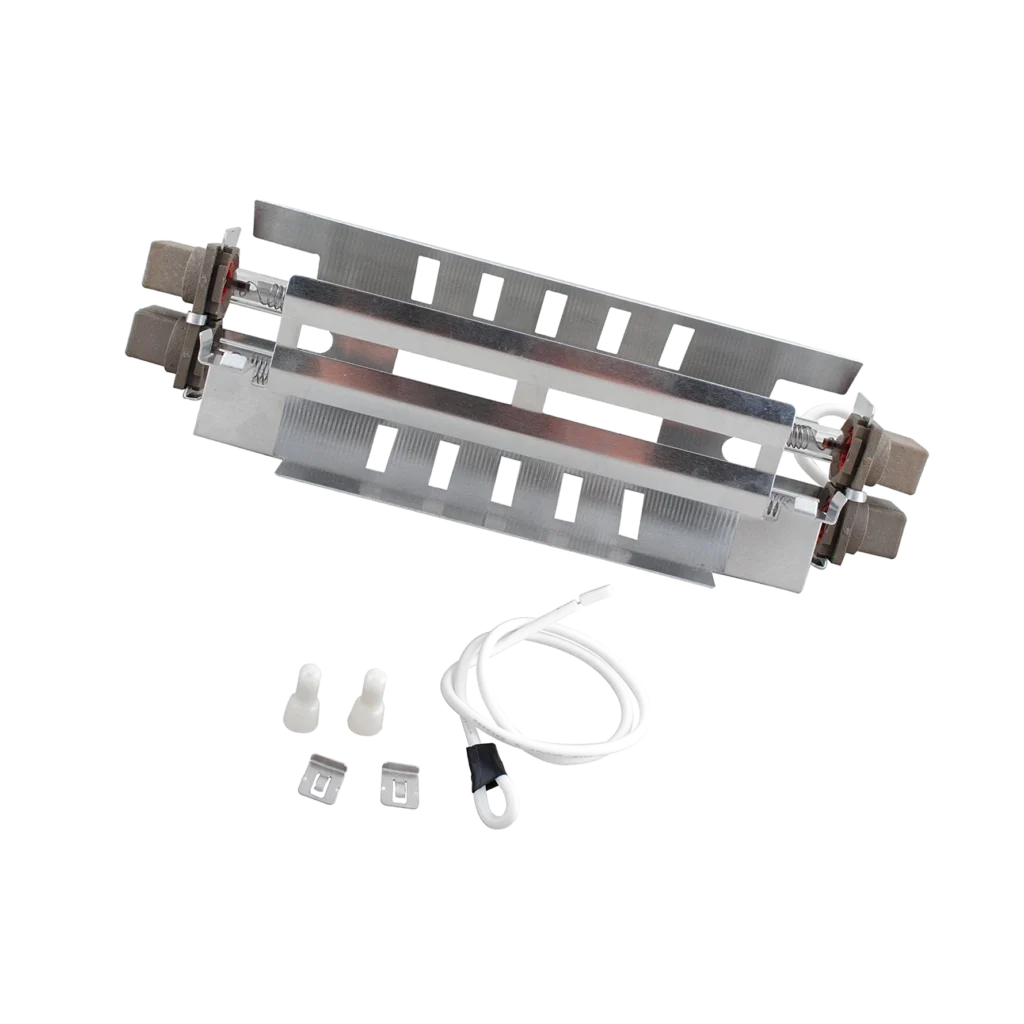
Your GE refrigerator's freezer section is coated in frost, and the ice buildup keeps getting worse. You've noticed the fridge section running warmer than usual, and your ice maker stopped producing cubes three days ago. What you're dealing with is a failed defrost heater — the WR51X10101 defrost heater kit, specifically — and it's preventing your freezer from cycling through its automatic defrost process.
This heater wraps around the evaporator coils in your freezer. Every 8-12 hours, it's supposed to warm up just enough to melt accumulated frost, then shut off so the freezer returns to normal temperature. When it fails, frost keeps building until airflow stops completely. You'll see ice coating the back wall, temperature swings in both compartments, and eventually your compressor running constantly trying to compensate.
The WR51X10101 fits over 300 GE, Hotpoint, and Kenmore side-by-side models including GSS20IETAWW, HSS22GFTGWW, and TFX20JABGWW. It replaces older part numbers WR51X10053, WR51X10032, and WR51X10097.
What You Need Before Starting
This repair requires accessing the evaporator compartment behind your freezer's back panel. You'll need:
- 1/4" nut driver or socket
- Phillips screwdriver
- Flat-head screwdriver
- Needle-nose pliers
- Hair dryer or heat gun (for melting existing frost)
- Towels (for water from melted ice)
- Wire cutters/strippers (if splicing connections)
- Electrical tape or wire nuts
Repair time: 45-60 minutes (plus 30-45 minutes for defrosting if heavily frosted)
Difficulty: Intermediate — requires some disassembly and basic electrical connections
Safety First
Unplug your refrigerator completely before starting this repair. You'll be working near electrical connections and potentially standing water from melted frost. The defrost heater operates at 120V, so disconnecting power isn't optional — it's mandatory. If your unit is heavily frosted, plan on spending extra time melting ice with a hair dryer before you can access the mounting clips. Never chip or scrape ice aggressively; you can puncture the evaporator coils and cause a refrigerant leak that'll cost you hundreds in professional repairs.
Step 1: Empty the Freezer and Remove the Back Panel
Pull everything out of your freezer section and locate the white plastic panel covering the back wall. You'll see several Phillips screws around the perimeter — typically 6-8 depending on your model. Remove these screws and carefully pull the panel forward. If it's stuck, there's likely frost holding it in place. Use your hair dryer on low heat to melt the edges until it releases. Set the panel aside and grab your towels — you're about to see just how much ice has accumulated.
Step 2: Defrost the Evaporator Coils
Behind that panel, you'll find the evaporator coils — a series of aluminum fins and tubes that look like a small radiator. If your defrost heater failed, these coils are probably encased in thick frost or solid ice. The old defrost heater is mounted underneath or alongside these coils, held by metal clips. You can't access it until you melt this ice. Use your hair dryer systematically, working from top to bottom. Don't blast one spot continuously; move the heat around to prevent warping plastic components. This is the most time-consuming part — just let physics do its work while you catch up on a podcast.
Step 3: Disconnect and Remove the Failed Heater
Once you can see clearly, locate the defrost heater assembly. It's a long, glass-encased tube with wire leads on each end. The WR51X10101 kit includes both the heater and a thermostat that clips onto the evaporator. Trace the wires from the heater to their connection points — usually white plastic connectors that simply pull apart. On some models, the wires are spliced directly. If that's your situation, cut the wires about 3-4 inches from the heater, leaving enough length to work with. Note which wire connected where; take a photo with your phone if you're uncertain. The heater itself slides out of metal mounting clips on either side. Flex the clips outward gently and slide the old heater free.
Step 4: Install the New WR51X10101 Heater
Slide the new heater into those same mounting clips. The fit should be snug but not forced. The glass tube is fragile — if you bend or twist it aggressively, you'll crack the element inside and create a short circuit. Make sure the heater sits flat against the bottom of the evaporator. Now deal with the electrical connections. If your original had plug connectors, the WR51X10101 kit includes matching connectors — just push them together until they click. If you cut spliced wires, strip about 1/2 inch from each wire end, twist matching wires together, secure with wire nuts, and wrap with electrical tape. White connects to white, and the other wire (often blue or black) connects to its match.
Step 5: Replace the Defrost Thermostat
The WR51X10101 kit includes a defrost thermostat — a small cylindrical component with a metal clip. This attaches directly to the evaporator coils, usually on the left side. The old thermostat unclips easily; just pry the metal clip open with your flat-head screwdriver. The new thermostat clips on the same way, making firm contact with the coil tube. Connect the thermostat wires to the corresponding harness connectors. This thermostat monitors coil temperature and tells the heater when to shut off once frost is cleared — it's just as critical as the heater itself.
Step 6: Reassemble and Test
Reposition the back panel and secure it with all the screws you removed earlier. Don't leave any out — that panel needs to seal properly to maintain airflow. Plug the refrigerator back in and listen. You should hear the compressor start within a few minutes. Set your freezer to its normal temperature setting. Within 8-12 hours, the defrost cycle will run automatically. You won't see the heater glowing (it operates behind the panel), but you'll know it's working when frost stops accumulating and your freezer maintains consistent temperature.
Testing After Installation
Give it 24 hours, then open your freezer and check the back wall. You should see no frost buildup — just a clean, dry panel. Check your refrigerator's temperature: it should be 37-40°F. Your freezer should read 0-5°F. If you've got a frost problem returning within two days, you've either got a bad defrost timer or control board, not the heater. But if temperatures stabilize and your ice maker starts producing again, you've fixed it. The compressor should cycle on and off regularly, not run continuously like it did when frost was blocking airflow.
Frequently Asked Questions
How do I know if my defrost heater is actually bad or if it's the timer?
Test the heater with a multimeter set to measure resistance. Disconnect the heater wires and touch the probes to each terminal. You should read between 20-50 ohms. If the meter shows infinite resistance or OL (open loop), the heater element is broken. If it shows 0 ohms, it's shorted. If the heater tests good but you've still got frost buildup, the defrost timer or control board isn't triggering the defrost cycle — that's a different repair.
Can I run my refrigerator while the evaporator is frosted over?
You can, but you're damaging the compressor. When frost blocks airflow across the evaporator, the compressor runs constantly trying to reach set temperature. It'll never get there, and you're burning through electricity while wearing out a $300 component. Fix the defrost system now, or pay for a compressor replacement later. Plus, running warm costs you food spoilage — those groceries add up fast.
Will this repair work if my freezer has frost only on one side?
Maybe. Uneven frost patterns sometimes indicate a failed defrost heater, but they can also mean a blocked drain tube or a door seal leak letting humid air inside. Replace the defrost heater if it tests bad, but also check that the drain hole at the bottom of the evaporator compartment isn't clogged with ice. Pour a cup of hot water down it to clear debris. If frost returns quickly in the same pattern, you've got an airflow issue, not an electrical one.
Note: This repair guide covers GE, Hotpoint, and Kenmore side-by-side refrigerators using the WR51X10101 defrost heater kit. Always verify your model number against the compatibility list before ordering. If you're working on a French door or bottom-freezer model, the evaporator access and heater mounting may differ significantly.
Take a photo of wire connections before disconnecting anything. Defrost heavily frosted evaporators completely before attempting heater removal to avoid breaking mounting clips.
Need the part for this repair?
WR51X10101 · In Stock · Ships next business day