
How to Replace WB26X23320 Microwave Magnetron on GE Over-the-Range Models — Step-by-Step
DANGER: Microwave capacitors store lethal voltage even when unplugged. Always discharge the high-voltage capacitor before servicing. If uncomfortable with high-voltage work, hire a qualified technician.
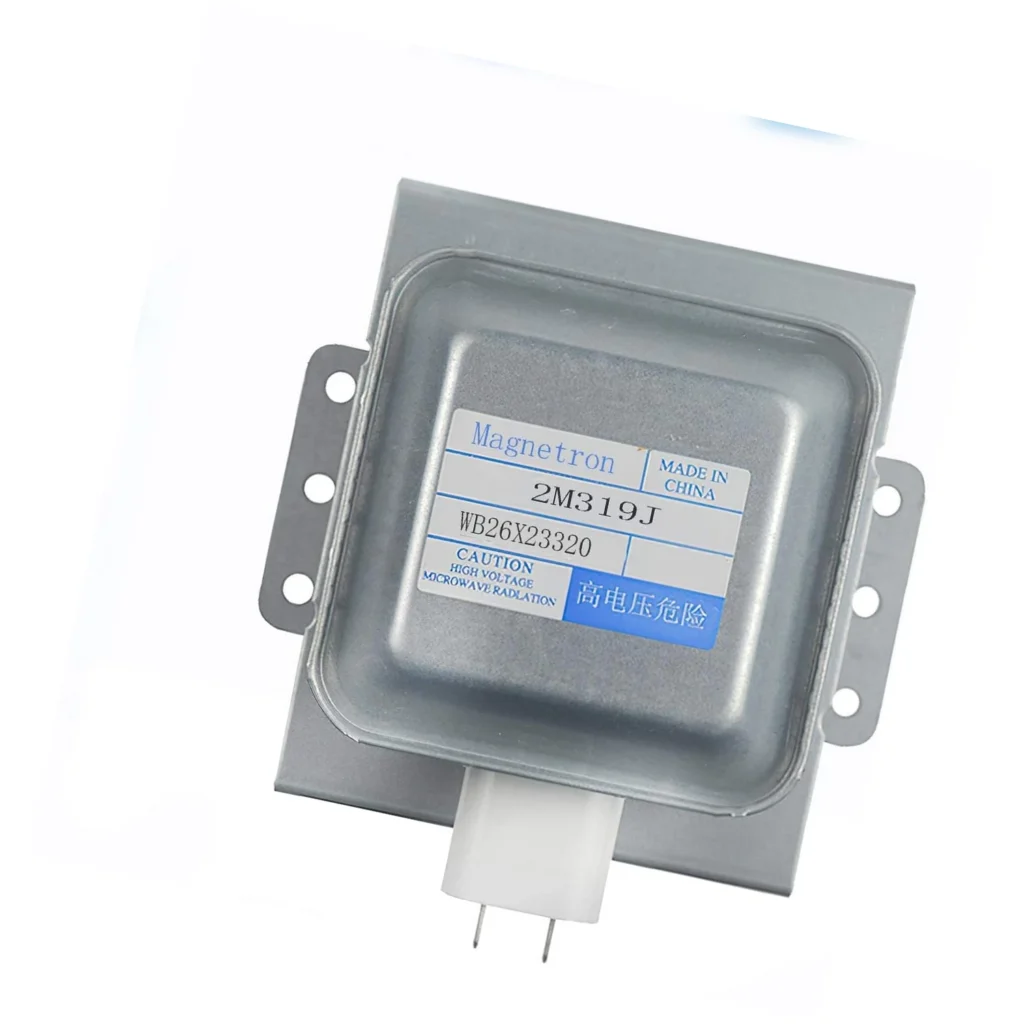
Your GE microwave's running, the turntable's spinning, but nothing's heating. You've just discovered what happens when a magnetron fails — the heart of your microwave stops generating the electromagnetic waves that cook your food. The WB26X23320 magnetron is the replacement part for dozens of GE and Hotpoint over-the-range models, including the JVM3160 and AVM4160 series. This isn't a beginner repair, but if you're comfortable working with high-voltage appliances and follow proper safety protocols, you can replace it yourself and save the $300+ service call.
What You Need Before Starting
Magnetron replacement requires specific tools and serious respect for high-voltage components. Even unplugged, microwaves store dangerous electrical charges in the high-voltage capacitor.
- Phillips head screwdriver
- 5/16" nut driver or socket
- Needle-nose pliers
- Insulated screwdriver for capacitor discharge
- Work gloves
- Digital multimeter (optional, for testing)
- Thermal paste or thermal grease pad
Estimated Time: 45-60 minutes
Difficulty: Advanced — High-voltage component replacement
Safety First: Discharge That Capacitor
This bears repeating: microwave capacitors can hold a lethal charge for weeks after unplugging. Before touching anything inside the cabinet, you must discharge the high-voltage capacitor. After unplugging the unit and removing the outer case, locate the capacitor (large cylindrical component near the magnetron). Using an insulated screwdriver, carefully short the terminals together, then short each terminal to the metal frame. You'll likely see a small spark — that's normal. Do this twice to ensure complete discharge. If you're not comfortable with this procedure, call a technician.
Step 1: Remove the Microwave and Access the Cavity
Unplug the microwave from the wall outlet or shut off the circuit breaker. For over-the-range models, you'll need a helper. Remove the two screws securing the unit to the upper cabinet, then have your assistant support the weight while you remove the mounting bracket screws at the back wall. Carefully lower the microwave to your work surface. Remove the control panel by taking out the screws along the top edge — usually 4-6 Phillips screws. The outer cabinet typically has screws along the top and sides; remove these to lift the metal housing off.
Step 2: Disconnect and Remove the Failed Magnetron
The magnetron sits in the center of the cavity wall, connected to the waveguide (the metal tunnel leading into the cooking chamber). First, photograph or label the wire connections — there's typically a thermal cutoff, the magnetron's primary terminals, and a grounding wire. Disconnect these carefully. Remove the screws or bolts securing the magnetron to its mounting bracket — usually four 5/16" fasteners. The magnetron and antenna cap will come out together. Note how the thermal grease pad sits between the magnetron fins and the cooling vanes; you'll need to replicate this thermal interface.
Step 3: Prepare the New WB26X23320 Magnetron
Clean the mounting surface on the waveguide and cooling fins with a dry cloth to remove any old thermal paste residue. The WB26X23320 comes with a new thermal grease pad — this pink or white pad ensures proper heat transfer from the magnetron to the cooling system. Position this pad on the magnetron's cooling fins exactly where the old one sat. Don't skip this step; improper cooling will destroy your new magnetron in weeks.
Step 4: Install and Connect the New Magnetron
Slide the new magnetron into position, making sure the antenna cap fits properly into the waveguide opening. Thread in the mounting bolts finger-tight first to ensure proper alignment, then tighten them in a cross pattern to ensure even pressure. Reconnect the wires exactly as photographed — the thermal cutoff typically has two spade connectors that push onto the magnetron terminals. Reattach the ground wire securely. Double-check that no wires touch the metal housing or other components.
Step 5: Reassemble and Test
Replace the outer cabinet, making sure no wires get pinched. Reinstall the control panel. Before mounting the microwave back above the range, plug it in and run a heating test at ground level. Put a cup of water inside and run the microwave for 30 seconds. The water should start warming noticeably. If it doesn't heat, immediately stop and recheck your connections. Once confirmed working, remount the unit above the range with your assistant's help, secure the mounting bracket, and test again with a full heating cycle.
Testing After Installation
Run several test cycles with different power levels. Heat a cup of water for one minute on high — it should reach near-boiling. Try 50% power for two minutes — the magnetron should cycle on and off (you'll hear it). Listen for unusual buzzing or humming that wasn't there before, which could indicate loose connections. Check that the exhaust fan still operates normally. The magnetron should not produce any burning smells during operation; if it does, shut down immediately and check for pinched wires or improper thermal pad installation.
Frequently Asked Questions
Can I test the old magnetron to confirm it's actually bad?
Yes, but it requires a multimeter and caution. With the capacitor discharged and power off, check continuity between the magnetron's two primary terminals — you should read near-zero ohms. Then check from each terminal to the magnetron's metal case — this should read infinite (open circuit). If you get continuity to the case, the magnetron is internally shorted and definitely failed. However, a magnetron can also fail by losing magnetic strength, which you can't test without specialized equipment.
Why is the WB26X23320 so expensive compared to other microwave parts?
Magnetrons contain rare earth magnets and precision-manufactured vacuum tubes that generate 2.45 GHz microwave energy at around 1000 watts. They're essentially small radio transmitters built to aerospace tolerances. The manufacturing process requires specialized equipment and quality control. At $236.99, you're paying for the technology, but it's still half the cost of a new over-the-range microwave and a fraction of a service call plus parts.
How long should a replacement magnetron last?
A properly installed magnetron in normal household use should last 5-8 years or longer. Factors that shorten magnetron life include running the microwave empty (never do this), poor ventilation causing overheating, voltage spikes, and running it continuously for extended periods. The thermal grease pad installation is critical — without proper thermal transfer, even a genuine GE magnetron can fail within months from overheating.
Take multiple photos before disconnecting any wires. The wire routing and connections must be exactly replicated for safe operation.
Need the part for this repair?
WB26X23320 · In Stock · Ships next business day