
How to Replace W11130359 Washer Suspension Rod Kit on Whirlpool Top-Load Washers — Step-by-Step
Unplug the washer and turn off water supply before starting. Get help tilting the washer — it's heavy and can crush fingers if it slips.
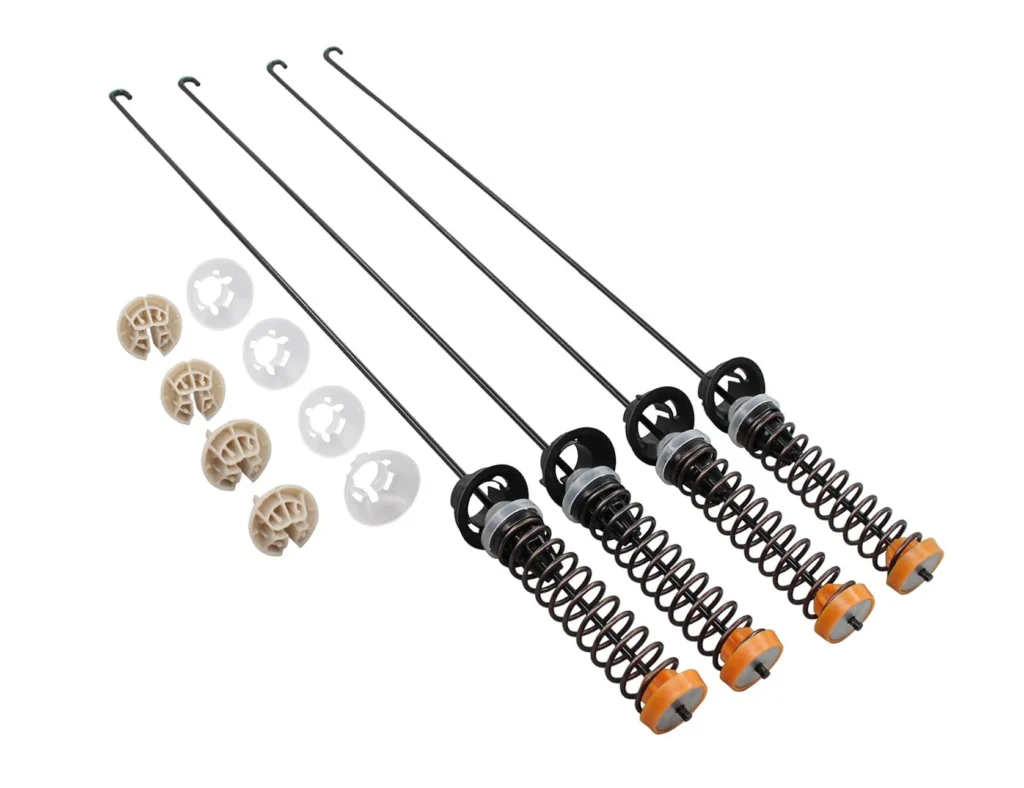
Your Whirlpool washer sounds like it's trying to break through the laundry room floor. That loud banging during the spin cycle? That's typically worn suspension rods failing to do their job. One customer told us they "replaced the lid and the 4 suspension rods" after their WTW7300DW2 started walking across the room during every load. If your washer's shaking violently or the drum looks like it's sagging, those suspension rods are done.
What You Need Before Starting
This repair takes 30-60 minutes and doesn't require appliance repair experience. Gather these tools before you start:
- Wrench set
- Nut drivers
- Pliers
- Adjustable wrench
- Screwdrivers (flathead and Phillips)
- Socket set
Difficulty: Easy | Time: 30-60 minutes
The W11130359 kit works on Whirlpool models like WTW7000DW0, WTW7040DW2, WTW7300DW1, and WTW7500GC0. It also fits Maytag, Kenmore, and Crosley top-load washers with similar suspension systems.
Safety First
Unplug the washer completely before starting. You'll be working around the drum assembly where electrical connections and moving parts can cause injury. Turn off the water supply valves behind the washer. Have someone help you tip the washer back — these machines are heavy and awkward to maneuver alone. Wear safety glasses because rust and debris can fall from underneath the cabinet.
Step 1: Access the Cabinet and Tilt the Washer
Unplug the washer and turn off both water valves. Pull the washer away from the wall so you have room to work. Remove the three screws along the back of the control panel, then lift it up and prop it back carefully — don't disconnect the wires. Now remove the cabinet screws (usually two at the back corners). With help, tilt the entire washer cabinet back and prop it securely against the wall. You'll see the drum suspended by four rods attached to each corner.
Step 2: Remove the Old Suspension Rods
Each suspension rod connects at the top (to the cabinet frame) and bottom (to the drum base). Start with one rod. Use your socket set to remove the top mounting nut, then the bottom. The rods are under tension, so they'll release with some resistance. If a rod is bent or the rubber mounting is torn, that's your smoking gun for the vibration problem. Remove all four rods one at a time, keeping track of the washers and nuts — you'll reuse some hardware depending on what's included in your kit.
Step 3: Install the New Suspension Rods
Take one new rod from the W11130359 kit. Attach the bottom ball joint to the drum base first, securing it with the nut finger-tight. Then stretch the rod up to the cabinet mounting point and secure the top with its nut and washer. Use your wrench to tighten both ends firmly — not gorilla-tight, but snug enough that the rod can't spin. The rubber bushings need to compress slightly but shouldn't be crushed flat. Repeat for the remaining three rods, working in a cross pattern (front-left, then back-right, then front-right, then back-left) to keep the drum balanced.
Step 4: Reassemble and Level the Washer
With all four rods installed, carefully lower the washer cabinet back down. Reinstall the cabinet screws at the back corners. Fold the control panel back down and secure it with the three screws. Push the washer back into position, reconnect the water lines, and plug it in. Before you call it done, check that the washer is level front-to-back and side-to-side. Adjust the leveling feet at each corner using your adjustable wrench. An unlevel washer will eat through suspension rods faster than normal.
Testing After Installation
Run an empty load on the highest spin speed. The washer should spin smoothly without the banging or walking you experienced before. Watch the first few minutes to make sure the drum stays centered and the machine doesn't move. Then run a normal load with clothes — start with a balanced load, not just one heavy towel that'll throw everything off. If you still hear minor vibration, recheck that all four mounting nuts are tight and the washer is perfectly level. Most customers report the noise completely disappears after replacing worn rods.
Frequently Asked Questions
Do I need to replace all four suspension rods or just the broken one?
Replace all four. If one rod failed from wear, the others are right behind it. The W11130359 kit includes all four rods for this exact reason. Replacing just one leaves you with mismatched suspension that'll cause the same vibration problems within weeks. Save yourself the hassle and do them all at once.
Why does overloading cause suspension rod failure?
Every time you cram too many clothes in, the drum weight exceeds what those four rods can safely handle during the high-speed spin. The rods flex beyond their design limits, the rubber bushings tear, and the metal fatigues. Over months of overloading, they bend permanently or the ball joints crack. Stick to the manufacturer's load size recommendations and your new rods will last years instead of months.
Will this fix my washer if it's walking across the floor?
Yes, if worn suspension rods are the cause. When rods fail, the drum bounces violently during spin and that force makes the whole washer move. But also check that your washer is level and on a solid floor — a washer on a weak wood floor will still vibrate even with new rods. If the floor flexes when you push down on it, you might need to reinforce the subfloor or move the washer to a concrete surface.
Replace all four rods at once even if only one looks damaged. Install them in a cross pattern to keep the drum balanced during installation.
Need the part for this repair?
W11130359 · In Stock · Ships next business day