
How to Replace W10434452 Dual Element Control Switch on Whirlpool & Maytag Ranges — Step-by-Step
Turn off the circuit breaker before starting — 240 volts at the switch terminals can be fatal
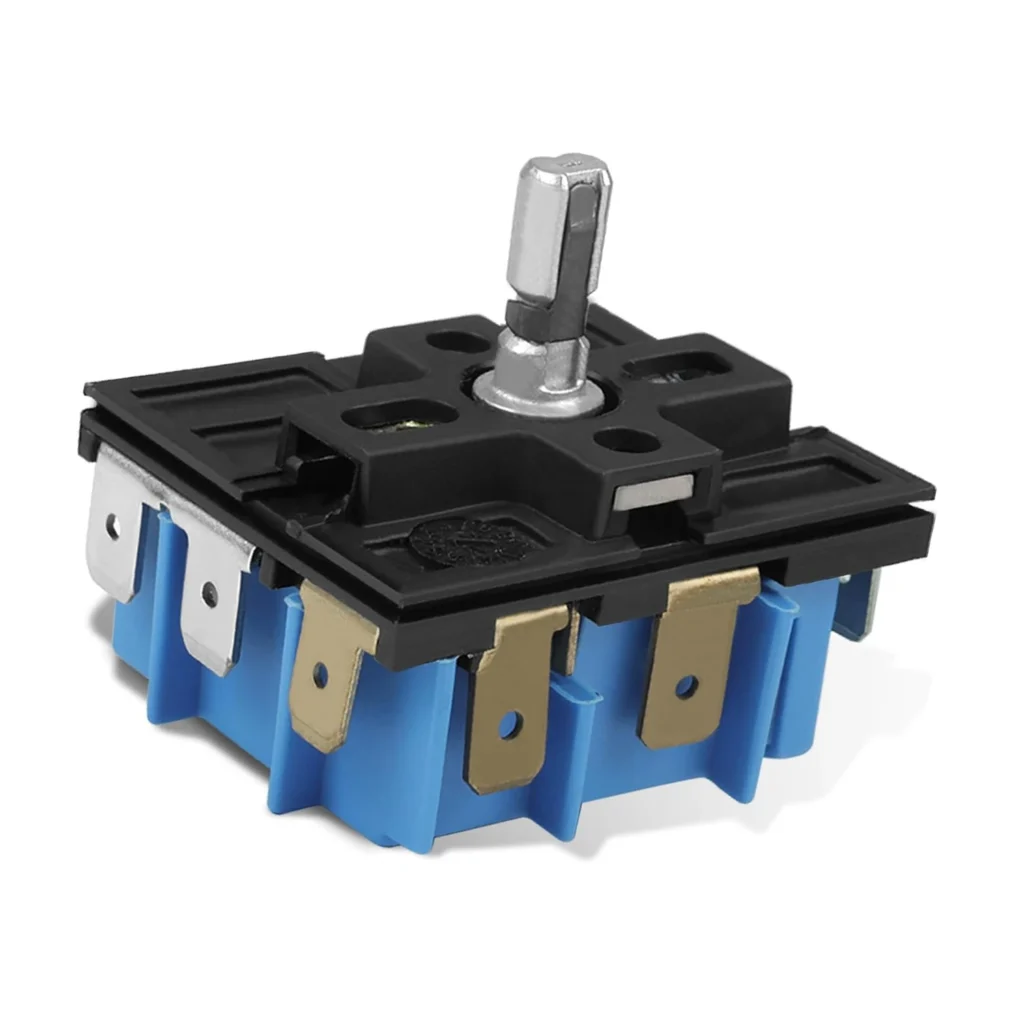
You're baking cookies in your Whirlpool range when you notice the oven isn't heating evenly anymore. The bottom element works fine, but the top element stays cold — or sometimes they both decide to work at the same time when you only want one. That's the classic sign your dual element control switch (W10434452) has failed. This switch controls the power distribution to your oven's heating elements, and when it goes bad, you lose precise temperature control.
The good news? This repair is more straightforward than most people think. You don't need to pull the entire range out or disconnect gas lines. The switch sits behind the control panel, accessible from the back or top depending on your model. I've replaced dozens of these on Whirlpool, Maytag, KitchenAid, and Amana ranges — they all use the same basic design.
What You Need Before Starting
Gather these tools before you begin:
- 1/4" nut driver or socket set
- Phillips head screwdriver
- Flathead screwdriver (for wire terminals)
- Needle-nose pliers
- Digital camera or smartphone (to photograph wire connections)
- Work gloves (metal edges are sharp)
- Masking tape and marker (for labeling wires)
Estimated repair time: 30-45 minutes
Difficulty level: Moderate — requires careful wire documentation
Safety First
Warning: Turn off the circuit breaker to your range before starting. Even with the range "off," 240 volts runs to the control switches. Test with a voltage tester if you have one. This isn't a repair to rush — high voltage can kill. If your range is gas, you're still dealing with electrical power for the ignition and controls. Don't just unplug it; kill the power at the breaker box.
Step 1: Access the Control Panel
Pull your range out slightly — just enough to work behind it comfortably. Most Whirlpool and Maytag ranges have the dual element switch mounted to the back of the control panel. You'll see screws along the top rear edge of the range. Remove these screws (typically four to six 1/4" hex head screws). On some models like the Whirlpool 4KWFE7685EW0 or Maytag 4KMER7685ES0, you'll need to lift the cooktop first by releasing front clips, then access screws underneath the control panel's front lip.
Step 2: Document Your Wire Connections
Here's where people mess up: the W10434452 has six to eight wire terminals, and they're not always color-coded consistently. Before disconnecting anything, take multiple clear photos from different angles. Better yet, use masking tape to label each wire with its terminal position ("L1", "L2", "H1", "H2", etc.). The switch usually has a diagram printed on it, but that diagram disappears when you remove the old part. I've seen experienced techs reconnect these wrong and blow fuses because they rushed this step.
Step 3: Remove the Failed Switch
The switch is held by two screws to a mounting bracket behind the control panel. Using your 1/4" nut driver, remove these mounting screws. Now carefully pull the wire terminals off the switch. They're push-on spade connectors — use your flathead screwdriver to gently pry if they're stubborn, but pull straight back to avoid bending the terminals. Some terminals will be tight from years of heat cycling. Don't yank; wiggle them gently while pulling.
Step 4: Install the New W10434452 Switch
Mount your new switch in the same position as the old one. Thread the mounting screws in but don't fully tighten yet — you want a little wiggle room for aligning wire connections. Now refer to your photos and labels. Connect each wire to its corresponding terminal, pushing firmly until you feel it seat. The terminals should slide on with moderate pressure. If one feels loose, the terminal may be corroded — clean it with fine sandpaper. Once all wires are connected, double-check against your photos, then tighten the mounting screws fully.
Step 5: Reassemble and Test
Reattach the control panel using the screws you removed earlier. Make sure all wire harnesses are tucked away from sharp edges — you don't want a pinched wire causing problems later. Push the range back into position, restore power at the breaker, and run a test. Set your oven to 350°F on bake mode. Both elements should glow within 5-10 minutes. Then test broil mode — only the top element should activate. If one mode works but not the other, you've likely swapped two wires. Kill the power and recheck your connections.
Testing After Installation
Run through all heating modes: bake, broil, and convection if your model has it. The dual element switch routes power differently for each mode. In bake mode, you should see both top and bottom elements cycle on and off to maintain temperature. In broil mode, only the top element should glow red-hot. If your oven has convection, the fan should run while the appropriate elements heat. Let the oven run a complete cycle to 350°F and back down. Any burnt smell is just manufacturing oils burning off the new switch — it'll disappear after one cycle.
Frequently Asked Questions
Will this switch work on both Whirlpool and Maytag ranges?
Yes, W10434452 is used across multiple brands including Whirlpool, Maytag, KitchenAid, and Amana. It's the same switch with different brand labels. Check your model number against the compatibility list — if your model's listed (like AER5630BAB0, 4KWFE7685EW1, or MER8875BS), you're good to go. The switch replaced older part numbers WPW10434452, AP6021365, and PS11754687.
How do I know if the switch is bad or if it's the heating element itself?
Set your oven to bake and watch what happens. If neither element heats, suspect the switch. If one element works fine but the other doesn't, that specific element is probably bad, not the switch. If elements randomly work or don't work — like the oven heats sometimes but not others — that's classic switch failure. You can also check with a multimeter: the switch should show continuity between specific terminals when activated, no continuity when off.
Can I install this switch with the range still plugged in?
Absolutely not. You're working with 240-volt connections that can kill you instantly. Always shut off the dedicated circuit breaker for your range. Just unplugging it isn't enough on hardwired installations, and many people forget ranges run on double-pole breakers — you need to flip both sides off. Verify power is off with a voltage tester before touching any wires. This isn't optional safety theater; it's life or death.
Photograph wire connections from multiple angles before disconnecting anything — the terminal diagram on the old switch disappears when you remove it
Need the part for this repair?
W10434452 · In Stock · Ships next business day