
How to Replace 12002126 Dryer Drum Front Glide Kit on Whirlpool Maytag Dryers — Step-by-Step
Unplug dryer completely and shut off gas supply if applicable before starting repair. Drum edges can be sharp — wear gloves throughout.
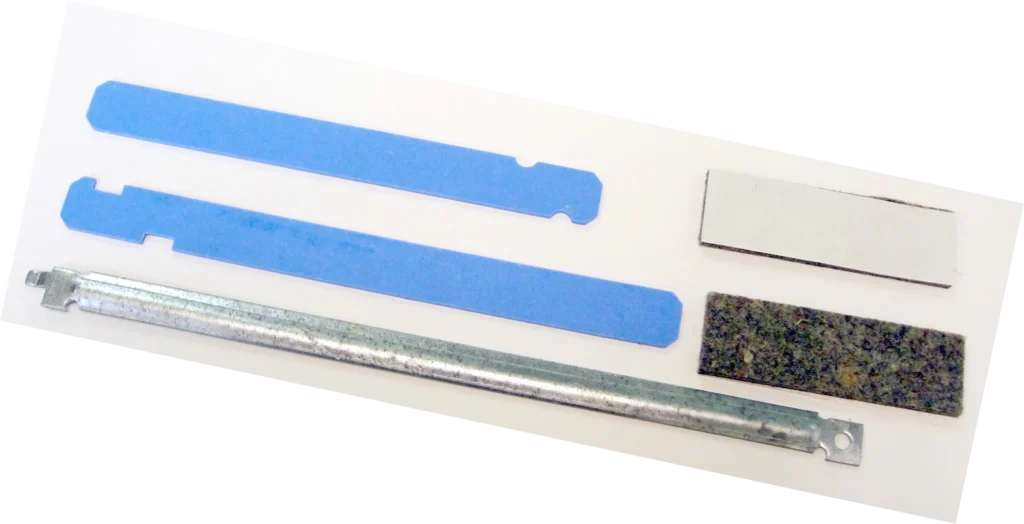
Your Whirlpool or Maytag dryer sounds like it's grinding gravel every time it tumbles. That metal-on-metal scraping noise? It's coming from worn drum front glide bearings — small Teflon pads that let your drum spin smoothly against the front bulkhead. When they wear down to nothing, the drum drops and drags directly on metal, creating that awful racket.
The 12002126 drum front glide kit fixes this issue on dozens of Whirlpool, Maytag, Admiral, Amana, and Crosley models. This replacement typically takes about an hour and requires basic hand tools. You'll need to partially disassemble the dryer cabinet to access the front drum support area, but it's straightforward work that'll save you a $200+ service call.
What You Need Before Starting
- Phillips screwdriver
- Putty knife or paint scraper
- 1/4" nut driver or socket set
- Work gloves (sheet metal edges are sharp)
- Vacuum cleaner with hose attachment
- Clean cloth and rubbing alcohol
Estimated Time: 45-60 minutes
Difficulty: Moderate — Requires cabinet disassembly but straightforward once inside
Safety First
Unplug your dryer completely before starting this repair. Don't just turn off the breaker — physically disconnect the power cord. If you have a gas dryer, also shut off the gas supply valve behind the unit. The drum is heavy and has sharp edges where the paint has chipped away, so wear gloves throughout this job. Keep children and pets away from your work area.
Step 1: Remove the Dryer Top and Front Panel
Pull the dryer away from the wall to access the back. Use your putty knife to release the spring clips holding the top panel — insert it between the top and front panel about 2-3 inches from each corner, push in, and pop the clips. Lift the top and prop it against the wall. Now remove the screws securing the front panel (usually two inside the door opening at the top corners, plus several around the perimeter). Disconnect the door switch wire harness, then lift the entire front panel off.
Step 2: Support and Remove the Drum
You'll see the drum belt looped around the drum and motor pulley below. Reach underneath the drum from the front and lift it slightly while rolling it forward — this releases tension on the belt. Pull the drum out through the front opening. It's bulky but not terribly heavy. Set it aside on a clean surface where it won't get scratched.
Step 3: Clean and Inspect the Front Bulkhead
Now you can see where the old glides were mounted on the front bulkhead — those worn plastic stumps or empty mounting spots. Use your vacuum to remove all the lint buildup around this area. There's always more than you expect. Then wipe the entire front bulkhead surface with rubbing alcohol on a clean cloth. This removes any residue or grime that would prevent the new glides from adhering properly. Let it dry completely.
Step 4: Install the New Front Glides
Your 12002126 kit includes replacement glides with adhesive backing. Don't remove the backing yet. Position each glide in its mounting location — they're shaped to fit specific spots on the bulkhead, usually two or three positions around the drum opening. Once you've confirmed correct placement, peel the backing from one glide and press it firmly into position for at least 30 seconds. Repeat for all glides. Some kits also include small metal clips — these snap into place to provide additional support.
Step 5: Reinstall the Drum and Reassemble
Carefully lift the drum and slide it back into the cabinet through the front opening. Make sure it seats properly on the rear rollers and the new front glides. Loop the belt around the drum and down around the motor pulley and idler pulley in the same configuration you found it — around the motor pulley in a counterclockwise direction when viewed from below. Rotate the drum by hand several times to verify smooth, quiet operation. Reattach the front panel, reconnect the door switch harness, secure all screws, and lower the top panel until it clicks into place.
Testing After Installation
Plug the dryer back in and run it empty on a timed dry cycle for about five minutes. Listen carefully — you should hear normal motor and airflow sounds, but no scraping, grinding, or squealing. The drum should spin smoothly without any wobble or rubbing noises. If you still hear noise, stop the dryer and check that the drum is seated properly on all support points and the belt is routed correctly. Open the door during operation (which stops the drum) and feel the front edge of the drum — it should be warm but not hot from friction.
Frequently Asked Questions
Will this kit work on my Whirlpool model LER5636PQ0?
The 12002126 kit is compatible with dozens of Whirlpool, Maytag, Admiral, Amana, and Crosley models including most LER and MED series dryers. Check the full compatibility list on the product page or compare your old glides to the kit contents — they should match in size and mounting style. If your model number starts with LER, MED, NED, or YED, this kit will likely fit.
How long do drum front glides typically last?
Drum glides usually last 8-12 years with normal use, though heavy use or running the dryer with excessive loads can wear them out faster. If you frequently overload your dryer or run it constantly, you might see wear in 5-7 years. Once they start making noise, don't delay the replacement — continuing to run the dryer with worn glides damages the drum and front bulkhead, turning a $60 repair into a $300+ repair.
Can I replace just the front glides, or do I need to do the rear rollers too?
If only your front glides are worn and the drum spins quietly except for the scraping sound at the front, you can replace just the front glides. However, if you're already inside the dryer and it's more than 8 years old, inspect the rear drum rollers and belt while you have access. Worn rear rollers cause a thumping sound. If they look flat-spotted or wobbly, replace them at the same time to avoid doing this job twice in six months.
Clean the front bulkhead thoroughly with rubbing alcohol before installing new glides — proper adhesion is critical for long-lasting, quiet operation.
Need the part for this repair?
12002126 · In Stock · Ships next business day