
Whirlpool Dryer Won't Start or Spin — 5 Motor Failure Causes & How to Fix
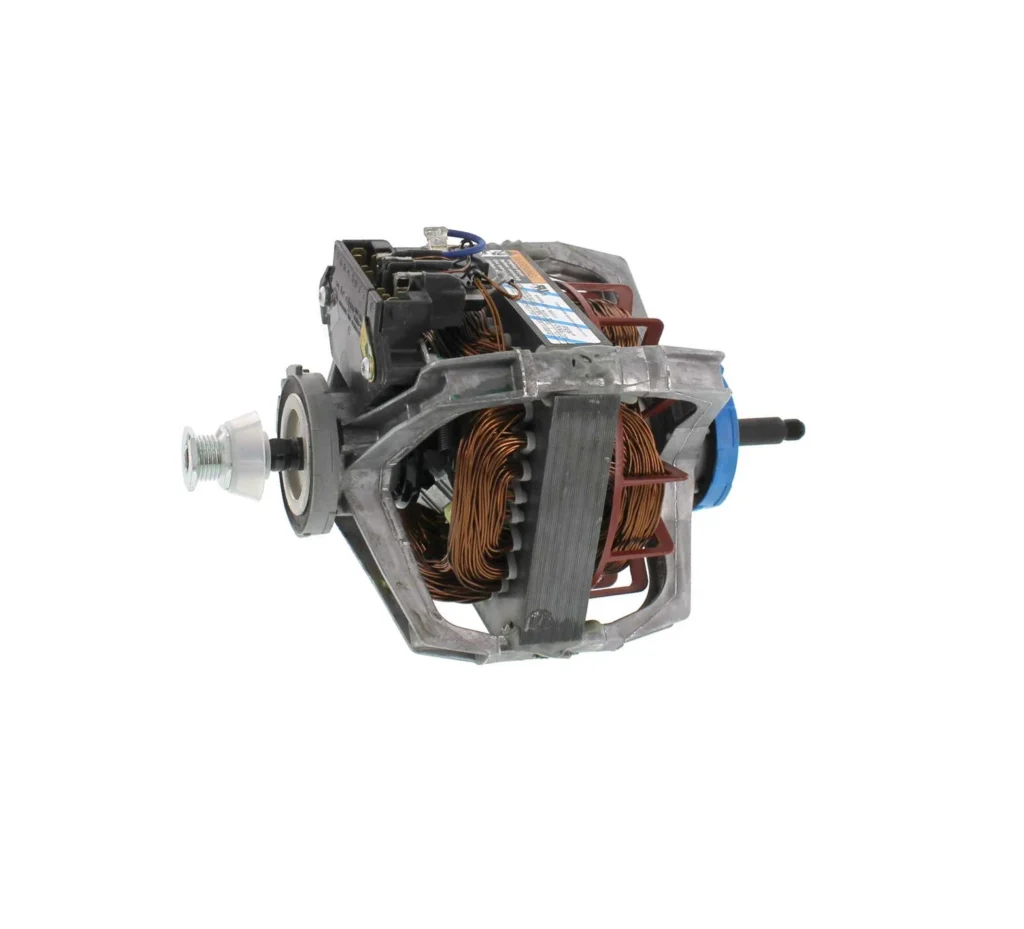
You load wet clothes, push the start button, and... nothing. Or maybe the drum turns a few inches then groans to a stop. The timer's counting down like everything's fine, but your Whirlpool dryer isn't moving an inch. When a dryer hums but won't spin, or makes a clicking sound without starting, the drive motor is usually the culprit—and models like the WED5000DW1, WGD5000DW1, and LER7646EQ0 share the same failure pattern.
The 279827 drive motor assembly powers the drum and blower wheel in dozens of Whirlpool, Maytag, and Kenmore dryers. When it fails, you'll see consistent symptoms across the entire product line. Here's how to diagnose whether your motor is dead or if something else is blocking it from running.
Quick Symptom Check
Your dryer's showing motor failure if you notice:
- Drum won't turn at all — Start button does nothing, no sound or movement
- Humming without spinning — Motor energizes but drum stays locked in place
- Brief spin then stops — Drum rotates 1-2 inches and quits immediately
- Burning smell from cabinet — Overheated motor windings create distinct electrical odor
- Timer advances but no heat or tumbling — Control thinks everything's running normally
- Repeated thermal cutoff trips — Motor overheats and safety switch kills power
Don't assume it's the motor until you've ruled out mechanical blockages. A seized drum bearing or jammed blower wheel creates identical symptoms but needs different repairs.
Cause #1: Burnt Motor Windings (40% of Cases)
The motor's internal copper windings burn out after years of heavy loads and overheating cycles. You'll smell it before you see it—a sharp electrical odor that lingers near the dryer even when it's off.
How to diagnose: Unplug the dryer and remove the front panel. Locate the motor mounted below the drum. Check for discoloration around the motor housing or visible burn marks on the terminal connections. Use a multimeter set to resistance mode—test between each motor terminal and ground. A healthy motor shows 3-6 ohms between run and start windings. Zero ohms or infinite resistance means the windings are shorted or open.
Why it happens: Restricted airflow from clogged vents forces the motor to work harder. Lint buildup around the blower wheel adds drag. Over time, the insulation on copper windings breaks down and shorts internally.
The fix: Replace the entire 279827 motor assembly—you can't repair burnt windings. The replacement includes the pulley already mounted, which saves assembly time. While you're in there, vacuum out every trace of lint from the motor cavity and blower housing.
Cause #2: Seized Motor Bearings (25% of Cases)
The motor shaft spins on internal bearings that wear out from constant use. When they seize, the motor hums loudly but the shaft won't rotate. Models like the WGD4815EW1 and WED4815EW1 are particularly prone to this after 8-10 years of service.
How to diagnose: With power disconnected, manually try to spin the motor pulley by hand. It should rotate freely with slight resistance. If it won't budge or feels gritty and rough, the bearings are shot. You might also hear clicking or grinding when you force rotation.
Why it happens: Lack of lubrication combined with dust contamination. The sealed bearings dry out over years of heat exposure. Once friction increases, the bearing races score and eventually lock solid.
The fix: The 279827 motor comes as a complete assembly with new bearings already installed. Don't waste time trying to source individual bearings—the labor cost exceeds the part price. After installing the new motor, verify the drive belt tension isn't excessive, which accelerates bearing wear.
Cause #3: Capacitor Failure Preventing Startup (20% of Cases)
Some motor configurations use a start capacitor to provide the initial electrical kick needed for rotation. When the capacitor dies, the motor hums continuously but never achieves starting torque.
How to diagnose: Listen carefully when you press start—a failing capacitor produces a distinct buzzing hum without any mechanical movement. Locate the cylindrical capacitor near the motor (not all models have one). Check for bulging, leaking, or burn marks on the casing. Test with a capacitance meter if available—it should read within 10% of the rated microfarad value printed on the label.
Why it happens: Capacitors deteriorate from heat cycles and voltage fluctuations. The internal dielectric breaks down, reducing stored charge below the threshold needed to start the motor. This is more common in older Kenmore models using the 279827 motor.
The fix: If your motor has a start capacitor, replace it first before condemning the motor itself. They're cheap and easy to swap. Discharge the old capacitor properly before touching terminals—stored voltage can shock you even with power off. If replacing the capacitor doesn't solve the problem, then proceed to motor replacement.
Cause #4: Thermal Overload Cutoff Stuck Open (10% of Cases)
The motor includes a built-in thermal protection switch that cuts power when temperatures exceed safe limits. If this switch fails in the open position, it blocks electricity to the motor permanently even though it's actually cool.
How to diagnose: The thermal cutoff is embedded in the motor housing—you can't see it without disassembly. Test for voltage at the motor terminals while someone presses the start button. If you have 120V present but the motor doesn't run and isn't hot to the touch, the internal thermal cutoff is likely stuck open.
Why it happens: Repeated overheating events from blocked vents or overloaded drums cause the bimetallic switch to fatigue and fail. Each thermal trip weakens the metal, eventually causing permanent failure. This is your dryer's way of telling you it's been stressed beyond design limits.
The fix: You can't replace the thermal cutoff separately—it requires a complete 279827 motor assembly. Before installing the new motor, address whatever caused the overheating. Clean the entire vent system, check for crushed ductwork, and ensure the external vent flap opens freely.
Cause #5: Worn Motor Brushes in Older Designs (5% of Cases)
Earlier motor versions used carbon brushes that contact the commutator to deliver power to the rotating shaft. When brushes wear below 1/4 inch, electrical contact becomes intermittent.
How to diagnose: The dryer starts occasionally but fails more often, especially when starting under load with heavy wet clothes. You might see sparking through the motor vents or smell ozone. Most 279827 motors are brush-type designs where you can inspect the brushes through access holes in the motor housing.
Why it happens: Normal wear from thousands of start cycles. Each time the motor starts, the brushes arc slightly against the commutator, gradually eroding the carbon material. Spring tension weakens over time, reducing contact pressure.
The fix: While you can buy replacement brushes separately, the motor's likely due for replacement anyway if brushes are worn out. The commutator is probably scored and pitted, which will eat through new brushes quickly. The complete 279827 assembly costs $88.99 and includes new brushes, fresh bearings, and unmarred commutator—better value than piecemeal repairs.
DIY Installation vs. Professional Service
Replacing the 279827 motor is straightforward if you're comfortable with basic tools and can safely work with 240V power disconnected. You'll need to remove the dryer's front or rear panel (varies by model), disconnect wire terminals, unbolt the motor mount, transfer the belt, and reassemble. Budget 1-2 hours for your first attempt.
Call a pro if:
- You're uncomfortable disconnecting 240V power at the breaker panel
- The drum won't rotate freely by hand even with the belt removed—you've got bearing or roller issues beyond just the motor
- You've replaced the motor but the dryer still won't run—there's an electrical fault in the control board or wiring harness
- The motor replacement requires complete cabinet disassembly on your specific model (some Maytag configurations are notoriously difficult)
Professional installation typically runs $150-250 for labor plus the motor part. The total repair cost stays under $350, which is reasonable compared to $600-1200 for a new dryer.
Preventing Premature Motor Failure
The 279827 motor should last 10-15 years with proper maintenance. Here's how to maximize its lifespan:
Clean the vent system twice yearly: Restricted airflow is the #1 cause of motor burnout. Pull the dryer out and vacuum behind it. Check the external vent hood for lint accumulation and stuck flaps.
Don't overload the drum: Stuffing too many clothes forces the motor to work harder during acceleration. Follow the manufacturer's capacity guidelines—clothes need space to tumble freely.
Replace the drive belt when you replace the motor: A worn belt slips, which makes the motor strain. The belt's cheap and you're already disassembled—install a fresh one while everything's accessible.
Listen for early warning signs: Squealing during startup, longer than normal heat-up times, or the drum taking several rotations to reach full speed all indicate the motor's struggling. Address problems early before complete failure.
Frequently Asked Questions
Will the 279827 motor fit my older Kenmore dryer from 2008?
Probably—this motor replaced several older part numbers including AP3094245 and PS334304. Check your model number against the compatibility list. Whirlpool used this basic motor design across Kenmore, Maytag, Roper, KitchenAid, and Amana brands for nearly 20 years. The mounting bolt pattern and shaft diameter remained consistent even as model numbers changed. If your current motor has a 5/16" shaft and four-bolt mounting, the 279827 will work.
Can I test the motor before removing it from the dryer?
You can do basic electrical testing with the motor installed. Disconnect power at the breaker, remove the front panel for access, and use a multimeter to check winding resistance and continuity. However, you can't fully test mechanical issues like bearing condition without removing the motor and manually rotating the shaft. If electrical tests pass but the motor still won't run, you'll need to pull it out for thorough inspection.
Why does my dryer run for 30 seconds then stop?
That's usually thermal overload protection cutting power because the motor's overheating almost immediately. The most common cause is a seized idler pulley creating excessive drag on the drive belt. Check that the idler pulley spins freely—if it's frozen, the motor can't maintain rotation and trips the thermal switch within seconds. Replace the idler pulley before condemning the motor. If the pulley's fine and the motor still overheats instantly, the motor windings are likely partially shorted and drawing excessive current.
Diagnosed the problem?
279827 · In Stock · Fast shipping