
How to Replace W10283356 Washer Drum Baffle on Whirlpool Front-Load Washers — Step-by-Step
Unplug the washer before starting any repair work, even simple ones
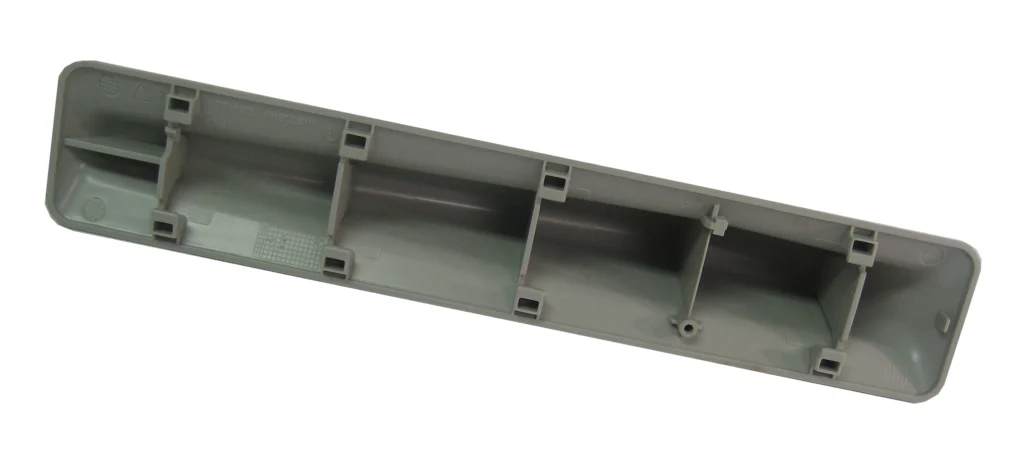
You're pulling wet clothes from your Whirlpool front-load washer when something clatters around inside the drum. You reach in and find a crescent-shaped plastic piece — one of three baffles that's supposed to be attached to the tub wall. This happened to one customer who told us, "One of the 3 baffles in our washer's tub broke and fell out." The good news? This is one of the easiest washer repairs you'll ever do, and it doesn't require removing the drum or calling a technician.
What You Need Before Starting
This repair is genuinely simple. You'll need:
- Replacement W10283356 drum baffle
- Pliers (needle-nose work best)
- Flashlight or phone light
Repair time: Less than 15 minutes
Difficulty: Very Easy
This part works across dozens of Whirlpool, Maytag, and Amana front-loaders, including models WFW9410XW00, WFW9550WL10, WFW9640XW00, and the entire WFW9400 series. The baffle clips directly into pre-drilled holes in the stainless steel drum — no tools needed for the actual attachment.
Safety First
Unplug your washer before starting. Even though you're not working with electrical components, it's smart practice. Make sure the drum is completely empty and dry — wet clothes make it harder to see the mounting holes, and you don't want anything getting in the way when you're pressing the clips into place.
Step 1: Locate the Missing Baffle Position
Open the washer door and look inside the drum. You'll see two remaining baffles (if only one broke) or empty mounting positions. The drum has three evenly-spaced positions around its circumference. Each baffle has three clip holes on its back that align with corresponding holes in the drum. Shine your light along the drum wall to find the empty mounting holes — they're about 1/4 inch in diameter and arranged in a triangular pattern.
Step 2: Align the Baffle Clips with the Drum Holes
Hold your new W10283356 baffle with the curved side facing outward (toward you). Flip it over and you'll see three sturdy plastic clips protruding from the back. Position the baffle against the drum wall so these clips line up with the three mounting holes. The baffle should sit flat against the drum surface before you push anything in. One user mentioned her husband "installed the baffle in a few minutes and now the washer works perfectly again" — it really is that straightforward.
Step 3: Press the Clips Firmly Into Place
Starting with the center clip, press firmly until you hear or feel it snap through the hole. The clip will expand slightly on the back side of the drum to lock it in place. Then press the remaining two clips. You might need to use your pliers to provide extra pressure if the clips feel tight — this is normal, especially with a new part. Push until all three clips are fully seated and the baffle sits flush against the drum with no gaps.
Step 4: Test the Baffle Security
Try to pull the baffle off the drum. It shouldn't budge. Give it a firm tug from different angles. If it pops loose, one or more clips didn't fully engage. Remove it and reposition. The clips need to pass completely through the drum holes to lock properly on the back side.
Step 5: Verify All Baffles Are Secure
While you're in there, check the other two baffles. Press on them to make sure their clips haven't loosened over time. If another baffle feels loose or shows cracks, order a replacement now rather than waiting for it to fail during a wash cycle. The original baffles crack or the clips shear off after years of use — it's a wear item, not a defect.
Testing After Installation
Close the washer door and plug the machine back in. Run a short rinse cycle with no clothes inside. Listen for any unusual rattling or banging — you should hear nothing abnormal. The baffle should stay firmly in place as the drum rotates. After the cycle completes, open the door and visually inspect all three baffles again. If everything looks good, your washer is ready for regular use.
Frequently Asked Questions
Can I run my washer with a missing baffle?
Technically yes, but don't. The baffles create turbulence that helps lift and clean your clothes. Without all three, your wash performance drops significantly and clothes can tangle more easily. Plus, the missing baffle creates an imbalance that can lead to excessive vibration and noise. Replace it as soon as possible.
Why did my baffle break in the first place?
The most common cause is age and thermal stress. These plastic baffles go through hundreds of heat cycles during hot wash and dry cycles (if you have a washer-dryer combo). Over 5-10 years, the plastic becomes brittle. Overloading the washer accelerates wear because heavy, wet loads put more stress on the clips during high-speed spin cycles.
Do I need to replace all three baffles at once?
Not required, but smart if your washer is over 8 years old. If one baffle failed, the others have experienced the same wear and will likely fail soon. Replacing all three now saves you from doing this repair twice more in the next year. The parts are inexpensive and you're already familiar with the process after doing the first one.
Check all three baffles while you're in there — if one failed, the others may be close behind
Need the part for this repair?
W10283356 · In Stock · Ships next business day