
GE Radiant Cooktop Element Not Heating — 4 Causes & How to Fix
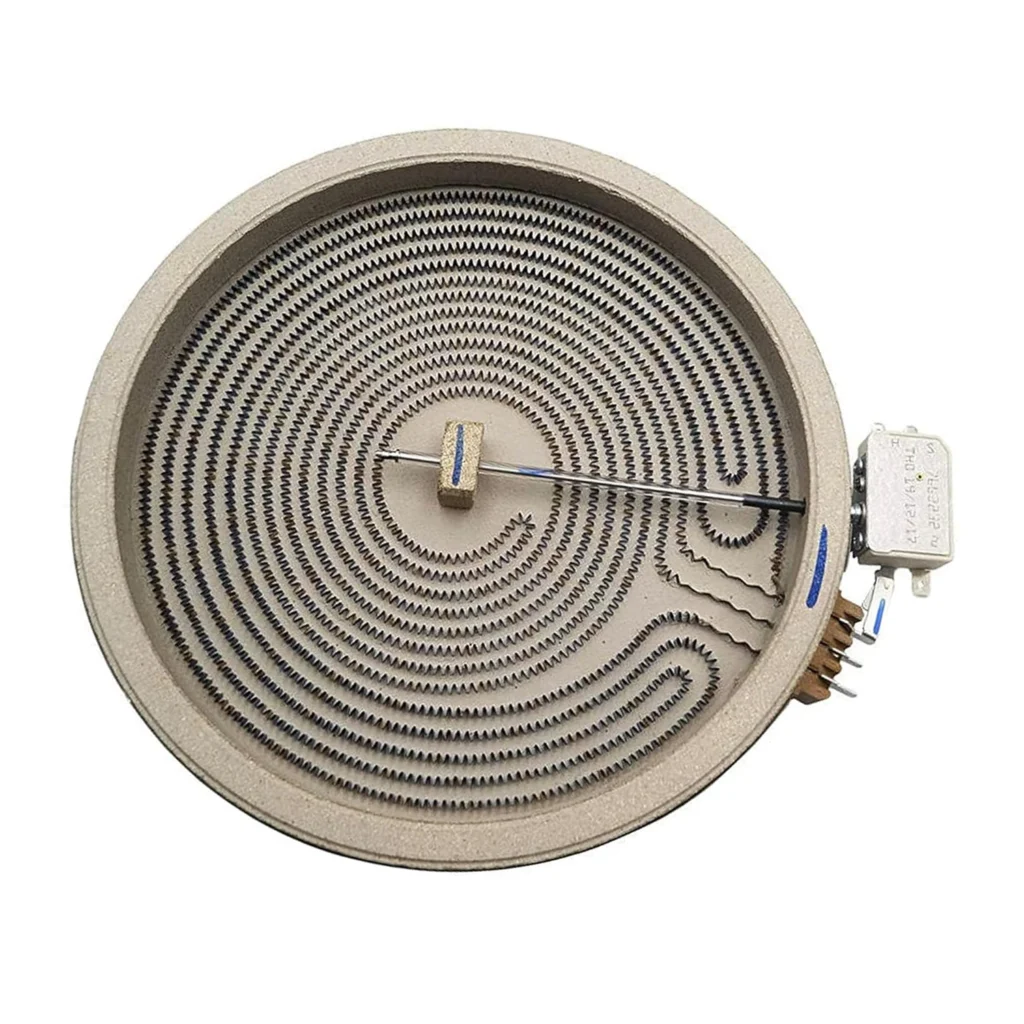
You turn the knob to high, wait for the familiar orange glow, and... nothing. Or maybe just the outer ring heats up while the center stays cold. One customer put it perfectly: "I noticed one of the spade connectors for the inner section of element was broken" — and that's exactly the kind of specific failure we're dealing with here.
This 12-inch dual radiant element (WB30T10130) is common on GE, Hotpoint, and RCA cooktops from the CS975SD1SS to the CS980ST8SS series. When it fails, it's usually one of four distinct problems, and most of them you can fix yourself in 20-30 minutes with basic tools.
Quick Symptom Check
Before you start taking things apart, confirm what you're seeing:
- Complete element failure: Nothing heats at all, no glow, no warmth
- Center coil dead: Outer ring works fine, but inner part stays cold
- Intermittent heating: Works sometimes, fails other times
- Visible damage: Cracks in the glass ceramic surface or visible breaks in the coil
- Tripping breaker: Element tries to heat but trips your circuit breaker
If your outer ring heats but the center doesn't, you've got a broken inner coil — the most common failure mode for dual elements. If nothing heats at all, keep reading.
Cause #1: Broken Spade Connector (40% of Cases)
Probability: High | Cost: $0-$15 | Difficulty: Easy
The spade connectors that power your element operate in extreme heat cycles. The metal fatigues, the heat shrink deteriorates, and eventually they crack or corrode. One repair tech described finding "deteriorated heat shrink" that couldn't handle the temperature — the connector had literally cooked itself to failure.
How to diagnose:
- Unplug the range completely (non-negotiable safety step)
- Remove the 2 screws under the range top to hinge the glass up
- Prop the glass with a 2x4 or sturdy box — it's heavier than it looks
- Inspect all spade connectors for cracks, corrosion, or burn marks
- Wiggle each connector gently; if it's loose or breaks off, you found your problem
If the connector is damaged but the element itself looks fine, you can replace just the connector. However, if you're already in there and the element is more than 5 years old, replacing the whole thing prevents a callback repair next month.
Cause #2: Failed Inner Coil (35% of Cases)
Probability: High | Cost: $156 | Difficulty: Easy
The inner coil on a dual element runs at higher temperatures and cycles more frequently than the outer ring. It burns out first. You'll know it's the coil if the outer ring works perfectly but the center stays completely cold, even after 5 minutes on high.
How to diagnose:
- Turn on the element and observe for 2-3 minutes
- If only the outer ring glows, the inner coil is definitely dead
- With power off, visually inspect under the glass for visible breaks in the coil pattern
There's no repairing a broken coil — you need the whole element assembly. The good news? As one DIYer said: "I watched a pregnant woman on Youtube do it so how could it be that hard?" It's legitimately one of the easier appliance repairs.
Cause #3: Loose or Corroded Clamp Connectors (15% of Cases)
Probability: Medium | Cost: $0 | Difficulty: Easy
The element sits in two metal clamps that both hold it in place and conduct electricity. Those small spikes on the clamps must align perfectly with the holes in the element's ceramic base. If they're misaligned or corroded, you get poor electrical contact.
How to diagnose:
- With power off and glass top propped open, remove the element
- Use a screwdriver to carefully pry up the 2 clamps
- Check the contact points for corrosion, carbon buildup, or damage
- Look at the ceramic base of your element for cracks around the spike holes
One installer noted: "I had a little trouble removing and replacing the clips that secured the element to the stove surface." They're spring-loaded and can be stubborn. Use a flathead screwdriver as a gentle lever, not a hammer.
When reinstalling, those alignment spikes matter. They dig into the ceramic material to ensure solid contact. If they're not seated, you'll get arcing and intermittent heating.
Cause #4: Failed Surface Element Switch (10% of Cases)
Probability: Low | Cost: $45-$85 | Difficulty: Moderate
If you've confirmed the element itself is good and all connections are solid, the infinite switch (the dial control) might be faulty. This is less common but happens, especially on ranges that have seen 10+ years of daily use.
How to diagnose:
- Swap the suspect element with another working burner of the same size
- If the element works in a different position, your switch is bad
- Use a multimeter to test for continuity through the switch at different settings
- You should see varying resistance as you turn the dial; if it's open or shorted, replace it
Replacing the switch requires removing the control panel, which is more involved than swapping the element. If you're not comfortable with that, this is a reasonable time to call a pro.
The Repair Process (Step-by-Step)
Assuming you need to replace the element itself, here's the full process:
- Safety first: Unplug the range or flip the breaker. Do not skip this.
- Access the element: Remove the 2 screws under the range top. The glass will hinge up from the front.
- Prop it safely: Use a 2x4, a sturdy box, or a proper prop rod. This glass top weighs 20-30 pounds.
- Disconnect power: Pull off all spade connectors. Take a photo first so you remember which wire goes where.
- Release clamps: Use a screwdriver to carefully pry up the 2 spring clamps holding the element.
- Remove old element: Lift it straight up and out.
- Install new element: Align those small spikes on the clamp connectors with the holes in the ceramic base. Press down firmly.
- Secure clamps: Push them back into locked position.
- Reconnect wires: Match your photo. If the old heat shrink is crispy and crumbling, replace it with high-temp heat shrink rated for at least 200°C.
- Test before closing: Plug in and turn on the element. Confirm both rings heat evenly.
- Close up: Lower the glass top, replace the screws, and you're done.
Total time: 15-30 minutes if you work methodically. One homeowner ordered the part, watched a video, and had it done in 20 minutes flat.
When to Call a Pro
This is a legitimate DIY repair for most people. You don't need specialized tools, and there's minimal risk if you follow basic electrical safety. That said, call a professional if:
- You're uncomfortable working with your hands under a propped-up glass cooktop
- The element failure coincided with a power surge or breaker trip (could indicate deeper electrical issues)
- You find multiple burnt or melted connections (suggests an overvoltage problem)
- The cooktop is still under warranty (DIY repair might void it)
A service call typically runs $150-$200, and that includes the part. If your time is worth more than that or you just don't want to deal with it, there's no shame in outsourcing.
Preventing Future Failures
Radiant elements don't last forever — figure 5-10 years depending on how hard you use them. But you can extend their life:
- Use flat-bottomed cookware: Warped pans create hot spots that stress the element
- Don't slide heavy pots: Lift them to avoid scratching the glass or stressing the element underneath
- Clean spills promptly: Burnt-on food can trap heat and cause premature coil failure
- Replace worn connectors: If your heat shrink looks crispy during a repair, replace it — don't wait for it to fail completely
Frequently Asked Questions
Can I replace just the inner coil on a dual element?
No. The coils are embedded in a sealed ceramic assembly. If the inner coil breaks, you need the entire element assembly (WB30T10130 for these GE models). There's no economical way to repair just one coil.
Why does my element work sometimes but not others?
Intermittent heating usually means a loose or corroded connection. The element makes contact when cold but expands slightly when hot, breaking the connection. Check your spade connectors and clamp alignment — that's where intermittent problems hide.
How do I know if I need high-temp heat shrink for the connectors?
Standard heat shrink fails at cooktop temperatures. Use heat shrink rated for at least 200°C (392°F), preferably higher. One repair found the original heat shrink had deteriorated because it wasn't rated high enough. Don't repeat that mistake.
Diagnosed the problem?
WB30T10130 · In Stock · Fast shipping