
How to Replace W10328463 Gas Valve Coil Kit on Whirlpool Dryer — Step-by-Step
Shut off gas supply and unplug dryer before starting. Wait 5 minutes after closing gas valve before disconnecting lines. Test all connections for leaks with soapy water before running the dryer.
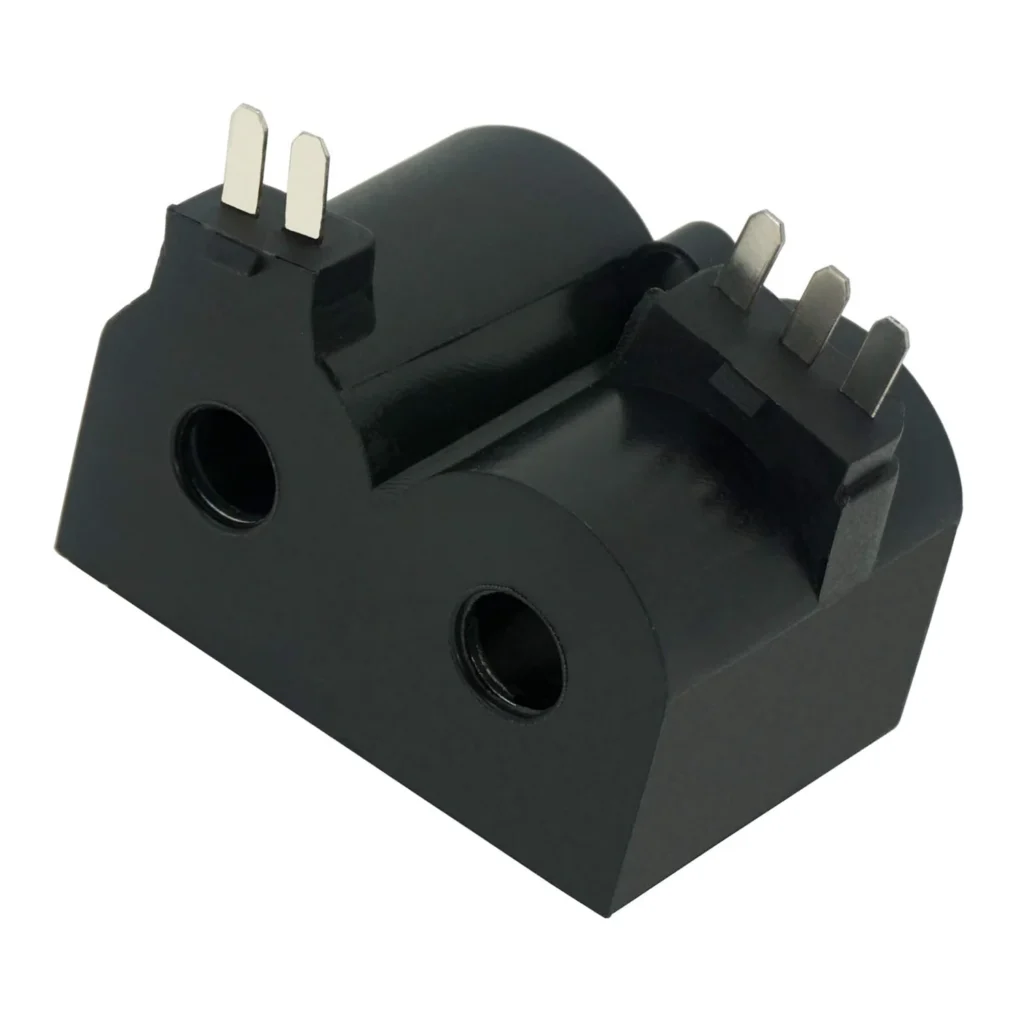
Your dryer tumbles fine, but there's no heat. You hear the igniter click a few times, maybe see a brief flash of flame, then nothing. That's the classic sign of failed gas valve coils — and it's exactly what happened to one homeowner who told us their "gas dryer stopped heating" until they replaced this part. The W10328463 gas valve coil kit controls the electromagnetic valves that release gas to your burner. When these coils wear out, you'll get either no flame at all or one that lights for a few seconds then shuts right off.
What You Need Before Starting
This repair takes 15-30 minutes and rates as easy difficulty. One customer's "super smart husband used multi meter to check out all the parts" before ordering, which is smart — you can test the coils with a multimeter (they should read around 1,000 ohms). But if you're getting the symptoms above, the coils are usually the culprit.
- Nut drivers (1/4" and 5/16")
- Flathead and Phillips screwdrivers
- Adjustable wrench
- Socket set
- Wrench set
- Pliers
- Work gloves
- Flashlight or headlamp
Compatible with: Whirlpool models WGD4815EW2, WGD5000DW, WGD94HEAW0, WGD49STBW2, WGD4975EW0, WGD8620HW1, WGD87HEDW0, 7MWGD9270XR1, and Maytag models MGDC465HW, MGDC215EW, plus Kenmore and Amana gas dryers. This kit replaces WPW10328463, AP6019658, W10273784, W10295524, and W10311021.
Safety First
Warning: Unplug your dryer and shut off the gas supply valve before starting. The valve is typically located on the gas line behind or beside the dryer — turn it perpendicular to the pipe to close it. Wait 5 minutes after shutting off gas before disconnecting any lines. Never use an open flame to check for gas leaks. If you smell gas at any point, stop immediately, evacuate the area, and call your gas company.
Step 1: Access the Gas Valve Assembly
Unplug the dryer and turn off the gas supply. Pull the dryer away from the wall so you can work comfortably. Remove the lower front access panel — on most Whirlpool and Maytag models, this involves removing 2-4 screws along the bottom edge, then lifting the panel up and out. You'll see the gas valve assembly mounted near the burner tube on the lower right side. It's a rectangular metal box with two coils stacked on top and gas lines connected to it.
Step 2: Disconnect the Wire Harnesses
Take a photo of the wire connections before you touch anything — you'll thank yourself later. The coils have push-on wire terminals, usually two wires per coil (four total). Gently pull each connector straight off. They might be tight, so wiggle them side to side while pulling. Don't yank on the wires themselves, grip the plastic connector.
Step 3: Remove the Old Coils
The coils are held to the gas valve body by a mounting bracket with one or two screws. Use your nut driver to remove these screws. The coils should lift straight off once the bracket is removed. Notice how they're positioned — one coil sits directly on top of the other, and they fit over metal plungers on the valve body. Clean any dust or lint from the valve assembly while you're in there.
Step 4: Install the New Coil Kit
Position the new coils exactly like the old ones — the bottom coil goes on first, followed by the top coil. Make sure they're seated flush against the valve body and the plungers extend through the center holes of each coil. Replace the mounting bracket and tighten the screws snugly, but don't overtighten (you're threading into metal, so be gentle). Reconnect the wire terminals to match your photo — terminals are usually labeled or color-coded, but double-check your picture to be sure.
Step 5: Test for Leaks and Reassemble
Replace the lower access panel. Turn the gas supply back on slowly. Mix a small amount of dish soap with water in a spray bottle and spray all the gas connections at the valve. Look for bubbles forming — if you see any, you've got a leak. Tighten that connection and test again. Once you're leak-free, plug the dryer back in and run a test cycle. You should hear the igniter glow, then hear the gas valve click open and the burner light. Let it run for a full minute to confirm stable operation.
Testing After Installation
Start a timed dry cycle on high heat with a few damp towels inside. Within 2-3 minutes, you should feel hot air coming from the exhaust vent outside. Open the door mid-cycle — the interior drum should be noticeably warm. One customer reported their dryer was "working better than I EVER remember" after this repair, which makes sense if the old coils were gradually weakening over time. The flame should stay lit continuously during the heating phase, not flicker on and off.
Frequently Asked Questions
How do I know if the gas valve coils are bad or if it's the igniter?
If your igniter glows bright orange but the gas never lights, or if the flame lights briefly then shuts off within seconds, that's coil failure. If the igniter doesn't glow at all, test the igniter itself. If it glows weak or cracks, replace the igniter instead. You can test the coils with a multimeter set to ohms — they should read around 1,000 ohms each. Infinite resistance means the coil is open and needs replacement.
Can I replace just one coil instead of the whole kit?
Technically yes, but it's not recommended. The coils typically wear at similar rates, so if one failed, the other is close behind. Plus, you're already in there doing the work — replacing both now saves you from doing this repair again in six months. The W10328463 kit includes both coils for a reason.
Why does my dryer work sometimes but not others after replacing the coils?
Check your wire connections — a loose terminal will cause intermittent operation. Also verify you installed the coils in the correct order (bottom and top positions matter on some valves). Finally, check the flame sensor. If it's coated in residue, it might be shutting off the gas flow prematurely even with new coils. Clean the sensor with fine steel wool and test again.
Take a clear photo of the wire connections before removing anything — the terminals can look identical and mixing them up will prevent proper operation.
Need the part for this repair?
W10328463 · In Stock · Ships next business day