
How to Extend Your Whirlpool Dishwasher Wash Arm Retainer Nut Life — Maintenance Guide
Never use tools to tighten this plastic nut — hand tighten only to avoid cracking. Ensure dishwasher is off and cool before removing spray arm.
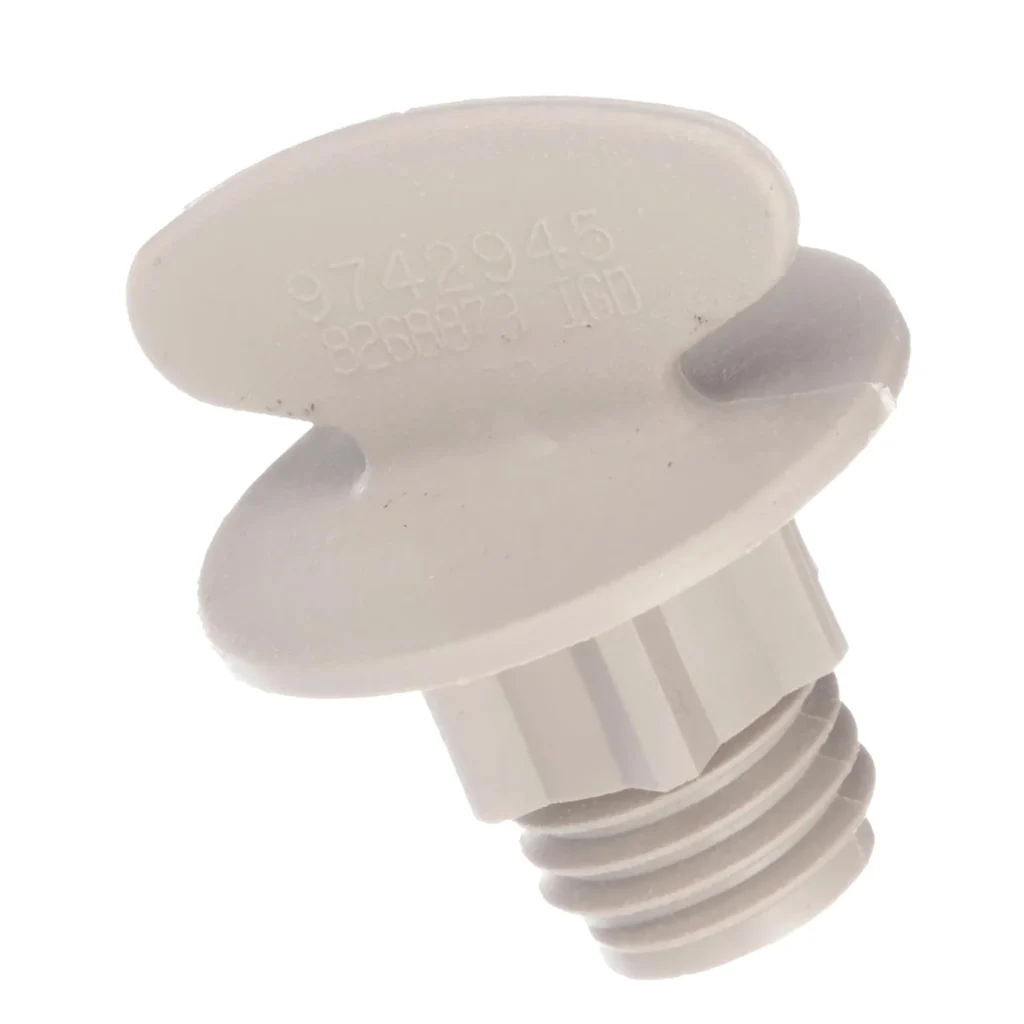
Here's something most people don't think about: that small plastic nut holding your dishwasher's spray arm in place does more work per cycle than almost any other component. It spins, locks, and holds against water pressure dozens of times each wash — yet most homeowners never look at it until their dishes start coming out dirty.
The wash arm retainer nut (part 9742945) threads onto the bottom of your dishwasher and secures the lower spray arm. When it loosens, cracks, or wears down, your spray arm wobbles or stops spinning completely. Clean dishes become a gamble.
How Long Should It Last?
Under normal conditions, this retainer nut should last 8–12 years. That's the entire lifespan of many dishwashers. But here's the catch — hard water, overtightening during installation, and food debris accelerate wear dramatically.
I've seen these nuts fail in as little as three years in homes with extremely hard water. The minerals eat away at the plastic threads. On the flip side, I've pulled perfectly functional ones from 15-year-old Whirlpool DU925SCGB units that were maintained properly.
What affects lifespan:
- Water hardness — Calcium and magnesium deposits corrode plastic threads
- Installation torque — Hand-tight only; overtightening cracks the nut immediately
- Detergent type — Gel detergents leave less residue than powder
- Load frequency — Running 2–3 cycles daily vs. 4–5 weekly makes a difference
- Filter cleaning habits — Food particles caught under the nut accelerate wear
Signs It's Wearing Out
You won't get a warning light for this part. The symptoms show up in your wash quality first, mechanical failure second.
Dishes in the Bottom Rack Don't Get Clean
If plates and bowls on the lower rack have dried food while everything on top is spotless, your spray arm isn't spinning properly. A loose retainer nut lets the arm wobble instead of rotate. Water sprays in random directions rather than sweeping the entire rack.
Pull out the bottom rack and spin the lower wash arm by hand. It should rotate smoothly with slight resistance. If it's floppy or catches, check the nut.
Rattling or Clicking During the Wash Cycle
A nut that's backed itself loose will let the spray arm bounce around. You'll hear a rhythmic clicking or rattling, especially during the main wash cycle when water pressure is highest. That's metal hitting plastic — and every impact damages the threads further.
This noise is different from the normal swishing sound of water. It's irregular and sounds like something's broken loose. Because something has.
Visible Thread Damage or Cracks
Remove the lower spray arm and inspect the retainer nut directly. Look for:
- White or brown mineral buildup in the threads
- Vertical cracks in the plastic body
- Stripped or flattened thread peaks
- The nut spins freely without tightening
Any of these mean replacement, not repair. Plastic threads don't regenerate.
Maintenance That Actually Extends Life
Most people install this part and forget it exists. That's a mistake. Monthly attention adds years.
After Each Wash (5 seconds)
Open the door once the cycle completes and heat has dissipated. Spin the lower wash arm by hand. It should rotate at least two full turns smoothly. If it doesn't, check for food debris before the next load.
Monthly Deep Check (3 minutes)
Pull out the bottom rack completely. Lift off the lower spray arm — it just lifts straight up on most Whirlpool models including the DU931SCGB and DU1000CGB series. Inspect the retainer nut threads for buildup.
Wipe the nut with a damp cloth. If you see white mineral deposits, soak a cloth in white vinegar and wrap it around the nut for 10 minutes. The acid dissolves calcium without damaging plastic. Rinse and reassemble.
Don't use abrasive scrubbers or steel wool. You'll scratch the plastic and create grooves where minerals lodge even faster.
Every Six Months (10 minutes)
Remove the spray arm and retainer nut completely. Inspect the mounting post in the dishwasher floor — that's what the nut threads onto. Clean any debris or mineral buildup from this post.
Check the nut's internal threads with a flashlight. If they're clogged with hard water deposits, soak the entire nut in a 50/50 vinegar and water solution for 30 minutes. Scrub gently with an old toothbrush.
When reinstalling, thread the nut on by hand only. Tighten until it stops, then add a quarter turn. That's it. No pliers, no wrenches. The nut's designed to seal with hand pressure.
When to Replace vs Maintain
Be honest about what you're seeing. Maintenance extends life, but it can't reverse physical damage.
Keep maintaining if:
- Threads are intact with no visible cracks
- The nut tightens securely and holds
- Mineral buildup responds to vinegar cleaning
- The spray arm spins freely when the nut's properly tightened
Replace immediately if:
- Vertical cracks appear anywhere on the nut body
- Threads are stripped or won't hold tension
- The nut spins freely without ever tightening
- You've overtightened it and heard cracking
At $14.99, this isn't a part worth babying past its usable life. A failed nut mid-cycle can let the spray arm jam against the heating element, causing hundreds in damage. Replace when you see wear.
The Hard Water Problem
If you're replacing this nut every 3–4 years, your water's the issue, not the part. Consider installing a whole-house water softener or at least a dishwasher-specific inline filter. The calcium that attacks this nut also destroys your heating element, pump seals, and valve mechanisms.
A $200 inline filter beats replacing multiple $15–$80 parts every few years. Do the math on your specific situation.
Frequently Asked Questions
Can I Use Any Plastic Nut or Does It Have to Be OEM?
The threads, height, and water resistance specs are critical here. Generic hardware store nuts won't have the correct NSF-certified plastic formulation for sustained hot water and detergent exposure. This isn't a place to improvise. Use the correct replacement part (9742945 or equivalent WP9742945) that's designed for these Whirlpool, KitchenAid, Kenmore, and Maytag dishwashers.
How Tight Should I Make It — Should I Use a Wrench?
Never use a wrench or pliers on this plastic nut. Thread it on by hand until it stops, then add a quarter turn for security. That's the correct torque. Overtightening cracks the plastic immediately and you won't always see the damage until the nut fails weeks later under pressure. Your hand is the proper tool here.
My Spray Arm Still Won't Spin Even With a New Nut — What's Wrong?
The retainer nut only holds the arm in place. If a new nut doesn't solve spinning issues, check three things: First, is food debris caught in the spray arm holes? Second, is the bearing surface on the pump housing worn or damaged? Third, is the spray arm itself warped from heat exposure? Pull the arm off and inspect the center hub where it sits on the mounting post. If that's worn smooth or melted, you need a new spray arm, not just a new nut.
Element showing wear?
9742945 · Replace before it fully fails