
GE Dishwasher Won't Fill or Drain Properly — 4 Check Valve Causes & Fixes
You start your GE dishwasher, walk away, and come back to find dishes still dirty with a puddle of water sitting in the bottom. Or maybe it's the opposite — the machine hums but never fills with water at all. Both scenarios often point to the same culprit: a failed check valve piston assembly.
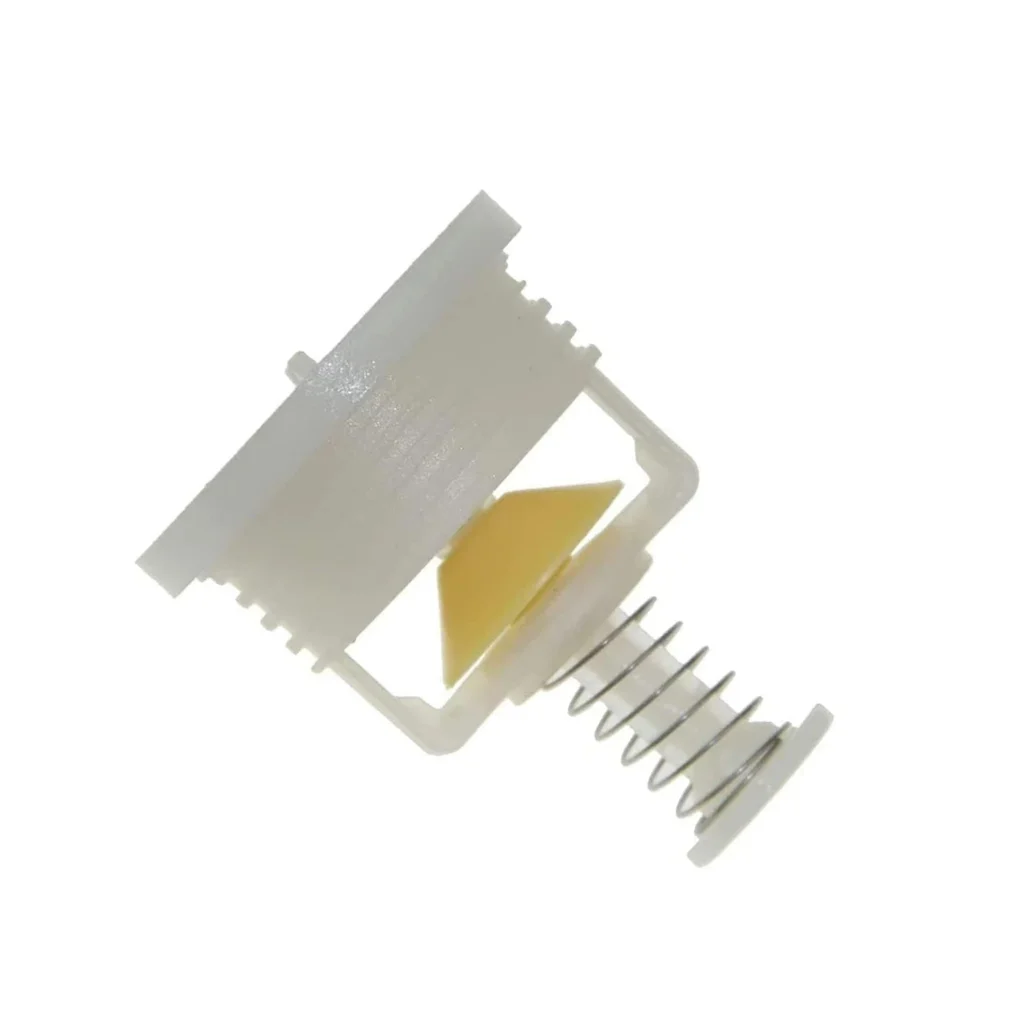
The check valve (part WD24X10018) sits in your dishwasher's pump housing and controls water flow direction. When it sticks, cracks, or gets clogged with food debris, your dishwasher can't regulate whether water flows in during the fill cycle or out during the drain cycle. It's a $15 part that causes hundreds of dollars in service calls.
This guide covers GSD, GSC, and GHD series GE dishwashers, plus compatible Hotpoint and Kenmore models using the WD24X10018 valve assembly.
Quick Symptom Check
Your dishwasher likely has a check valve problem if you're experiencing:
- Water remains in tub after cycle completes — usually 1-3 inches of standing water
- Dishwasher won't fill with water — you hear the motor but no water enters
- Fills but won't drain — cycle runs but water stays put
- Intermittent filling — sometimes it works, sometimes it doesn't
- Gurgling sounds during drain cycle — indicates partial blockage or stuck valve
- Clean light flashing or error codes — particularly related to fill/drain failures
The check valve assembly includes the piston, spring, nut, and seal. When any component fails, the entire valve loses its ability to create proper directional flow.
Cause #1: Stuck or Corroded Check Valve Piston
Likelihood: 65%
The piston inside the check valve moves up and down to allow water flow in one direction while blocking reverse flow. Hard water deposits, detergent buildup, and mineral corrosion cause the piston to stick in one position. When it sticks open, water drains during the fill cycle. When it sticks closed, water can't enter or exit properly.
How to diagnose:
- Disconnect power and water supply to the dishwasher
- Remove the lower spray arm and filter assembly
- Locate the pump housing at the bottom center of the tub
- Remove the check valve assembly (counterclockwise turn with pliers on the nut)
- Inspect the piston — it should move freely when you push it with your finger
- Check for white/green mineral buildup, rust, or cracks in the rubber seal
If the piston doesn't spring back immediately or feels gritty when moving, it's failed. You might see calcium deposits around the seal or corrosion on the metal components. Models like the GSD5860G00SS and GSD4800G00WW are particularly prone to this in areas with hard water.
Fix: Replace the entire WD24X10018 check valve assembly. Clean the pump housing seat thoroughly before installing the new valve — any debris left behind will cause premature failure of the replacement part.
Cause #2: Cracked or Deteriorated Valve Seal
Likelihood: 20%
The rubber seal on the check valve piston creates the watertight barrier that directs flow. Over time, exposure to hot water, detergent chemicals, and temperature cycling causes the rubber to harden, crack, or tear. Once the seal fails, water bypasses the valve in both directions.
How to diagnose:
Remove the check valve assembly as described above. Examine the rubber seal closely under good lighting. Look for:
- Visible cracks or splits in the rubber
- Hard, brittle texture (healthy rubber should be slightly pliable)
- Chunks missing from the seal edge
- Permanent compression marks that prevent proper sealing
Run your fingernail along the seal — if the rubber flakes off or feels like hard plastic instead of rubber, it's deteriorated beyond function.
Fix: The seal isn't sold separately, so you'll need the complete WD24X10018 assembly. This is actually good — replacing just the seal often leads to repeat failures because the piston and spring are usually degraded too.
Cause #3: Debris Blockage in Valve Assembly
Likelihood: 10%
Food particles, broken glass, and hard water chunks can lodge in the check valve housing or around the piston. This prevents the piston from moving freely or creates a gap that breaks the seal. It's less common than mechanical failure but happens frequently in households that don't pre-rinse dishes.
How to diagnose:
After removing the valve assembly, shine a flashlight into the pump housing cavity where the valve sits. Look for:
- Food debris around the valve seat
- Small bone fragments or toothpicks
- Broken pieces of plastic or glass
- Chunks of hardened detergent
Also check inside the valve assembly itself — sometimes debris gets trapped between the piston and housing.
Fix: If the debris is the only issue and the valve components look good, you can try cleaning everything thoroughly with white vinegar and a small brush. Reinstall and test. However, if the dishwasher is more than 5 years old, replace the valve anyway — it's likely near failure and you've already got everything apart.
Cause #4: Worn Internal Spring
Likelihood: 5%
The spring inside the check valve provides the tension that returns the piston to closed position. After thousands of cycles, the spring can weaken or break. You'll usually see intermittent problems — the valve works when water pressure is high but fails when pressure drops.
How to diagnose:
Remove the check valve assembly and separate the components. Inspect the spring for:
- Broken coils or complete fracture
- Stretched appearance (compare to new part if possible)
- Corrosion that has eaten through the spring wire
Test the spring tension by compressing it — it should push back firmly. A weak spring barely resists compression.
Fix: Replace with new WD24X10018 assembly. The spring failure is usually a sign that the entire valve has reached end of life.
Step-by-Step Replacement Guide
Replacing the check valve takes about 20 minutes with basic tools:
- Power and water off — flip breaker and close water valve under sink
- Empty the tub — use a wet vac or towels to remove standing water
- Remove lower spray arm — typically twists off counterclockwise
- Take out filter assembly — lift straight up on most GE models
- Locate check valve — you'll see the hex nut in the center of the pump housing
- Remove old valve — use pliers or 1/2" socket to turn counterclockwise, then pull straight up
- Clean the housing — scrub away any buildup from the valve seat with a plastic scrub pad
- Install WD24X10018 — insert new valve, press down firmly, and turn clockwise until snug (don't overtighten or you'll crack the plastic housing)
- Reassemble — filter, spray arm, then run a test cycle
The valve should seat flush with the pump housing. If it sits high or crooked, remove it and check for debris preventing proper installation.
When to Call a Pro
This is a straightforward DIY repair if you're comfortable removing the lower dishwasher components. However, call a technician if:
- You've replaced the check valve but still have fill/drain issues — the problem may be the drain pump motor, circulation pump, or control board
- Water is leaking from places other than the valve area — could indicate cracked pump housing
- The dishwasher is still under warranty — manufacturer coverage often requires authorized service
- You find cracks or damage in the pump housing itself — that's a major repair requiring pump replacement
For models like the GSD5330D00WW and GSD4930Z02WW, sometimes the issue is a failing drain pump that's creating backpressure on the check valve. If you replace the valve and it fails again within a few months, have the pump tested.
Preventing Future Check Valve Failure
Extend the life of your new WD24X10018 valve:
- Scrape dishes before loading — you don't need to pre-rinse, but remove large food chunks
- Run hot water at sink first — ensures the dishwasher starts with hot water, which dissolves detergent better
- Use rinse aid — helps prevent mineral buildup throughout the system
- Monthly cleaning cycle — run empty dishwasher with 2 cups white vinegar in bottom to dissolve deposits
- Check and clean filter weekly — prevents debris from reaching the check valve
In hard water areas, consider installing a water softener. The mineral content in hard water is the #1 cause of premature check valve failure in GE dishwashers.
Frequently Asked Questions
Can I clean and reuse the old check valve instead of replacing it?
You can try, but it rarely works long-term. The valve components degrade at the microscopic level — even if you remove visible buildup, the seal won't create proper pressure anymore. For a $15.99 part that takes 20 minutes to replace, it's not worth the risk of repeated failures and potential water damage from overflow situations.
Will a failed check valve cause my dishwasher to overflow?
Not typically. A stuck-open check valve causes water to drain out during the fill cycle, so the dishwasher never gets enough water to overflow. However, if the valve sticks closed AND there's a separate drain pump failure, water could potentially overflow. The float switch should prevent this, but it's another reason to address check valve problems promptly.
Are aftermarket check valves as good as OEM GE parts?
The WD24X10018 is the OEM part number, and most sellers (including Heima) provide the genuine GE assembly. It replaces older part numbers AP2617344, PS260690, and WD24X220. Avoid ultra-cheap alternatives from unknown brands — the materials quality matters for something that handles hot water and detergent chemicals thousands of times. Stick with parts that specifically list the WD24X10018 number and work across GSD, GSC, and GHD model series.
Diagnosed the problem?
WD24X10018 · In Stock · Fast shipping