
Whirlpool Dryer Making Rattling Noise or No Airflow — 4 Causes & How to Fix
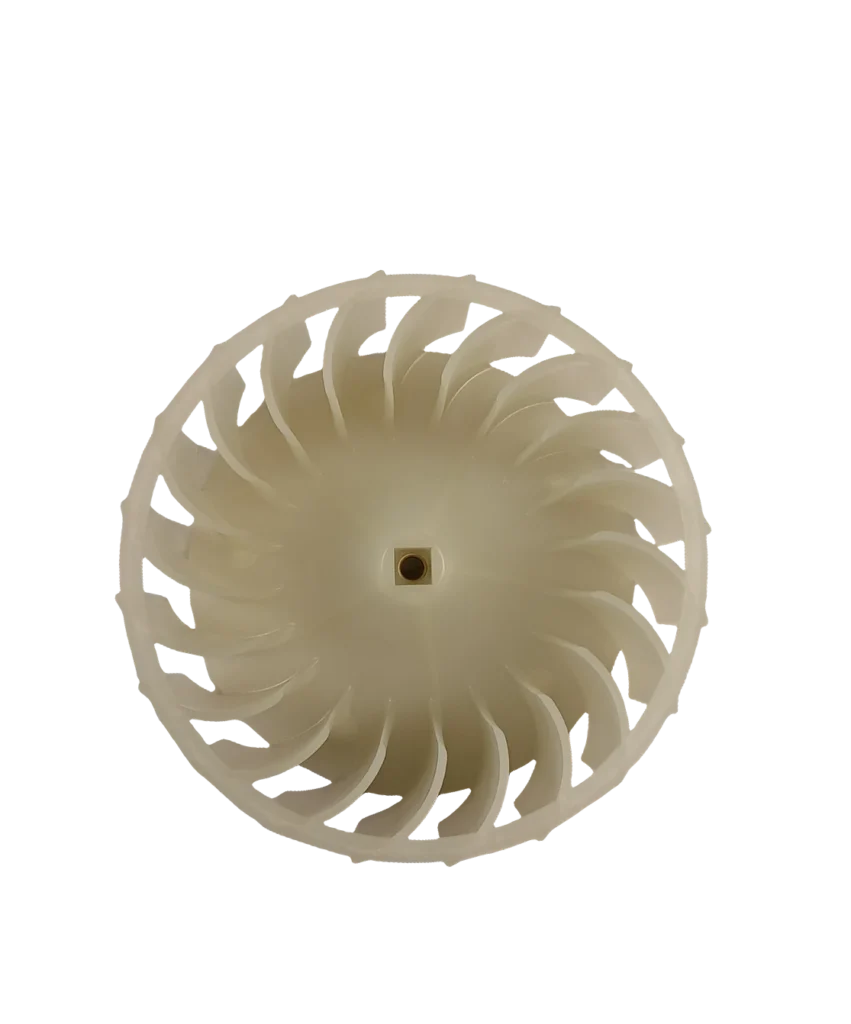
You're standing in your laundry room listening to what sounds like a playing card stuck in bicycle spokes — except it's coming from your Whirlpool dryer. Or maybe you've noticed your clothes are still damp after a full cycle and there's zero airflow coming from the vent. Either way, you've likely got a blower wheel problem.
Here's what happened to one dryer owner: "There is an odd sound in my dryer. It kind of sounds like something stuck in a bicycle spoke." That distinctive rattling? It's usually the blower wheel either separating from its mounting nut, catching lint buildup, or wobbling because it's lost its secure connection to the motor shaft.
The blower wheel (part W10349492) is what pulls air through your dryer drum and pushes it out the vent. When it fails, you'll know immediately — your dryer either sounds like it's about to launch into space or stops moving air entirely.
Quick Symptom Check
- Odd rattling or clicking noise that starts 3-5 minutes into the cycle
- No air coming from the vent even though the drum spins normally
- Overheating and tripping the circuit breaker due to restricted airflow
- Clothes taking 2-3 cycles to dry when they used to dry in one
- Noise disappears when blower housing is removed but returns when reassembled
Cause #1: Blower Wheel Separated from Motor Shaft (Most Common — 65% of Cases)
This is the big one. The blower wheel attaches to the motor shaft with a threaded nut, and over time that connection can loosen or the wheel itself can crack where it mounts.
How to diagnose: Unplug the dryer and access the blower housing (usually behind the front or lower panel on models like 7MWED5600BW0 or 7MMGDX700BG0). Try to wiggle the wheel back and forth on the shaft. If there's play, or if the wheel spins freely without turning the shaft, you've found your problem.
One repair tech noted: "Since the wheel had separated from the nut, it wasn't quite as easy as holding the shaft and loosening the wheel. I had to remove (destroy) the wheel first. Then I was left with the nut on the shaft."
Critical detail: The blower wheel uses REVERSE threading. As one installer warns: "The wheel is REVERSE threaded. Just follow the arrows on the wheel and you'll be fine." Turn it clockwise to loosen, counterclockwise to tighten — opposite of what you'd expect.
Fix difficulty: Easy
Repair time: 30-60 minutes
Part cost: $71.99 for W10349492
Cause #2: Lint Buildup Jamming the Wheel (20% of Cases)
Lint doesn't just collect in your filter — it sneaks past and accumulates around the blower wheel and housing. Eventually, enough builds up to either jam the wheel entirely or cause it to rub against the housing.
How to diagnose: Remove the blower housing and inspect the wheel. You're looking for felt-like lint accumulation between the blades or packed around the hub. If you see lint, but the wheel still spins freely when you rotate it by hand, cleaning might be all you need.
As one tech advised: "Check the blower wheel for proper connection to the motor and that there is no debris caught in it, clear as necessary."
The tricky part: Sometimes lint buildup is a symptom of a cracked or loose wheel that's been vibrating abnormally. Clean thoroughly, but if the noise returns within a few loads, you'll need the wheel replaced regardless.
Fix difficulty: Easy
Repair time: 20-30 minutes
Cost: $0 (just cleaning)
Cause #3: Blower Housing Misalignment (10% of Cases)
Here's a weird one: "My blower wheel sounds fine ONLY when the housing is not attached. As soon as I put the housing back on, it makes an awful sound after 3-5 minutes."
How to diagnose: This happens when the blower housing isn't seated correctly or when mounting screws are overtightened, warping the housing slightly. The wheel rubs against the housing wall as it heats up and expands.
Run the dryer with the housing removed (just for 30 seconds to test — never operate long-term without it). If silent, you've got an alignment issue. Check that all mounting points are secure but not torqued down excessively. Look for stress cracks in the plastic housing near screw holes.
Fix difficulty: Easy
Repair time: 15 minutes
Cost: $0-$40 (housing replacement if cracked)
Cause #4: Motor Shaft Stripped or Damaged (5% of Cases)
Less common but catastrophic: the motor shaft threads themselves are stripped, so even a new wheel won't stay tight.
How to diagnose: If you've replaced the wheel and it loosens again within a few loads, inspect the motor shaft threads. They should be clean and well-defined. Stripped threads look rounded or have visible gouges.
The bad news: This usually means motor replacement, not just the wheel. The motor itself typically costs $150-$250 plus labor.
When this happens: Often after someone over-tightened the blower wheel (forgetting it's reverse-threaded) or ran the dryer with a separated wheel banging around.
DIY Replacement Walkthrough
Tools needed:
- Adjustable wrench or 7/16" socket
- Phillips and flathead screwdrivers
- Work gloves (blower housing edges are sharp)
Steps:
- Unplug the dryer. Not negotiable.
- Access the blower. On most Whirlpool models (like 3LCED9100WQ0 or 7MWGD9150XW3), remove the lower front panel or tip the dryer back to access from underneath.
- Remove the blower housing. Usually 3-4 screws or clips. Watch for the felt seal — don't tear it.
- Remove the old wheel. Remember: REVERSE threaded. Turn clockwise to loosen. If it's seized, you may need to brace the motor shaft with a wrench on the opposite end.
- Clean the motor shaft. Remove any lint or debris. Check threads for damage.
- Install the new wheel. Thread it on counterclockwise (opposite of normal). Tighten firmly but don't gorilla-grip it — you'll strip the plastic threads.
- Reassemble housing. Make sure it seats flush all around. Don't overtighten screws.
- Test run. Listen for abnormal sounds in the first 5 minutes of operation.
As one DIYer put it: "It was a relatively easy fix — if you know how to take the dryer apart. If you don't, there are plenty of YouTube videos explaining how."
When to Call a Pro
Call a technician if:
- You've replaced the blower wheel but it loosens again within a week (motor shaft likely stripped)
- The motor itself won't spin even with the wheel removed
- You're getting error codes along with the airflow issue
- Your dryer is still under warranty (DIY repairs can void coverage)
Professional diagnosis typically costs $85-$125. If it's just the wheel, most techs charge $150-$200 total including the part.
Cost Breakdown
- DIY wheel replacement: $71.99 (part only)
- Professional replacement: $150-$200
- Motor replacement (if shaft damaged): $300-$450
Preventing Future Failures
Clean your lint filter religiously — every single load. Once a year, vacuum out the blower housing area. Check your external vent for blockages quarterly. These simple habits prevent 80% of blower wheel issues.
And if you ever remove that wheel for any reason, remember: reverse threaded. Write it on the housing with a marker if you need to. Half of DIY blower wheel failures come from people cranking it the wrong direction and stripping everything.
Frequently Asked Questions
Can a bad blower wheel cause my dryer to overheat and trip the breaker?
Absolutely. When the blower wheel fails, airflow stops even though the heating element keeps running. The high-limit thermostat is supposed to shut things down, but if it cycles too rapidly, it can trip your circuit breaker. However, verify the wheel is actually the problem first — check that it's securely attached to the motor shaft and not just clogged with lint. A loose or stripped wheel won't move air even if it looks like it's spinning.
Why does my dryer only make noise when the blower housing is installed?
This indicates the blower wheel is rubbing against the housing, which usually means either the housing is slightly misaligned or the wheel itself is wobbling due to a loose connection. The wheel might seem fine when tested separately because there's no resistance. When you reinstall the housing, thermal expansion after 3-5 minutes of operation causes the slight misalignment to become contact. Check that all housing mounting screws are snug but not overtightened, and verify the wheel has zero play on the motor shaft.
How can I tell if the problem is the blower wheel or something else?
Simple test: put your hand near the external dryer vent while it's running. No airflow at all usually means blower wheel failure or severe duct blockage. Weak airflow typically means lint buildup. Loud rattling or clicking that starts a few minutes into the cycle points to a loose or damaged wheel. If the drum doesn't turn at all, that's a belt issue, not the blower. And if you're getting heat but no tumbling, you're looking at a motor or belt problem entirely separate from the blower system.
Diagnosed the problem?
W10349492 · In Stock · Fast shipping