
Whirlpool Dishwasher Won't Start or Shuts Off Mid-Cycle — 5 Causes & How to Fix
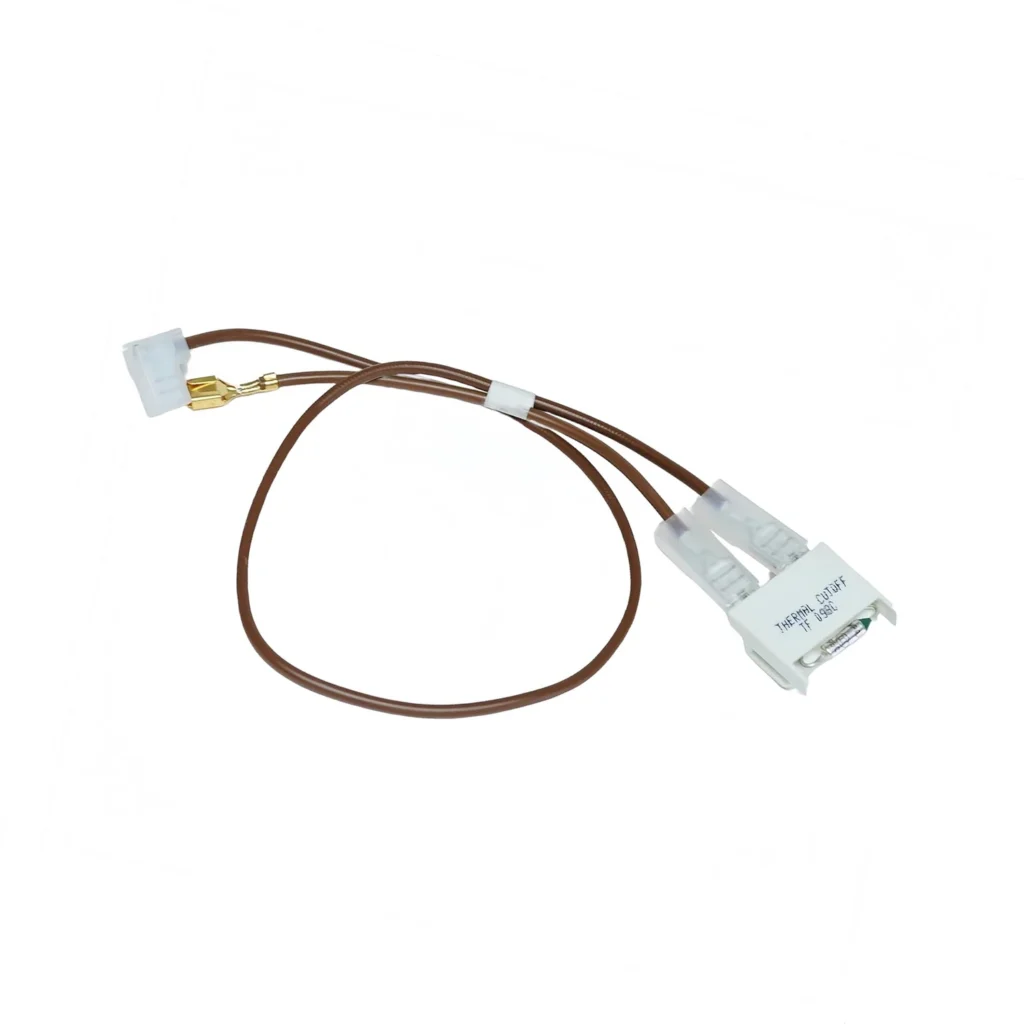
Your Whirlpool dishwasher was running fine last week. Now you press Start and... nothing. Or worse, it starts normally but shuts down halfway through the wash cycle, leaving you with half-cleaned dishes and soapy water. If your DU920QWDB4, DU940PWKB0, or similar Whirlpool, KitchenAid, Kenmore, or Maytag dishwasher suddenly refuses to complete a cycle, the thermal fuse is the first component you need to check.
Quick Symptom Check
Before you grab your toolbox, confirm what's actually happening:
- Completely dead: No lights, no sounds, no response to any button press
- Starts then stops: Begins washing but shuts off 5-15 minutes in
- Control panel lights but won't run: Buttons illuminate but cycle won't initiate
- Intermittent operation: Works sometimes, fails other times with no pattern
- Tripped breaker history: Circuit breaker has tripped once or twice recently
If you're seeing any combination of these, especially the "starts then stops" behavior, you're likely dealing with a failed thermal fuse or its harness connection.
Cause #1: Blown Thermal Fuse (70% of Cases)
Likelihood: Very High
The thermal fuse is a one-time safety device designed to cut power if your dishwasher's heating element or motor overheats. Once it blows, it's done — there's no reset button. On Whirlpool models like the DU920PFGQ3 and DU945PWPQ0, this fuse typically fails after 8-12 years of regular use, or immediately if there's been an overheating incident.
How to diagnose:
- Unplug the dishwasher or flip its dedicated breaker
- Remove the lower access panel (usually 4-6 screws along the bottom edge)
- Locate the thermal fuse — it's a small cylindrical component with two wires, typically mounted on or near the control board
- Set your multimeter to continuity mode (or lowest ohms setting)
- Touch probes to both terminals — you should get a reading of near-zero ohms
- If you get "OL" or infinite resistance, the fuse is blown
The fix: The thermal fuse can't be repaired. You'll need to replace it along with its harness connector. The 675813 assembly includes both components and the proper terminals, which matters because corroded connections often caused the original failure. Cost: around $35 in parts, 30-45 minutes if you're methodical.
Cause #2: Corroded or Loose Harness Connection (15% of Cases)
Likelihood: Moderate
Sometimes the fuse itself tests fine, but the connector has developed resistance from years of heat cycling and humidity exposure. This creates an intermittent connection that makes your dishwasher act possessed — working one day, dead the next.
How to diagnose:
- With power off, wiggle the harness connector while watching for loose movement
- Inspect the terminals for green corrosion, discoloration, or burn marks
- Check the wire insulation near the connector for brittleness or cracks
- If the connector feels loose or you see any corrosion, that's your problem
Here's the thing: even if the fuse tests good, a compromised harness will cause the same symptoms within weeks. That's why the 675813 kit includes both — replacing just one rarely solves the problem permanently.
Cause #3: Control Board Secondary Failure (10% of Cases)
Likelihood: Lower, but possible
If you've already replaced the thermal fuse and harness but still have no-start symptoms, the control board might have suffered damage when the original fuse blew. The sudden power interruption can fry sensitive circuits.
How to diagnose:
- With a known-good thermal fuse installed, power up the dishwasher
- Check for any error codes on the display
- Listen for relay clicks when you press Start
- If you get absolutely no response — no clicks, no display changes — the control board may need replacement
Control boards for these Whirlpool models run $150-$300, so you'll want to be certain the thermal fuse assembly isn't the issue first.
Cause #4: Actual Overheating Problem (3% of Cases)
Likelihood: Rare as primary cause
If you replace the thermal fuse and it blows again within a few cycles, you've got a genuine overheating situation. Common culprits:
- Failed heating element: Shorted element draws excessive current
- Stuck circulation pump: Motor overheats from mechanical resistance
- Clogged wash arm bearings: Creates back-pressure and heat buildup
Test the heating element with your multimeter — it should read 15-30 ohms between its terminals and infinite ohms to ground. Anything else means replacement time.
Cause #5: Water Leak Causing Short Circuit (2% of Cases)
Likelihood: Very rare but catastrophic
Water that's leaked onto electrical components can create a direct short that blows the thermal fuse instantly. Check under the dishwasher for:
- Puddles or water stains on the subfloor
- Wet insulation around the tub
- Moisture in the junction box area
If you find water damage, you'll need to fix the leak source before replacing any electrical parts, or you'll just blow the new fuse immediately.
Step-by-Step: Replacing the Thermal Fuse Assembly
What you'll need:
- 675813 thermal fuse and harness assembly
- 1/4" nut driver or socket set
- Flathead screwdriver
- Multimeter (for testing)
- 20-30 minutes
The process:
- Kill the power: Unplug the unit or flip the breaker — this isn't optional
- Access the components: Remove the lower front panel screws and set the panel aside
- Locate the thermal fuse: It's typically mounted on the right side of the control board area on models like the DU920QWDQ4
- Disconnect the old harness: Pull the connector straight off — don't yank the wires
- Remove mounting hardware: Usually one screw or a snap-fit bracket
- Install the new 675813 assembly: Mount the fuse securely, ensuring good metal-to-metal contact if it's grounded to the frame
- Connect the new harness: Push firmly until you hear/feel the click
- Test before reassembly: Restore power and run a short cycle to confirm operation
- Button it up: Reinstall the access panel
When to Call a Pro
This is a straightforward replacement for most DIYers, but call a tech if:
- You're not comfortable working with 120V household current
- The thermal fuse location isn't obvious after removing the panel
- You've replaced the fuse twice and it keeps blowing
- You discover water damage or active leaking
- The control board shows visible burn marks or damage
Professional diagnosis runs $100-150, full repair typically $175-275 including parts.
Prevention Tips
To avoid future thermal fuse failures:
- Clean the filter and spray arms monthly — debris causes the motor to work harder
- Don't overload the dishwasher — poor circulation creates heat buildup
- Run a cleaning cycle every 2-3 months to prevent scale accumulation
- Check for leaks regularly, especially around the door seal
- If the unit trips the breaker even once, investigate immediately
Frequently Asked Questions
Will my Whirlpool dishwasher work with any thermal fuse, or do I need the 675813 specifically?
The 675813 is engineered for your specific Whirlpool, KitchenAid, Kenmore, and Maytag models. Generic fuses might physically fit, but they often have incorrect temperature ratings or inferior connector quality. Since this is a critical safety component, use the OEM-equivalent 675813 that includes the proper harness — it's designed to handle the exact electrical load and temperature conditions in models like the DU943PWKB0 and DU948PWKQ1.
Can I just bypass the thermal fuse to get my dishwasher working again?
Absolutely not. The thermal fuse exists to prevent fires when something overheats. Bypassing it removes the only safeguard between a stuck motor or shorted element and your house burning down. It might get your dishes clean once, but it's genuinely dangerous. The 675813 replacement costs $36 — your homeowner's insurance deductible is probably 50 times that.
How do I know if the thermal fuse blew because of a bigger problem?
If the new fuse fails within 1-5 cycles, you've got an underlying issue. Test the heating element first — it should read 15-30 ohms and have no continuity to ground. Check that the circulation pump spins freely by hand. Inspect for any water intrusion in electrical areas. If everything checks out but the fuse keeps blowing, you likely have a control board issue causing voltage spikes, and that's when you call a pro with proper diagnostic equipment.
Diagnosed the problem?
675813 · In Stock · Fast shipping