
LG Washer Leaking From Bottom — 4 Causes & How to Fix
You're folding laundry when you notice it: a puddle spreading across your laundry room floor. Your LG washer (maybe a WM2010CW or WM2432HW) is leaking from the front lower panel, and it's getting worse with every wash cycle.
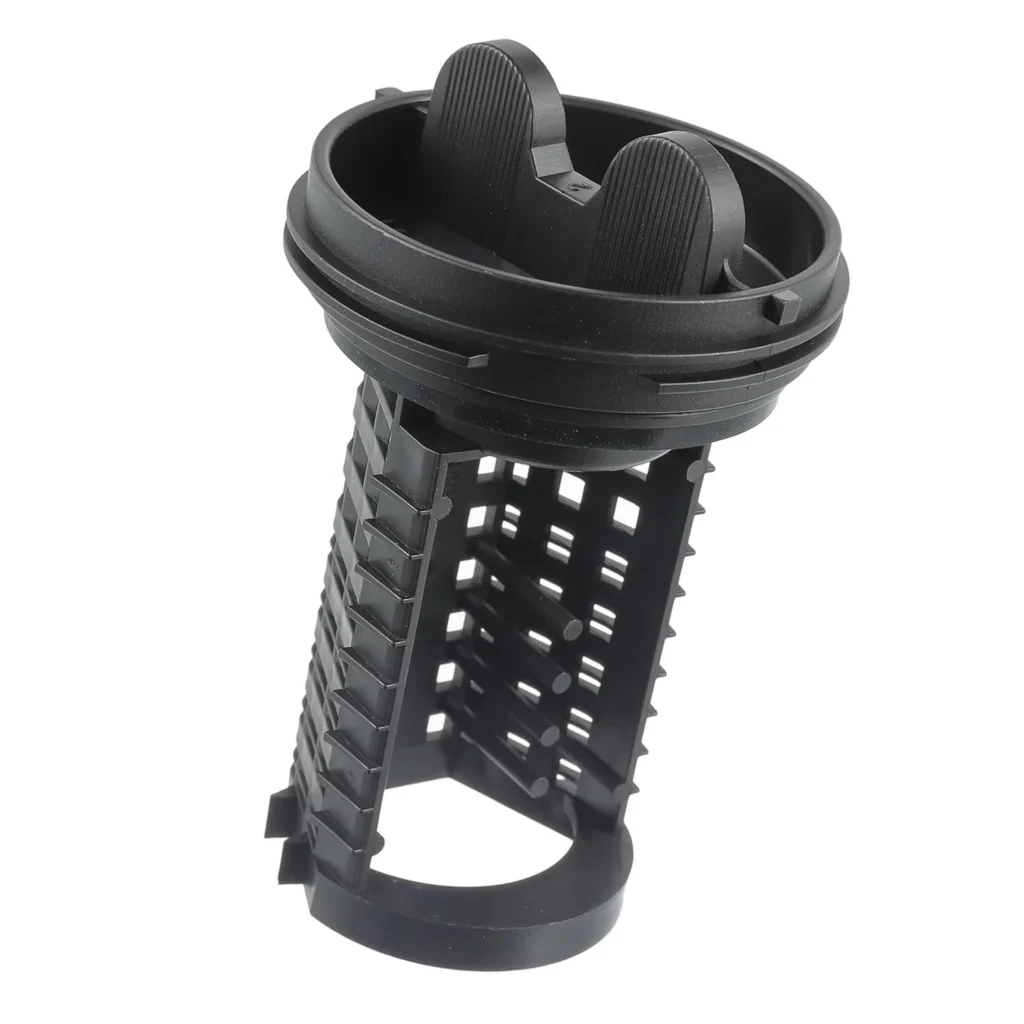
The good news? Most leaks from the bottom front of LG washers trace back to the drain pump filter assembly — part number 383EER2001A. This $9.99 component is actually a maintenance item that many owners don't know exists until it starts causing problems.
Quick Leak Location Check
- Is water coming from the small access door at the bottom front?
- Does the leak happen during the drain cycle specifically?
- Is there visible water around the filter cap area?
- Does the leak worsen with heavily soiled loads?
- Can you see water pooling inside the small access panel?
If you answered yes to any of these, keep reading. We'll walk through the four most common causes, starting with the most likely culprit.
Cause #1: Cracked or Damaged Filter Housing (Most Likely — 60% of Cases)
The drain pump filter assembly (383EER2001A) sits behind that small door at the bottom front of your washer. Over time, the plastic housing cracks from:
- Overtightening during previous cleaning
- Impact from dropped objects during loading
- Normal wear from thermal expansion cycles
- Cross-threading when reinstalling after cleaning
How to diagnose: Turn off your washer and unplug it. Pry open the small access door on the front using a flat-blade screwdriver. Unscrew the filter cap (counterclockwise) and have a bucket ready — water will pour out. Once drained, inspect the filter housing carefully with a flashlight. Look for hairline cracks, chips around the threads, or visible damage to the seal area.
The fix: Replace the entire filter assembly. The 383EER2001A includes the housing, cap, and seal as one unit. This takes about 15 minutes and costs under $10.
Parts needed: 383EER2001A drain pump filter ($9.99)
Cause #2: Worn or Missing O-Ring Seal (25% of Cases)
The filter cap has a rubber O-ring that creates a watertight seal. This seal deteriorates from detergent residue, hard water minerals, and repeated removal during cleaning.
How to diagnose: Remove the filter (following the steps above). Examine the O-ring on the cap threads. It should be black, flexible, and evenly rounded. If it's flattened, cracked, brittle, or has detergent buildup, it's compromised.
The fix: While you could try cleaning the O-ring, replacement is more reliable since the entire 383EER2001A assembly is inexpensive. The new filter comes with a fresh seal already installed.
Prevention tip: Clean your drain filter monthly, but don't overtighten when reinstalling. Hand-tight is enough — you should feel resistance, then stop.
Cause #3: Filter Not Properly Seated (10% of Cases)
Sometimes the leak isn't from damage — it's from improper installation after cleaning. If the filter isn't threaded correctly or isn't fully tightened, water escapes during the drain cycle.
How to diagnose: Open the access door and check if you can turn the filter cap further clockwise. If it turns easily or wobbles, it wasn't seated properly.
The fix: Remove the filter completely, inspect the threads inside the housing for debris or lint buildup. Clean both the housing threads and filter cap threads with a damp cloth. Reinstall by threading carefully — you should feel smooth threading with no resistance until the final quarter-turn when it snugs up.
Cause #4: Clogged Filter Causing Backpressure (5% of Cases)
A severely clogged filter can create enough backpressure during draining to force water past the seal. This typically happens when small items (coins, bobby pins, buttons) get trapped or when you've gone months without cleaning.
How to diagnose: When you remove the filter, is it packed with lint, hair, or small objects? Does water drain very slowly when you unscrew it?
The fix: If the filter housing itself isn't damaged, thoroughly clean the filter and reinstall. However, if you're already this far into the repair, replacing with a new 383EER2001A ensures you're starting fresh with clean threads and a perfect seal.
Step-by-Step: Replacing the Drain Pump Filter
This repair takes 10-15 minutes and requires minimal tools.
What you'll need:
- Flat-blade screwdriver
- Bucket or shallow pan
- Towels
- Replacement filter 383EER2001A
The process:
- Turn off the washer and unplug it from the wall
- Turn off the water supply valves (hot and cold)
- Pry open the small access door at the bottom front using the screwdriver
- Place your bucket under the filter area
- Locate the small drain hose next to the filter (it has a cap)
- Pull out the hose, remove its cap, and drain water into the bucket
- Unscrew the main filter cap counterclockwise — more water will pour out
- Remove the old filter assembly completely
- Wipe the housing area clean of any lint or debris
- Thread the new 383EER2001A filter in clockwise until hand-tight
- Replace the drain hose cap and tuck the hose back in
- Close the access door
- Run a rinse cycle and check for leaks
When to Call a Pro
Call a technician if:
- The leak persists after replacing the filter assembly
- Water is coming from behind the filter housing (could indicate a cracked pump body)
- You see water leaking from higher up on the door seal area (different issue — door boot seal)
- The drain pump makes grinding noises during the drain cycle
- You're uncomfortable working with the water drainage step
Most appliance repair services charge $150-250 for this repair including parts. Doing it yourself saves about $140.
Prevention: Keep Your Filter Clean
The 383EER2001A filter is designed to catch debris before it reaches the drain pump. Clean it monthly:
- Catch coins, buttons, and small items from pockets before washing
- Run a cleaning cycle with washer cleaner every 30 loads
- Check the filter monthly, even if no problems are apparent
- Don't overtighten — hand-tight prevents cross-threading
Regular maintenance extends the life of both the filter and the more expensive drain pump behind it.
Compatible LG and Kenmore Models
The 383EER2001A works with dozens of LG and Kenmore front-load washers, including: WM2010CW, WM2032HW, WM1814CW, WM1815CS, WM2016CW, WM2077CW, WM2233HS, WM2301HW, WM2432HW, WM2487HRM, WM2496HWM, WM2688HNM, WM2688HWM, WM2801HWA, WM3875HVCA, WM0532HW, WM0742HGA, and Kenmore 796 series models.
This part replaces AP4440367, 383EER2001F, 5230ER3002A, and PS3522306.
Frequently Asked Questions
How often should I clean my LG washer drain filter?
Clean it monthly if you wash heavily soiled items regularly, or every 2-3 months for typical household use. If you notice slow draining or see debris in the filter housing, increase frequency. Regular cleaning prevents clogs and extends the life of your drain pump.
Can I run my washer without the drain filter installed?
No. Running without the filter will cause immediate leaking and allows debris to enter the drain pump, which can cause expensive pump failure. The filter is essential for proper operation — if yours is damaged, replace it before using the washer again.
Why does water pour out when I open the filter?
This is normal. Water remains in the system after the drain cycle completes — typically 1-2 cups. Always have a bucket and towels ready when opening the filter. Use the small drain hose next to the filter to pre-drain as much as possible before unscrewing the main filter cap.
Diagnosed the problem?
383EER2001A · In Stock · Fast shipping