
Frigidaire Dryer Not Heating — 5 Causes & How to Fix Element 137114000
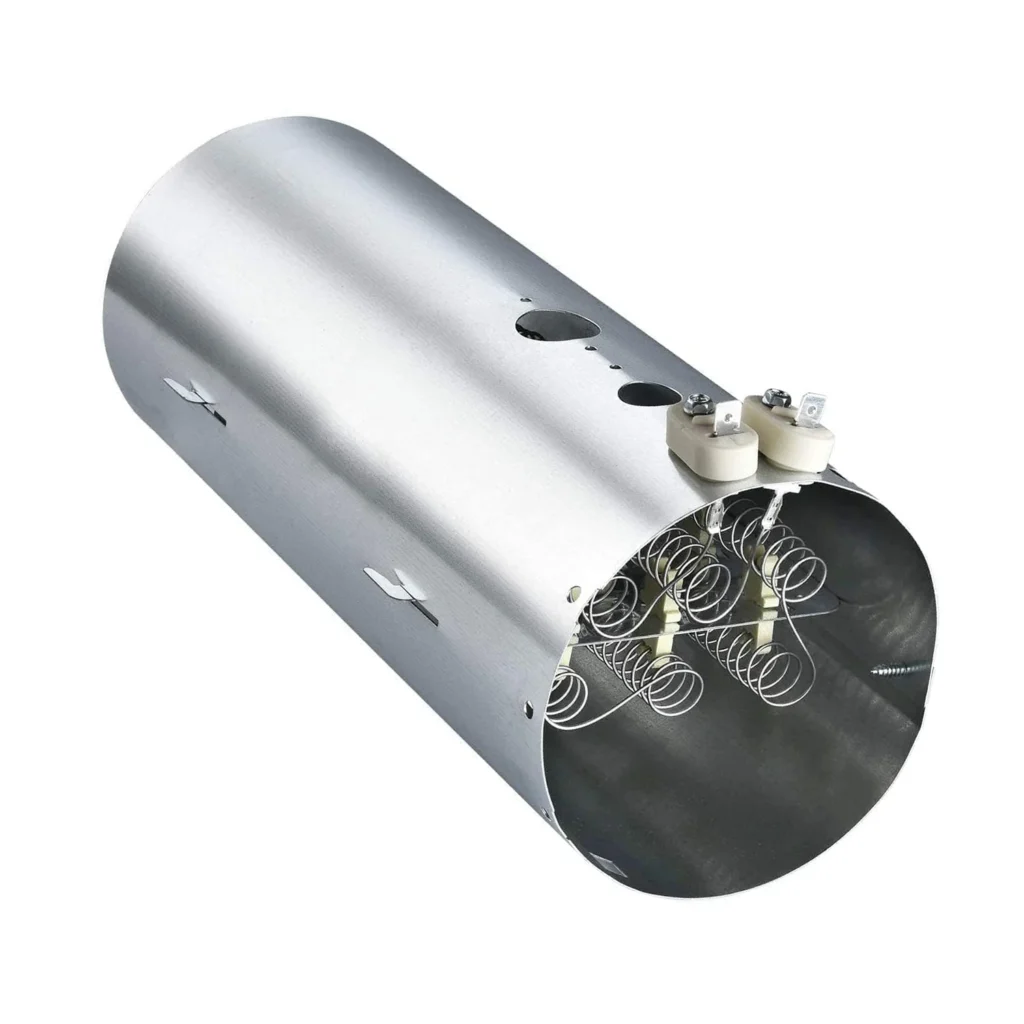
Your Frigidaire dryer runs through a full cycle, but when you open the door, everything's still damp. The drum turns, the motor hums, but there's no heat whatsoever. You've just wasted an hour and still have wet laundry. This is the most common dryer complaint we see, and while it's frustrating, it's usually fixable without calling a repair tech.
The heating element assembly (part 137114000) fails more often than any other component in Frigidaire, Electrolux, Crosley, and Kenmore dryers. It's essentially a coiled wire that gets extremely hot — over time, thermal expansion and contraction cause the wire to break. When it does, you get zero heat.
Quick Symptom Check — Is Your Heating Element the Problem?
Before you order parts, verify these symptoms match your situation:
- Dryer runs normally — drum spins, timer advances, no error codes
- Absolutely no heat — clothes are completely cold at the end of the cycle
- No burning smell — if you smell burning, stop and check for lint buildup first
- All settings affected — low, medium, and high heat all produce the same cold result
- Vent is clear — airflow from the outside vent is normal
If all five apply, keep reading. If your dryer heats intermittently or only on certain settings, you're likely dealing with a cycling thermostat or thermal fuse instead.
Cause #1: Broken Heating Element (Probability: 65%)
The heating element itself burns out. It's a consumable part — not a question of if, but when. On models like the FAQE7011KR0, BAQE7073KW0, and CAQE7073KW0, we see element failure typically around the 8-12 year mark, though heavy use can shorten that.
How to diagnose: Unplug the dryer. Remove the lower front panel (two screws at the bottom, lift up and out). The heating element canister is a rectangular metal box on the right side. Disconnect the two wire terminals and use a multimeter set to ohms. Touch one probe to each terminal on the element. You should see 8-12 ohms of resistance. Infinite resistance (OL on the meter) means the coil is broken.
Visual inspection works too — if you remove the element from its canister (two screws), you can often see the break in the coil. It looks like a gap in the tightly wound wire.
The fix: Replace the entire heating element assembly (137114000). It takes about 30 minutes and requires only a screwdriver and nut driver. The part includes the coil and housing — you don't reuse anything from the old one.
Cause #2: Blown Thermal Fuse (Probability: 20%)
The thermal fuse is a one-time safety device mounted on the heating element canister. It blows if the dryer overheats — usually because the vent is clogged with lint. Once blown, it cuts power to the heating circuit permanently until replaced.
How to diagnose: The thermal fuse is a small white or beige component with two wire terminals, attached to the heating element housing. Disconnect the wires and test continuity with your multimeter. It should read near 0 ohms (complete continuity). No continuity means it's blown.
Here's the critical part: if your thermal fuse blew, there's a reason. Check your vent system for restrictions before running the dryer again. A clogged vent will blow the new fuse immediately.
The fix: Replace the thermal fuse (it's usually sold separately from the heating element). More importantly, clean your entire vent run — from the dryer to the outside termination. Pull the dryer out, disconnect the vent, and vacuum both the dryer connection and the wall duct.
Cause #3: Faulty High-Limit Thermostat (Probability: 10%)
The high-limit thermostat is another safety device on the heating element canister. Unlike the thermal fuse (which blows once), the high-limit is resettable — it opens the circuit when temperature exceeds safe limits, then closes again when things cool down. When it fails stuck open, you get no heat.
How to diagnose: It looks similar to the thermal fuse but is usually mounted separately on the canister. Test for continuity at room temperature — it should show continuity. No continuity when the dryer is completely cool indicates failure.
The fix: Replace the high-limit thermostat. These rarely fail compared to the element itself, but when they do, symptoms are identical to a blown thermal fuse. Cost is typically $15-25.
Cause #4: Defective Cycling Thermostat (Probability: 3%)
The cycling thermostat regulates temperature by turning the element on and off during the cycle. When it fails, it's usually stuck open (no heat) or stuck closed (overheating). This is rare on Frigidaire dryers compared to the element itself.
How to diagnose: The cycling thermostat is typically located on the blower housing, not on the heating element canister. Test for continuity — it should cycle open and closed as temperature changes. A consistently open circuit regardless of temperature indicates failure.
The fix: Replace the cycling thermostat. This requires accessing the blower housing, which means removing more panels than just the front. Budget an hour for this repair if you're doing it yourself.
Cause #5: Failed Timer or Control Board (Probability: 2%)
The timer or electronic control board sends voltage to the heating element circuit. If this fails, the element gets no power even though it's intact. This is the least likely cause — diagnose everything else first.
How to diagnose: If you've tested the element, thermal fuse, and thermostats and all show proper continuity, check for voltage at the element terminals while the dryer is running on a heat cycle (be extremely careful — this is live voltage testing). No voltage means the control isn't sending power.
The fix: Replace the timer (mechanical models) or electronic control board. This is expensive ($150-300 for the part) and complex. At this point, consider calling a professional or evaluating whether repair makes economic sense.
The 30-Minute Fix: Replacing Element 137114000
If you've diagnosed a bad heating element, here's how to replace it:
- Unplug the dryer — don't skip this. You're working near electrical components.
- Remove the front panel — two screws at the bottom, then lift up and pull forward.
- Locate the element canister — rectangular metal box on the lower right.
- Disconnect all wires — take a photo first for reference. Note which wires connect to the element, thermal fuse, and thermostats.
- Remove the canister — typically held by 2-3 screws. Slide it out carefully.
- Install the new element assembly — the 137114000 includes the canister and element pre-assembled. Secure it with the original screws.
- Reconnect all wires — refer to your photo. Connections must be tight.
- Reassemble the front panel — reverse the disassembly process.
- Test the dryer — run a short timed dry cycle with a few damp towels.
The 137114000 element assembly is compatible with dozens of Frigidaire, Electrolux, Kenmore, and Crosley models including FAQE7017KW0, CAQE7077KW0, and CDE7500KW0. It replaces original part numbers AP4456656, PS2367792, 1531129, and AH2367792.
When to Call a Pro
DIY this repair if you're comfortable with basic tools and can follow the steps above. It's straightforward and parts cost $40-80. Call a professional if:
- You've replaced the element and all thermostats but still have no heat
- You smell burning or see scorch marks inside the dryer cabinet
- You're not comfortable working around electrical components
- Your dryer uses 240V and you've never tested high voltage before
A service call costs $150-250 including diagnosis. Parts and labor for element replacement total $200-300 typically. If your dryer is over 15 years old, factor replacement cost into your decision.
Frequently Asked Questions
How long should a Frigidaire heating element last?
Average lifespan is 10-15 years with normal use (6-8 loads per week). Heavy use or frequent overloading shortens this to 7-10 years. Power surges and voltage fluctuations can also cause premature failure. The element operates at extremely high temperatures, so thermal stress eventually breaks the coil.
Can I test the heating element without removing it?
Yes, but you need access to the terminals. You'll still need to remove the lower front panel to reach the element canister. Disconnect the wires and test resistance across the element terminals — 8-12 ohms is normal. Infinite resistance means the element is broken. You can't reliably test it while wires are connected because you might get false readings through other circuit components.
Why did my heating element fail so quickly after the last replacement?
Three common reasons: First, restricted airflow from a clogged vent causes the element to overheat and fail prematurely. Clean your entire vent system. Second, you're overloading the dryer, which increases run time and thermal stress. Third, you received a defective replacement part (rare but possible). Always verify your vent is clear before blaming the new element.
Diagnosed the problem?
137114000 · In Stock · Fast shipping