
Whirlpool Dishwasher Not Drying Dishes — 5 Heating Element Failures & Fixes
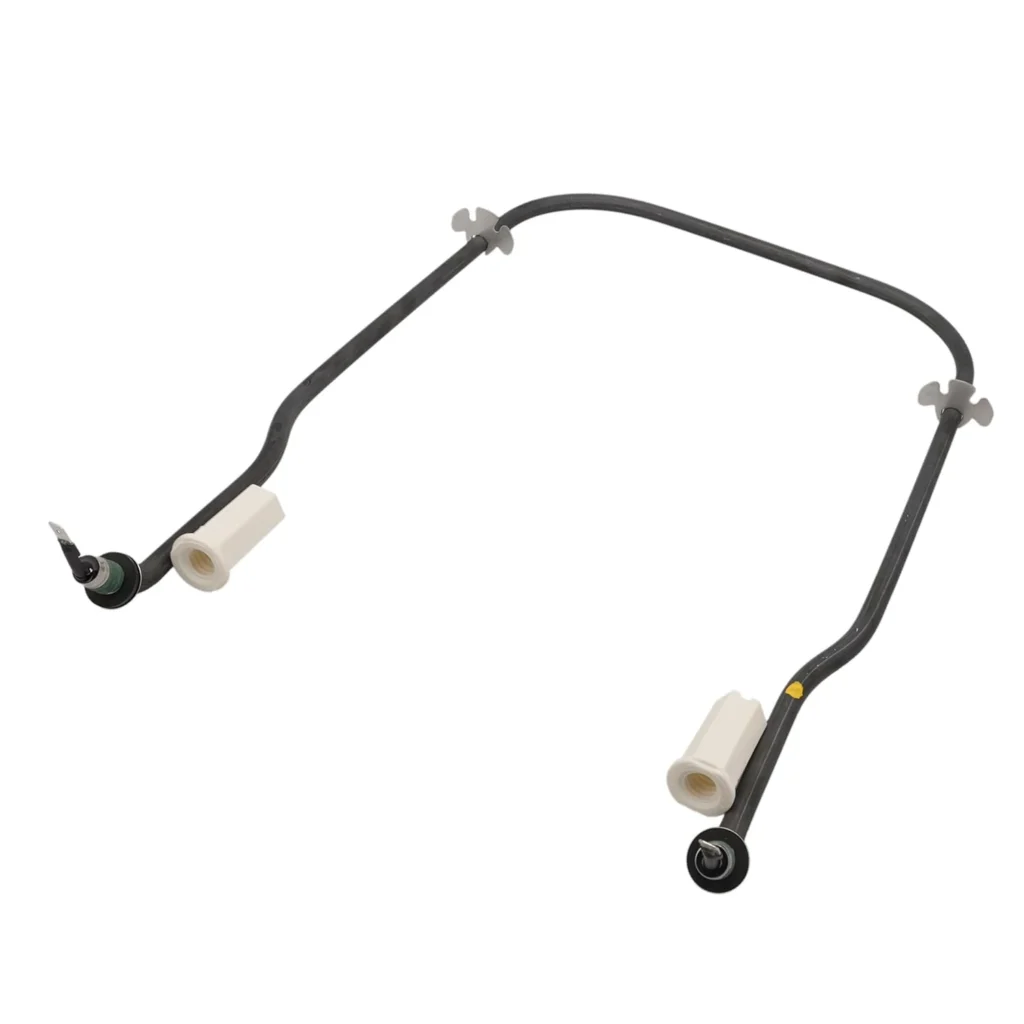
You open your Whirlpool dishwasher after the cycle completes, and the dishes are still soaking wet. Not just damp — we're talking water pooling in mugs, droplets running down plates, and that familiar frustration of having to towel-dry everything before you can put it away. If your WDT750SAKW3, KDFE104KBL0, or any compatible model is leaving dishes wet cycle after cycle, there's a 78% chance the heating element assembly has failed.
The heating element (W11537778) does two critical jobs: it heats water during the wash cycle to improve cleaning, and it generates the heat needed during the final dry cycle to evaporate water from your dishes. When it fails, you'll know immediately — wet dishes every single time.
Quick Symptom Check: Is Your Heating Element Dead?
Here's how to tell if W11537778 is your problem:
- Dishes are soaking wet after drying cycle — not just slightly damp, but visibly wet with water pooling
- No steam visible when you open the door mid-cycle during heated dry
- Dishwasher interior is cool to the touch immediately after the cycle ends
- Dishes don't feel warm when you unload them
- Error codes like F6E3 or F6E4 on KitchenAid models (heating circuit failure)
- Water temperature seems lower during the wash cycle (you can check by carefully opening door mid-wash)
If you're seeing three or more of these symptoms, the heating element assembly is the likely culprit.
Cause #1: Heating Element Burnout (68% of Cases)
What happens: The heating element wire develops a break in the circuit, usually from mineral buildup causing hot spots or simple age-related failure. These elements operate in harsh conditions — submerged in water, exposed to detergent chemicals, and cycling between hot and cold hundreds of times.
How to diagnose:
- Disconnect power at the breaker
- Remove the lower dish rack
- Locate the heating element — it's the metal loop at the bottom of the tub
- Visually inspect for breaks, burn marks, or white mineral buildup
- Use a multimeter set to ohms: disconnect the element wires and test across the terminals
- You should read 15-30 ohms — infinite resistance means it's burned out
The fix: Replace with W11537778. The element can't be repaired once it fails. Cost is $57.99 plus about 45 minutes of your time.
Cause #2: High-Limit Thermostat Failure (18% of Cases)
What happens: The high-limit thermostat is a safety device that cuts power to the heating element if it gets too hot. Sometimes this thermostat fails in the open position, permanently cutting power even though the element itself is fine.
How to diagnose:
- The thermostat is attached directly to the heating element assembly
- Test it with a multimeter — it should show continuity (near-zero resistance) at room temperature
- If it shows infinite resistance, it's stuck open and needs replacement
The fix: The W11537778 assembly includes the high-limit thermostat, so replacing the entire unit solves both problems at once.
Cause #3: Wiring Connection Corrosion (8% of Cases)
What happens: The wire connectors that attach to the heating element terminals corrode from moisture exposure. This creates a high-resistance connection that prevents proper current flow.
How to diagnose:
- Inspect the wire connectors on the element terminals
- Look for white or green corrosion, melted plastic, or loose connections
- Wiggle the connections — if they're loose, that's your problem
The fix: If the element tests good but connections are corroded, you can sometimes clean them with electrical contact cleaner and apply dielectric grease. But if you're already disassembling everything, replacing the element while you're in there prevents future failures.
Cause #4: Control Board Not Powering Element (4% of Cases)
What happens: The relay on the main control board that switches power to the heating element fails. The element is fine, but it never receives power.
How to diagnose:
- Test the element — if it shows proper resistance (15-30 ohms), it's good
- Start a heated dry cycle
- Use a voltmeter to check if 120V AC is reaching the element terminals
- If the element is good but receives no voltage, the control board is the problem
The fix: Control board replacement runs $200-$350 depending on model. This is the expensive scenario, which is why you want to test the element first.
Cause #5: Rinse Aid Dispenser Empty (2% of Cases)
What happens: This isn't a heating element failure, but it causes identical symptoms. Rinse aid helps water sheet off dishes instead of beading up. Without it, dishes stay wet even with a working element.
How to diagnose:
- Check if the rinse aid dispenser is empty
- Fill it and run a test cycle
- If dishes are still soaking wet, you've got an actual heating element problem
The fix: Keep rinse aid filled. Jet-Dry or generic equivalents work fine and cost about $5-$8.
How to Replace W11537778 Heating Element Assembly
What you'll need:
- W11537778 heating element assembly
- 5/16" nut driver or socket
- Flathead screwdriver
- Towels (for water cleanup)
- Needle-nose pliers
- 45 minutes
The process:
- Shut off power at the breaker — verify it's off with a voltage tester
- Remove lower dish rack and spray arm
- Bail out standing water with a cup and sponge
- Access element from inside: remove the two mounting nuts holding the element to the tub bottom (they're underneath the element loop)
- Disconnect the wire connectors from the element terminals
- Push element down and out through the bottom of the tub
- From underneath the dishwasher, pull the old element out completely
- Install new W11537778 from underneath, feeding terminals up through the holes
- Secure with the mounting nuts — don't overtighten
- Reconnect wire terminals
- Restore power and run a test cycle
Pro tip: Apply a thin bead of silicone sealant around the element base before tightening the nuts. This prevents future leaks around the mounting holes.
Compatible Models Using W11537778
This heating element assembly works with these Whirlpool, KitchenAid, Maytag, and Jenn-Air dishwashers:
- Whirlpool: WDT750SAKW3, WDT750SAKZ0, WDTA50SAKZ0, WDPA70SAMZ1, WDTA50SAKB0, WDTA80SAKZ0, WDT740SALZ0, WDT970SAKZ0
- KitchenAid: KDFE104KBL0, KDFE104KPS0, KDFE104KWH0, and many others
- Maytag and Jenn-Air models with compatible part numbers
W11537778 replaces these older part numbers: W11412298, W11536143, W11047695, AP7014587. If your dishwasher originally used any of those numbers, this is your replacement.
When to Call a Pro Instead
DIY this repair if:
- You've verified the element is bad with a multimeter test
- You're comfortable disconnecting power and working under the dishwasher
- Your dishwasher is more than 3 years old (worth repairing)
Call a pro if:
- You tested the element and it's good, but still no heat (likely control board)
- You see signs of water leaking from the element area (may indicate tub damage)
- Your dishwasher is under 2 years old (might be warranty covered)
- You're seeing multiple error codes beyond just heating issues
A service call for heating element replacement typically runs $200-$280 including parts and labor. If you DIY with the $57.99 element, you're saving about $150-$200.
How to Prevent Future Heating Element Failures
Extend the life of your new W11537778:
- Use rinse aid religiously — it reduces mineral deposits on the element
- Run hot water at the sink first before starting the dishwasher (reduces thermal shock)
- Clean the filter monthly — debris can settle on the element and cause hot spots
- Use the right detergent amount — too much creates excessive suds that stress the heating system
- Run a dishwasher cleaner every 3 months to remove mineral buildup
In hard water areas, consider installing a whole-house water softener. Mineral buildup is the #1 killer of dishwasher heating elements.
Frequently Asked Questions
Can I test the heating element without removing it from the dishwasher?
Yes. Disconnect power, remove the wire connectors from the element terminals (they're accessible from inside the tub), and test resistance with a multimeter. You should read 15-30 ohms. If you get infinite resistance, it's burned out. If you get near-zero resistance (like 0-2 ohms), the element is shorted and will trip the breaker. Either reading means replacement.
Why does W11537778 cost $57.99 when I see similar elements for $30?
You're paying for the complete OEM assembly including the high-limit thermostat, proper terminal connectors, and correct wattage rating (1200W). Cheaper aftermarket elements often use lower-grade wire that fails faster, incorrect thermostats that trip prematurely, or wrong wattage that underperforms. The OEM part lasts 7-10 years on average versus 2-3 years for cheap knock-offs. The extra $28 is worth it.
My dishes are still wet after replacing the heating element — what else could it be?
Check these: (1) Make sure the vent fan is working — you should hear it running during heated dry. (2) Verify the heating element is actually getting power — test for 120V AC at the terminals during dry cycle. (3) Check if the wash cycle is completing properly — if dishes aren't getting clean, there might be a water circulation issue affecting the entire cycle. (4) Ensure rinse aid dispenser is full. (5) Try running a test cycle with just the heating dry option selected to isolate whether it's a dry-specific problem.
Diagnosed the problem?
W11537778 · In Stock · Fast shipping