
Samsung Dryer Lint Filter Not Fitting or Damaged — 5 Causes & How to Fix
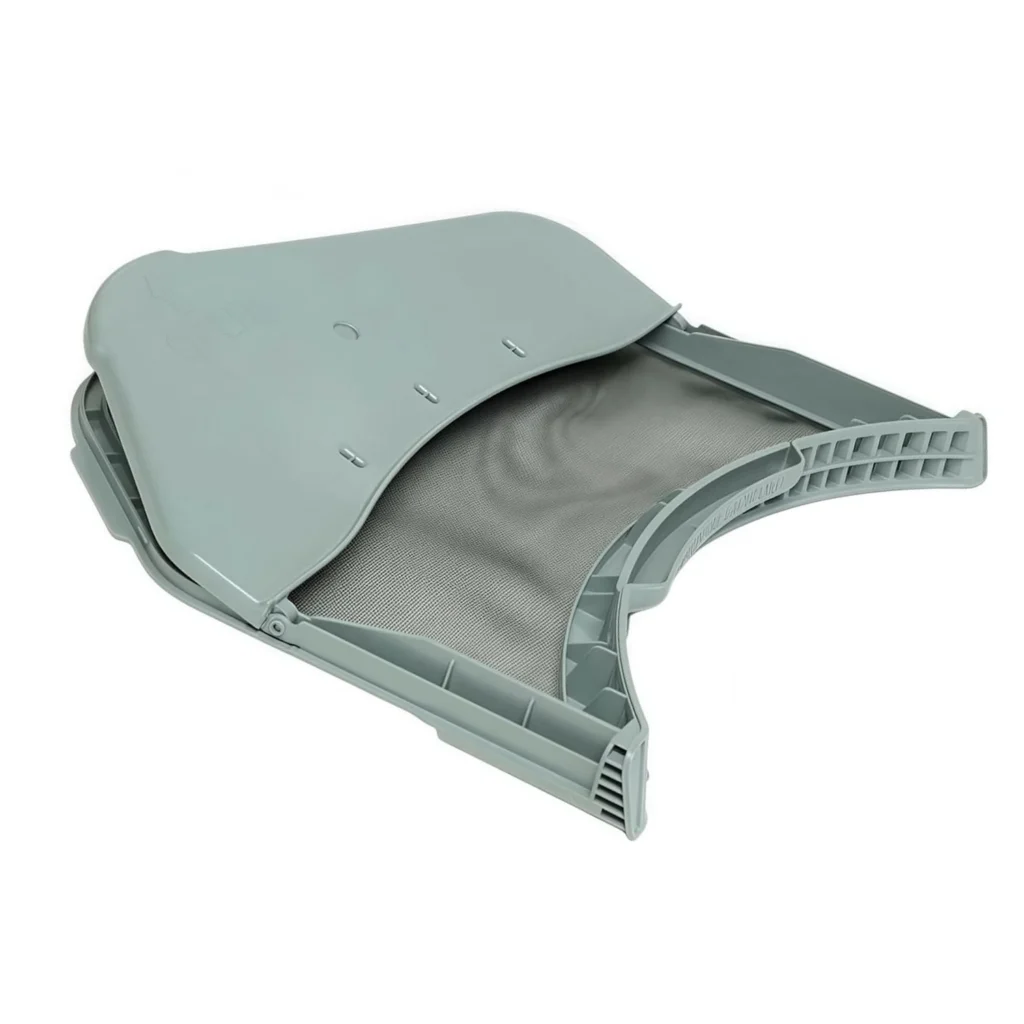
You pull out your Samsung dryer's lint screen and chunks of the plastic frame come with it. Or maybe you've noticed the filter doesn't snap in like it used to, leaving gaps where lint escapes into the duct system. On models like the DV210AEW/XAA or DV330AEW/XAA, a failing lint filter assembly (DC97-16013A) creates problems that go way beyond poor drying — we're talking potential fire hazards and motor damage from lint buildup.
The lint filter assembly isn't just a screen. It's a complete housing unit that creates an airtight seal in your dryer's air pathway. When it fails, you'll see lint accumulating in places it shouldn't be, longer drying times, and sometimes a burning smell from lint hitting hot components.
Quick Symptom Check
- Filter frame is cracked or broken — plastic pieces separate when you remove it
- Won't stay seated properly — filter pops out during cycle or feels loose
- Visible gaps around edges — you can see light or feel air escaping around the housing
- Lint bypassing into drum — finding excessive lint on clothes after drying
- Longer drying times — clothes take 2-3 cycles to dry completely
- Lint accumulation in cabinet — opening the panel reveals lint coating internal components
Cause #1: Cracked or Broken Filter Housing Frame
Probability: 65% — This is the most common failure mode for DC97-16013A assemblies on Samsung dryers.
The plastic housing develops stress cracks over time, typically at the corners or along the edges where you grip it. What starts as a hairline crack becomes a full break, letting lint bypass the filter entirely. If you've been rough pulling the filter out, or if someone's pushed it back in at an angle repeatedly, you've accelerated this wear.
How to diagnose: Remove the filter completely and inspect the frame under good light. Flex it gently — if you see any movement at seams or hear cracking sounds, the housing is compromised. Check all four corners and the handle attachment points. Even small cracks mean it's not creating a proper seal.
The fix: You need the complete DC97-16013A assembly ($77.99). This isn't something you can glue or tape — the airflow pressure will just blow it apart again. Pull the old assembly straight out, noting how it seats. The new unit slides into the same slot and should click firmly into place with no wiggle.
Cause #2: Warped Filter Housing from Heat Exposure
Probability: 20%
Extended exposure to high heat cycles can warp the plastic housing, especially on the DV330 and DV331 series that run hotter. You'll notice the filter doesn't sit flush anymore — there's a visible gap along one side or the bottom edge. This happens gradually, so you might not realize it's warped until you compare it to a new one.
How to diagnose: Place the filter assembly on a flat surface. It should sit completely flat with no rocking. Hold it up to eye level and sight down the edges — they should be perfectly straight, not bowed. Try installing it in the dryer — if you have to force it or if it won't seat completely on one side, it's warped.
The fix: Heat-warped plastic can't be reversed. Order the DC97-16013A replacement. Going forward, avoid running consecutive high-heat cycles back-to-back, which reduces this type of damage. Let the dryer cool for 10 minutes between loads if you're doing heavy drying sessions.
Cause #3: Missing or Damaged Filter Screen Mesh
Probability: 10%
The mesh screen itself can develop holes or tears, especially along the edges where it's attached to the frame. If you've been scraping the lint off with sharp objects instead of using your fingers, you've probably damaged the mesh. Small holes quickly become large ones under airflow pressure.
How to diagnose: Hold the filter up to a light source. You should see consistent tiny perforations across the entire surface with no large holes or tears. Run your finger gently across both sides — if you feel snags or rough spots, the mesh is damaged. Check the edges where mesh meets frame for separation.
The fix: The mesh is integrated into the DC97-16013A assembly and can't be replaced separately. You need the full unit. When you install the new one, commit to cleaning it properly — use just your fingers to remove lint, never brushes, knives, or other tools that can puncture the mesh.
Cause #4: Improper Installation After Previous Replacement
Probability: 3%
If you or a previous owner replaced this filter before, it might not be seated correctly. The DC97-16013A has specific alignment tabs that must engage with slots in the dryer housing. Get it wrong and you'll have gaps that let lint escape.
How to diagnose: Pull the filter out and look at the cavity. You should see alignment guides or slots inside the opening. Compare them to the tabs on your filter housing. Push the filter back in slowly — you should feel it click or snap into position at the very end. If it stops short or goes in too far, alignment is off.
The fix: Remove the filter completely. Clean out any lint from the cavity with a vacuum attachment. Look for the orientation — Samsung filters typically have a specific top/bottom or front/back orientation. Line up the tabs, insert straight in (not at an angle), and push firmly until you hear or feel it seat. Test by trying to pull it out gently — it should resist slightly before releasing.
Cause #5: Lint Buildup Preventing Proper Seating
Probability: 2%
Massive lint accumulation in the filter cavity can prevent the assembly from seating properly. This happens on dryers that haven't had the cavity cleaned in years — just cleaning the filter screen isn't enough.
How to diagnose: Remove the filter and shine a flashlight into the cavity. If you see thick lint coating the walls or buildup on the bottom that's more than just a light dusting, that's your problem. The filter can't push past this accumulation to reach its proper seating position.
The fix: Vacuum the entire cavity thoroughly using a crevice tool. You might need to use a long flexible brush to loosen packed lint from corners. Once it's completely clean, test-fit your current filter — if it now seats properly and the housing isn't damaged, you might not need the DC97-16013A replacement yet. But if the filter is already cracked or warped, replace it while you're in there.
When to Call a Pro
This is honestly a straightforward DIY repair. The DC97-16013A assembly is designed for homeowner replacement — no tools required, just pull the old one out and push the new one in. However, call a tech if:
- You've replaced the filter but still have excessive lint in the dryer cabinet (suggests ductwork problems or a failed blower housing seal)
- The filter cavity itself is damaged or cracked (requires dryer disassembly to replace the housing unit)
- You're getting error codes after filter replacement (might indicate airflow sensors that need recalibration)
Otherwise, this is a $77.99 part and 30 seconds of your time. Don't pay a service call for this one.
Frequently Asked Questions
Will a generic lint filter work instead of the DC97-16013A?
No, and here's why that matters more than you'd think. Generic filters might fit the opening, but they won't create the airtight seal that Samsung designed into the DC97-16013A. You'll get lint bypass that clogs your blower wheel and ductwork. The OEM part has specific dimensions and sealing surfaces that generics don't replicate. Spend the extra $20-30 for the real assembly — it'll save you a $300 blower motor replacement later.
How often should I replace the lint filter assembly on my Samsung dryer?
You're looking at 5-7 years under normal use, though that varies wildly based on how many loads you run. If you're doing 10+ loads a week, expect the shorter end of that range. The housing plastic fatigues from repeated removal and heat exposure. Replace it immediately if you see any cracks, warping, or if it won't stay seated properly. Don't wait until it breaks apart completely — that's when lint gets into places it really shouldn't be.
Can I just clean my existing filter instead of replacing it?
If the housing is intact with no cracks or warping, absolutely — clean it after every load. But here's what people miss: cleaning doesn't fix structural damage. If your DC97-16013A has stress cracks, warped edges, or damaged mesh, no amount of cleaning will restore the seal. The question isn't whether to clean vs. replace, it's whether your current assembly is still structurally sound. Inspect it honestly. Cracked plastic won't magically heal, and a compromised lint filter creates genuine fire risks.
Diagnosed the problem?
DC97-16013A · In Stock · Fast shipping